
Last Updated:
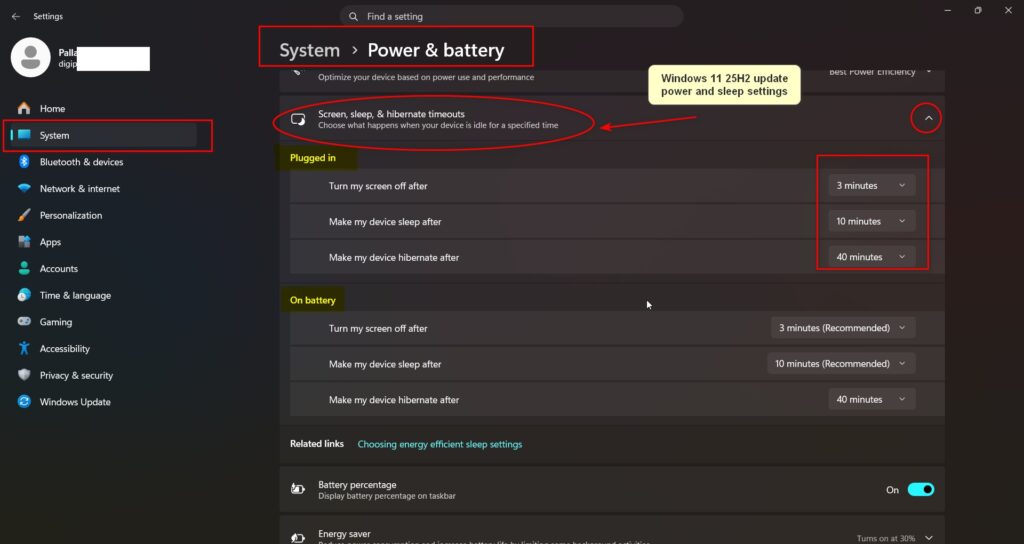
To adjust power and sleep settings in Windows 11, follow these steps: Press Windows + I, go to System → Power & battery → Screen and sleep (called “Screen, sleep, & hibernate timeouts” on 25H2). Set separate timers for screen-off and sleep—on battery and plugged in. Defaults are 3 minutes on battery and 5 plugged in. Changes save instantly.
Is your laptop battery draining faster than it should? Does your screen keep going dark in the middle of a meeting, or does your PC drift off to sleep during a long download?
These everyday frustrations almost always trace back to one place most Windows 11 users never open: the power and sleep settings.
By default, Windows 11 is tuned for energy efficiency, not your convenience. Out of the box, it turns the screen off after just 3 minutes on battery and 5 minutes when plugged in.
The good news is that all of it is adjustable, and learning how to adjust power and sleep settings in Windows 11 puts you firmly back in control.
Windows 11 provides fine-grained control over power management, including the screen and sleep timers, power mode, battery settings, and the advanced power settings hidden in the classic Control Panel.
These options decide when your screen turns off, when sleep mode kicks in, how aggressively the system saves energy, and even what happens when you close the lid or press the power button.
This guide walks home users and office users through every method in plain language—the fast Settings app path, Energy Saver and Energy Recommendations, the Control Panel’s Advanced Power Settings, and the command line for scripting across office machines.
I’ve also included the latest changes from Windows 11 24H2 and 25H2, including the switch from Battery Saver to Energy Saver, which many older guides still get wrong.
What Are Power and Sleep Settings in Windows 11?
Windows 11 power and sleep settings control several distinct behaviors:
| Setting | What It Does |
|---|---|
| Screen timeout | Turns off the display after a set idle period (PC stays awake) |
| Sleep | Puts PC into low-power state, keeping session in memory |
| Hibernate | Saves session to disk and fully powers down (slower resume) |
| Power Mode | Controls performance vs battery balance system-wide |
| Energy Saver | Reduces background activity and brightness at low battery |
| Energy Recommendations | Personalized suggestions from Microsoft for your hardware |
Related Reading – What is the difference between sleep, hibernate, and shut down
Screen Timeout vs. Sleep vs. Hibernate — What’s the Difference?
These three are often confused:
- Screen timeout — the monitor goes dark, but the CPU and RAM stay active. Your work is immediately available when you move the mouse.
- Sleep — the system enters a low-power state. RAM stays powered so your session is preserved. Wakes in 1–3 seconds.
- Hibernate — RAM contents are saved to the hard drive, and the PC shuts down. Uses no power. Resumes in 10–30 seconds depending on your drive speed.
In my experience, sleep is the best choice for most users — it’s faster to resume than hibernate and uses far less power than leaving the screen on.
Method 1: Change Power and Sleep Settings via the Settings App (Fastest)
This is the quickest way to change power and sleep settings in Windows for everyday use.
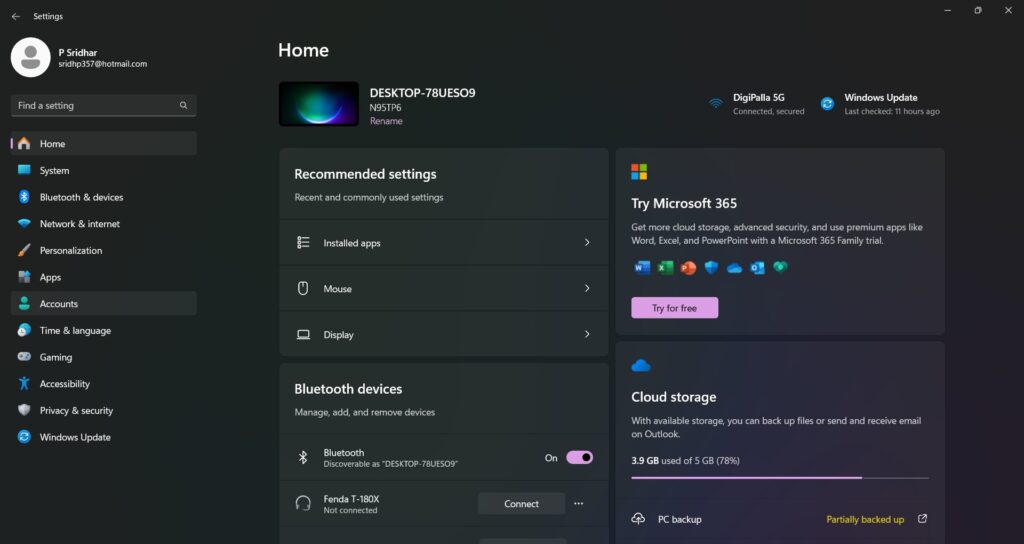
- Press
Win + Ito open Settings. - Click System in the left sidebar.
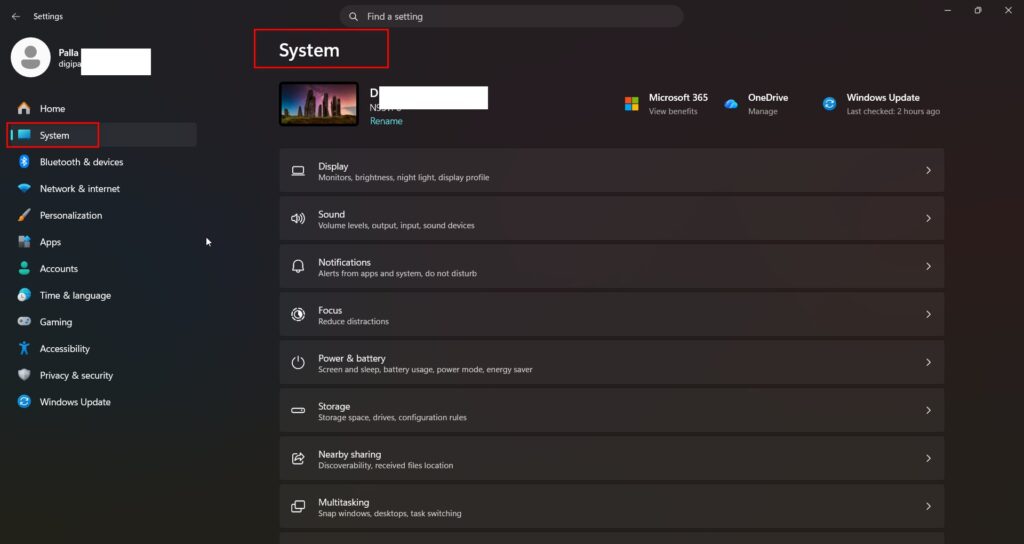
- Click Power & battery.
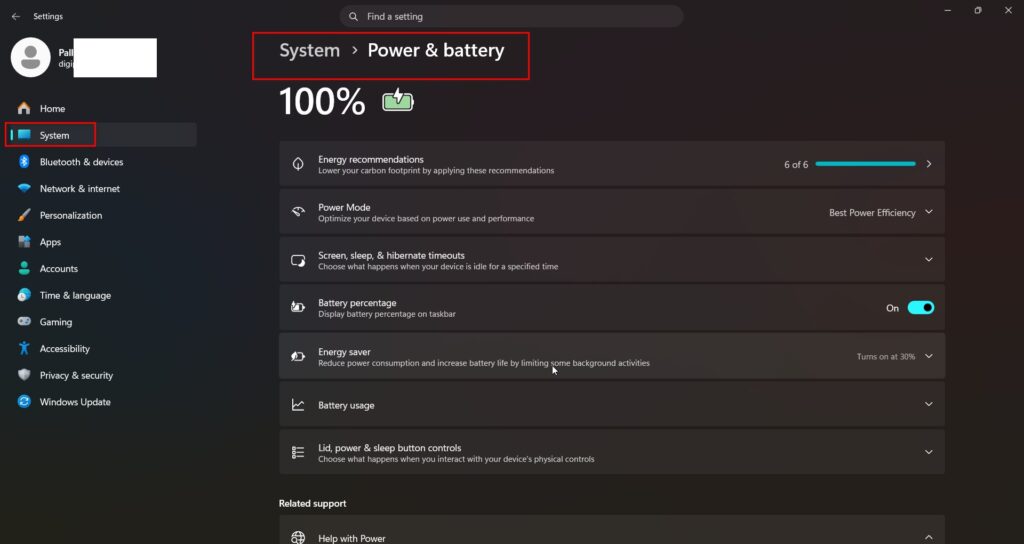
- Expand Screen, sleep, & hibernate timeouts (called Screen and sleep on 24H2 and earlier). You’ll see up to four dropdowns:
- On battery power, turn off my screen after (laptops)
- When plugged in, turn off my screen after
- On battery power, put my device to sleep after (laptops)
- When plugged in, put my device to sleep after
- Click each dropdown and select your preferred duration (options range from 1 minute to 5 hours).
- Changes save instantly—no Apply button needed.
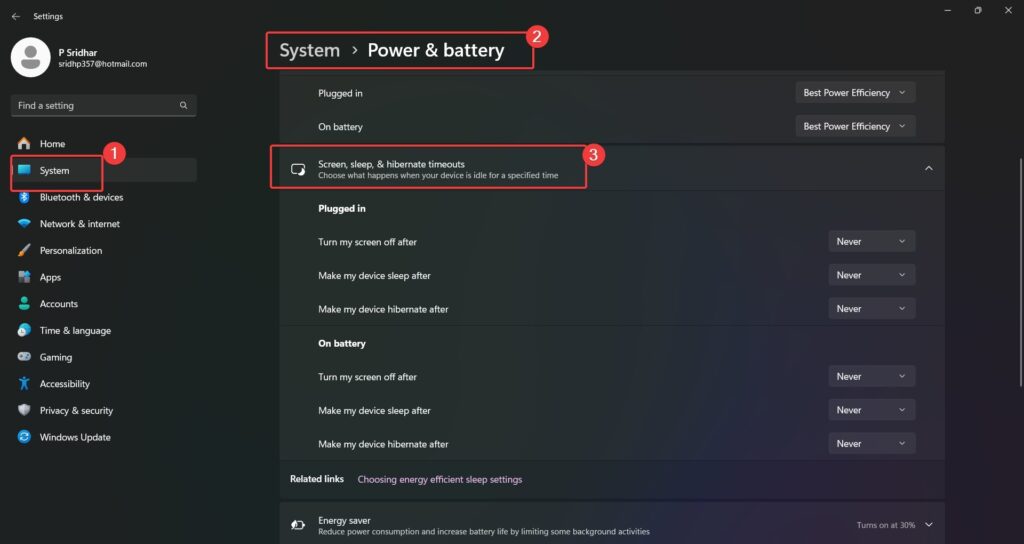
Recommended timing: Laptops—screen off after 3–5 min on battery, sleep after 10–15 min. Plugged in — screen off after 10–15 min, sleep after 30–60 min. Desktops—screen off after 15 min, sleep after 1–2 hours (or Never if it runs background tasks).
To disable sleep entirely — for long downloads, presentations, or media playback—select Never in the sleep dropdowns for battery and plugged-in as needed. Keep in mind this increases power consumption, and on laptops it will drain the battery faster; I recommend keeping sleep enabled for battery scenarios.
How to Change Power Mode in Windows 11
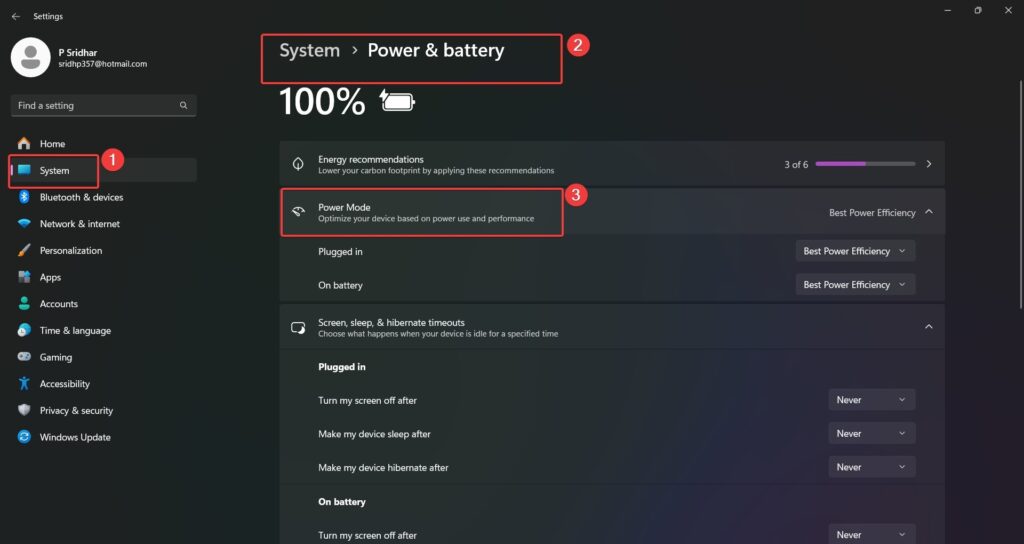
Power Mode is a system-wide setting that balances CPU performance, fan speed, and battery life. You’ll find it in Settings → System → Power & battery.
| Mode | Best For |
|---|---|
| Best power efficiency | Maximum battery life, light tasks |
| Balanced (default) | Everyday use — good balance of speed and battery |
| Best performance | Gaming, video rendering, demanding workloads |
- Go to Settings → System → Power & battery.
- Click the Power mode dropdown.
- Select your preferred mode.
On plugged-in desktop PCs, best performance is a reasonable default. On laptops running on battery, the best power efficiency will noticeably extend your runtime.
Related Reading – How to enable Ultimate Performance Mode
How to Enable and Configure Energy Saver (24H2+)
Energy Saver replaces the older “Battery Saver” label starting with Windows 11 24H2 (late 2024). It reduces screen brightness, limits background activity, and throttles less-critical system tasks.
| Windows 11 Version | Feature Name |
|---|---|
| 23H2 and earlier | Battery Saver |
| 24H2 and later | Energy Saver |
Both work the same way — the name change is cosmetic. If your post-update PC shows “Energy Saver,” you’re on 24H2 or newer.
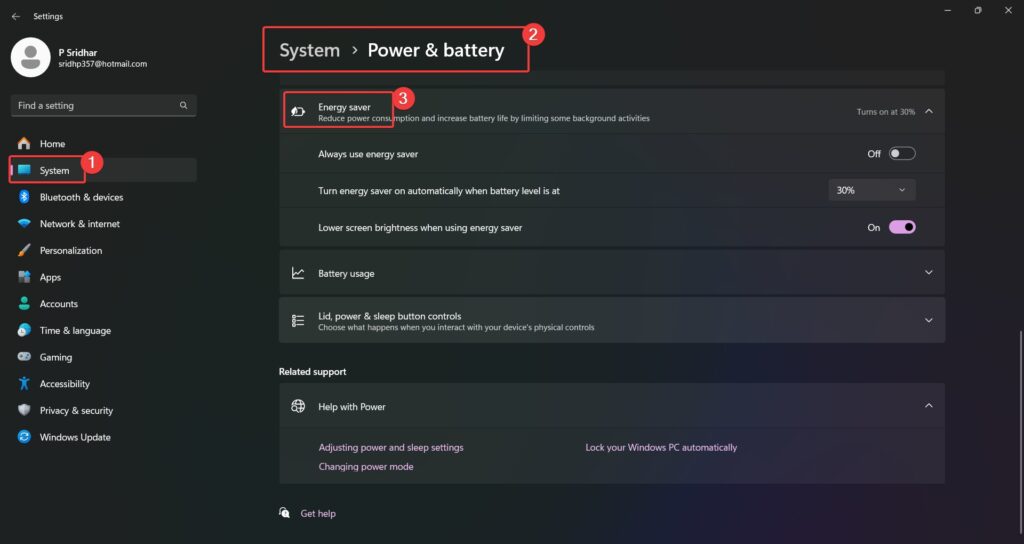
Turn it on manually: press Win + A to open Quick Settings and click the Energy saver tile.
Turn it on automatically:
- Go to Settings → System → Power & battery.
- Expand Energy saver.
- Under Turn Energy saver on automatically, set your preferred battery percentage (default: 20%).
- Optionally enable Lower screen brightness when using Energy saver.
New in 24H2: Energy Saver can manage system and app power usage more granularly than the older Battery Saver, including reducing background app refresh rates.
How to Use Energy Recommendations
Energy Recommendations is a dedicated page Microsoft added to help you apply hardware-specific power optimizations with one click.
- Go to Settings → System → Power & battery.
- Click Energy recommendations.
- You’ll see suggestions tailored to your device—adjusting screen brightness, shortening sleep timers, or switching power modes.
- Click Apply next to each, or Apply all.
These vary by device — laptops typically see more suggestions than desktops. In my experience, accepting all recommendations is safe for most users and can meaningfully extend battery life.
Method 2: Advanced Power Settings via Control Panel
For granular control—USB selective suspend, hard disk timeout, processor states, and multiple power plans—use the older Control Panel, which Microsoft still keeps for advanced users.
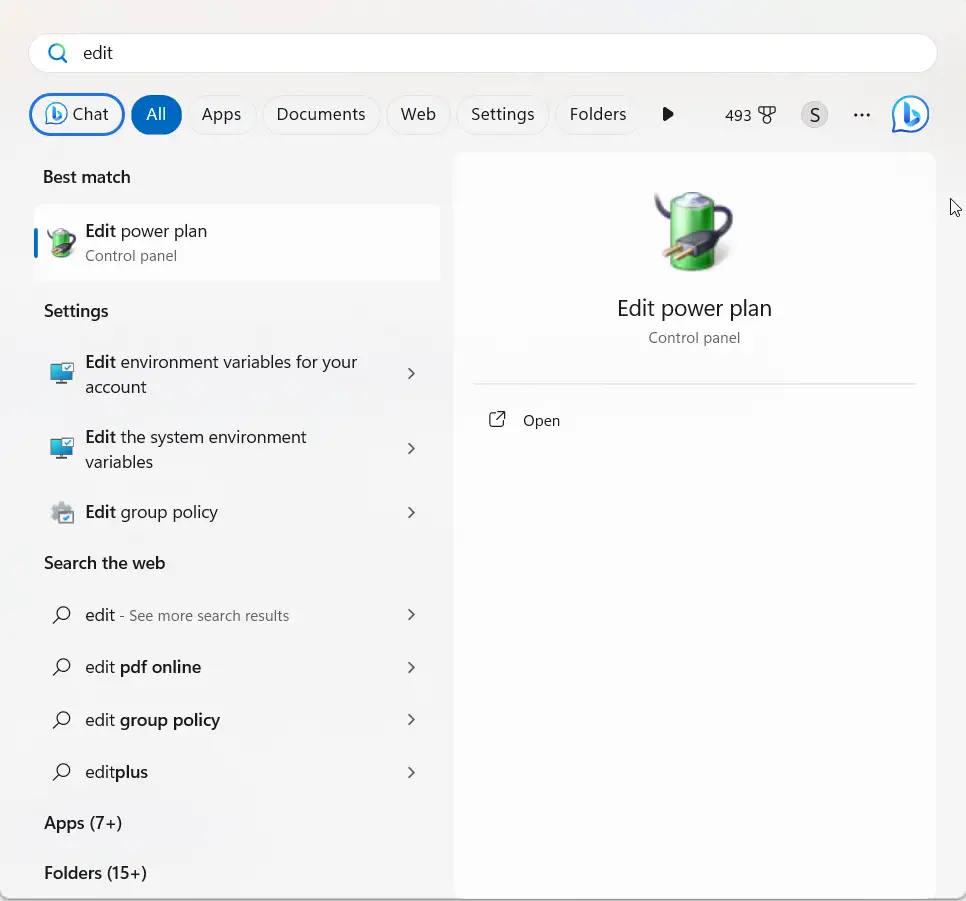
- Press
Win + R, typepowercfg.cpl, press Enter. - Click Change plan settings next to your active plan.
- Click Change advanced power settings.
- Expand any category and adjust the value — click a row to expose its dropdown, or type into its text field.
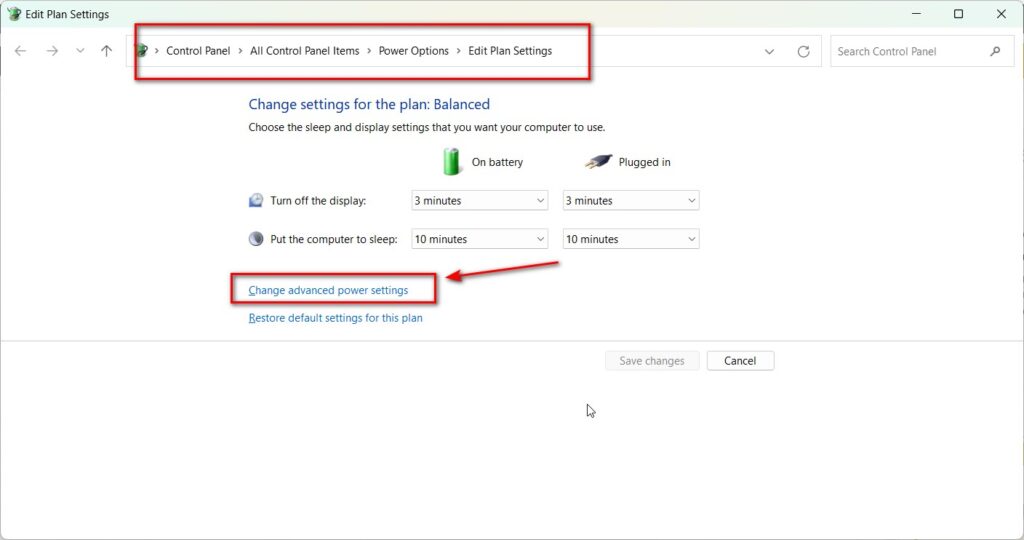
The categories you’ll find include Hard disk, Sleep, Display, Processor power management, USB settings, and PCI Express—though how many appear varies by machine: Modern Standby laptops show far fewer than desktops, and that’s by design, not a fault.
Two quick wins worth knowing even at this level: USB selective suspend (under USB settings) fixes many randomly-disconnecting USB devices when turned off, and Maximum processor state (under Processor power management) at 100% is the standard tweak for gaming rigs.
For everything deeper—every category explained with recommended values, restoring the High Performance and Ultimate Performance plans Windows hides, unhiding options with powercfg -attributes, and the fix when your advanced settings are missing or greyed out—see our complete guide to Windows 11 Advanced Power Settings.
Method 3: Change Power Settings via Command Prompt (powercfg)
This method isn’t in most consumer guides, but it’s the fastest way to change power and sleep settings in Windows across multiple office PCs without opening any menu — perfect for IT admins or power users who prefer scripting.
Open Command Prompt or PowerShell as Administrator, then use:
powercfg /change standby-timeout-ac 30
powercfg /change standby-timeout-dc 15
powercfg /change monitor-timeout-ac 15
powercfg /change monitor-timeout-dc 5
-ac= plugged in,-dc= on battery. Values are in minutes. Use0to disable a timer entirely.- Run
powercfg /listfirst to see all power plans and confirm which is active. - Apply a plan with
powercfg /setactive <GUID>.
This lets you script identical power settings across every machine in an office without touching the GUI on each one.
Find Out Why Your PC Won’t Stay Asleep
This is the part most articles never explain. If your sleep mode settings seem to “not work”—the PC wakes up randomly—the cause is almost always a scheduled task or device with wake permission, not a broken setting.
Run this single command to get the real answer:
powercfg /lastwake
This shows exactly which device or process last woke your PC. Common culprits: network adapters, USB mice with wake enabled, or scheduled Windows Update tasks.
To stop a device from waking your PC:
- Open Device Manager.
- Find the device shown in
powercfg /lastwake(often Network Adapters or Mice and other pointing devices). - Right-click → Properties → Power Management tab.
- Uncheck Allow this device to wake the computer.
This single adjustment resolves the majority of “PC won’t sleep” and “PC wakes up overnight” complaints.
Related to the Topic – How to fix a Windows 11 PC that keeps going to sleep
How to View Battery Usage on Windows 11
Monitoring battery usage helps you identify power-hungry apps:
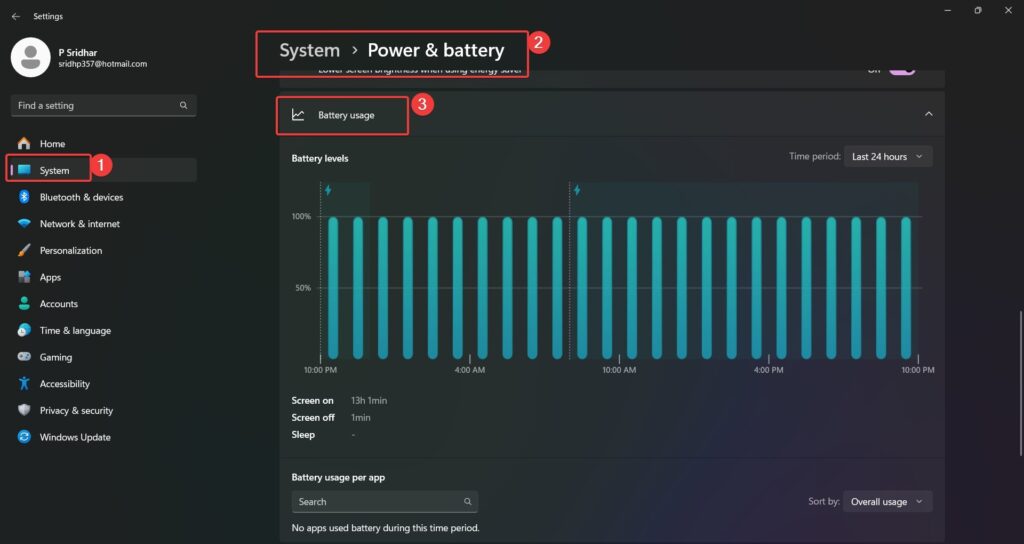
- Open Settings → System → Power & battery.
- Scroll to Battery usage. You’ll see battery usage over time and a per-app consumption ranking.
To manage background app activity—a major battery drain:
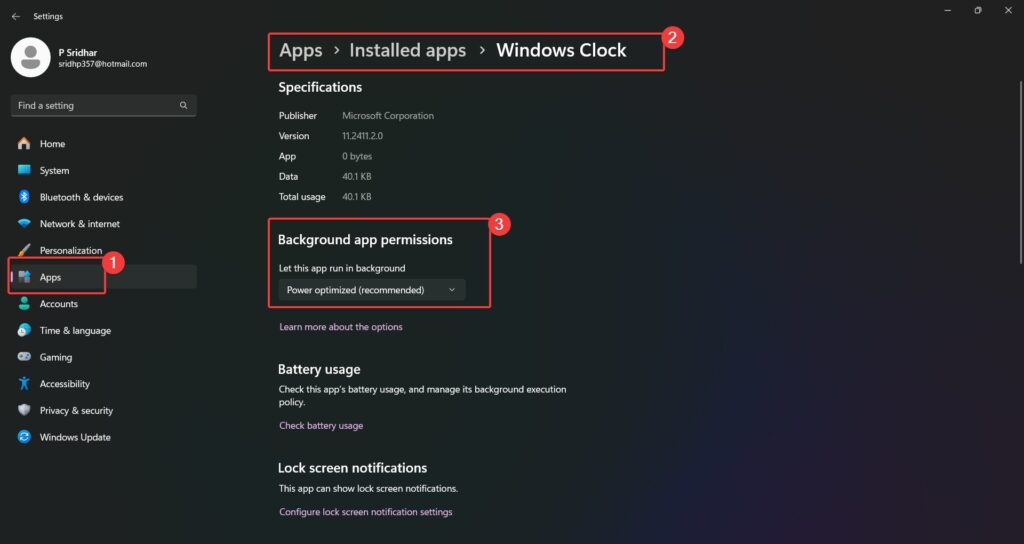
- Open Settings → Apps → Installed apps.
- Click the app’s three-dot menu → Advanced options.
- Under Background app permissions, choose either Power optimized (recommended) or Never.
How to Enable Hibernation, Power Button, and Lid Actions
These three all live in the same Control Panel page: Control Panel → Hardware and Sound → Power Options → Choose what the power buttons do.
Enable hibernation: under Shutdown settings, tick Hibernate and click Save changes — it now appears in the Start menu’s power options. Hibernation is particularly useful for laptops over long downtimes, since it uses no power while preserving your session.
Power button action: choose Sleep, Hibernate, Shut down, or Do nothing from the dropdown.
Lid-close action: click Choose what closing the lid does and set the behavior separately for battery and plugged-in states.
Best Power Settings for Gaming on Windows 11
For gaming, the priority is maximum performance with no unexpected sleep interruptions. I recommend:
- Power Mode: Best performance
- Screen timeout (plugged in): 30 minutes (so the screen doesn’t cut off during cutscenes)
- Sleep timer (plugged in): Never
- Energy Saver: Off (it throttles background CPU/GPU activity)
- Advanced → Processor power management → Maximum processor state: 100%
Also consider disabling USB selective suspend in Advanced Power Settings if your controller or headset disconnects unexpectedly during gameplay.
Laptop vs Desktop: What’s Different?
| Setting | Laptop | Desktop |
|---|---|---|
| Screen timeout (battery) | ✅ Available | ❌ Not shown |
| Screen timeout (plugged in) | ✅ Available | ✅ Available |
| Sleep timer (battery) | ✅ Available | ❌ Not shown |
| Sleep timer (plugged in) | ✅ Available | ✅ Available |
| Energy Saver / Battery percentage | ✅ Available | ❌ Not shown |
| Power Mode | ✅ Available | ✅ Available |
Desktop PCs only show “plugged in” options since they don’t run on battery.
Recommended settings based on your use case:
| Use Case | Screen Off | Sleep |
|---|---|---|
| General laptop use | 5–10 min (battery), 15 min (plugged in) | 15 min (battery), 30 min (plugged in) |
| Presentations / no sleep | Never | Never |
| Gaming PC | 15–30 min | Never |
| Office / work from home | 10 min | 30 min |
Related Stuff – What is the difference in power settings for battery vs plugged in
Tips to Extend Battery Life
- Lower screen brightness, or enable adaptive brightness.
- Set background app permissions to Power optimized for heavy apps.
- Turn off Wi-Fi and Bluetooth when not in use.
- Disconnect external USB devices and drives when idle.
- Use Hibernate instead of Sleep for extended downtime.
- Keep Windows and hardware drivers updated for the latest power management patches.
- Review Battery usage regularly to catch new power-hungry apps.
Settings can only stretch a battery so far — the hardware sets the ceiling. If your current laptop drains fast no matter how you configure it, it may be time to look at the best laptops with the longest battery life for Windows 11, where all-day endurance is built in before you touch a single setting.
FAQs About Changing Power and Sleep Settings in Windows 11
How do I adjust power and sleep settings in Windows 11?
Open Settings → System → Power & battery → Screen and sleep. From there you can set how long Windows waits before turning off the screen and putting the device to sleep, separately for battery and plugged-in states. Changes save instantly — no restart required.
What is the most battery-efficient power mode?
The best power efficiency mode conserves battery by limiting background activity and maximizing runtime. Pair it with Energy Saver, which is set to activate automatically at 20%, for the longest runtime on a charge.
Can I create custom power plans?
Yes. In Control Panel → Power Options, click Create a power plan, customize the settings, and save it. Custom plans let you switch between whole groups of advanced settings — useful for moving between travel, office, and gaming setups.
Why is my PC not going to sleep?
Usually a device or scheduled task holds wake permission. Run powercfg /lastwake in an admin command. Prompt to see exactly what woke it last, then disable that device’s Allow this device to wake the computer option in Device Manager.
What is Energy Saver in Windows 11 24H2?
Energy Saver is the updated version of Battery Saver, introduced in Windows 11 24H2. It reduces screen brightness, limits background app activity, and throttles non-critical tasks to extend battery life. It activates automatically at a battery percentage you choose or manually via Quick Settings (Win + A).
How can I manage apps running in the background for power saving?
Open Settings → Apps → Installed apps, choose the app’s Advanced options, and set Background app permissions to Power optimized or Never. This significantly reduces battery drain from apps you rarely use.
Why does my computer go to sleep too quickly?
Your sleep timers are set too low; the default is just 3 minutes when on battery. Raise them in Settings → System → Power & battery → Screen and sleep, setting battery and plugged-in durations separately.
Conclusion
Whether you’re tweaking power and sleep settings to eke out extra battery life on a long flight, preventing Windows from sleeping during a presentation, or optimizing a gaming PC for uninterrupted sessions, Windows 11 gives you fine-grained control through the Settings app, Control Panel’s Advanced Power Settings, and even the command line.
Start with Settings → System → Power & battery for 90% of what you need. If you want deeper control, powercfg.cpl unlock the full Advanced Power Settings tree. And if you’re on Windows 11 24H2 or later, check Energy Recommendations — Microsoft’s personalized suggestions are genuinely useful.
If your PC isn’t sleeping properly, skip the guesswork—run powercfg /lastwake first. It almost always points straight to the fix.

this product is ratty.
Do you mean the OS Win 11 or the feature of power and sleep settings?