Quick answer: To limit the processor in Windows 11, press Win + R, type
powercfg.cpl, then Change plan settings → Change advanced power settings → Processor power management. Set Maximum processor state to 99% to disable Turbo Boost (lowers heat and fan noise on most PCs) and Minimum processor state to 5% so the CPU idles cool. Apply separately for battery and plugged-in.
Is your laptop scorching hot, the fan screaming during simple tasks, or the CPU sitting at 100% while you’re doing nothing? Most people reach for a cooling pad. The real fix is usually a free setting Windows already has: processor power management.
Key Takeaways
- Setting Maximum processor state to 99% disables Turbo Boost on most CPUs. This alone commonly drops temperatures 15–30°C with minimal performance loss—the single most effective heat-and-noise fix in Windows 11. It’s not universal, though, so verify with a temperature monitor.
- A CPU running hot at idle is usually one wrong setting. Minimum processor state set too high forces full speed even when you’re doing nothing. Drop it to 5% and the CPU idles cool.
- You can run cool on battery and full-speed plugged in. Every setting has separate On battery and Plugged in values, so one profile gives you a quiet, long-lasting laptop unplugged and full performance on mains—automatically.
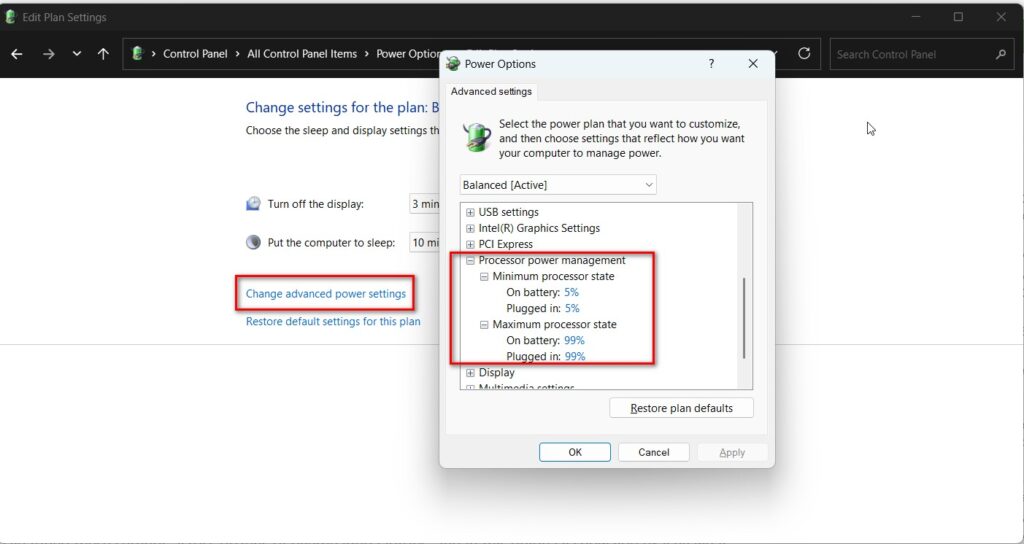
Buried in the Advanced Power Settings, this section lets you cap how hard your CPU works — capping the maximum, raising or lowering the idle floor, and telling the fan when to spin up. Used well, it can drop CPU temperatures by 20–30°C with almost no performance loss. Used wrong, it wastes power or hurts speed.
I’ve tuned these settings across dozens of overheating laptops, and in this guide I’ll show you exactly what each option does, the 99% Turbo Boost trick that actually works, how to set different limits on battery versus plugged in, and what to do when processor power management is missing from your menu entirely. Home users and office users can follow every step.
For the basics of the power menu where these settings live, see our guide to Windows 11 Advanced Power Settings. This article is a deep dive into the processor.
What Is Processor Power Management? (Featured Snippet)
Processor power management is a group of Windows 11 power settings that control how much of your CPU’s speed and power the system can use. Its two main controls—minimum and maximum processor state—set the lowest and highest percentage of CPU performance Windows allows. Lowering the maximum reduces heat, fan noise, and power draw, usually by disabling Turbo Boost.
Think of maximum processor state as a speed limiter and minimum processor state as an idle floor. Between them are boost mode and cooling policy—finer controls that most people never see.
How to Open Processor Power Management
- Press
Win + R, typepowercfg.cpl, press Enter. - Click Change plan settings beside your active plan.
- Click Change advanced power settings.
- Scroll down and expand Processor power management.
You’ll see (at minimum) Minimum processor state, System cooling policy, and Maximum processor state. On laptops, each shows two values — On battery and Plugged in — which is exactly what lets you run cool and quiet on battery but full speed on mains.
If the section is empty or missing entirely, skip to the “Missing or Greyed Out” section below—that’s a known Windows 11 behavior with a fix.
The Settings Explained (And What to Set Them To)
Maximum Processor State — The Heat Switch
This caps the highest performance level Windows will request. It’s the single most powerful setting here.
The key trick: set Maximum processor state to 99%. On most CPUs, dropping below 100% completely disables Turbo Boost (Intel) or Precision Boost (AMD)—the feature that pushes clock speeds high and generates most of the heat and fan noise. The performance loss is often tiny; the temperature drop can be dramatic.
How dramatic? One user with a Ryzen 5 5600X on a stock cooler reported temperatures falling from 85–90°C down to 55–60°C after switching from 100% to 99% — losing only 2–3 frames in games. That 30°C swing is typical when a CPU stops boosting.
One honest caveat competitors skip: 99% is not a guaranteed Turbo switch on every machine. On modern Intel hybrid CPUs with P-cores and E-cores, the effect can be partial or uneven. Test it and watch your temperatures—if 99% doesn’t help, the real Turbo control lives in your BIOS/UEFI. But for most PCs, 99% plugged in is the first thing to try.
Minimum Processor State — The Idle Floor
This sets the lowest performance level. The recommended value is 5%, which lets the CPU drop to near-idle speeds when you’re doing nothing, running cool and sipping power.
A common and costly mistake is to set the minimum to 99% or 100%. That forces the CPU to run flat-out even at idle—wasting power, generating heat, and spinning the fan for no reason. One user on Intel’s own community forum had the min set to 99% and wondered why their PC ran hot while idle; lowering it to 5% solved the problem. If your CPU runs at 100% when idle, check this setting first.
System Cooling Policy — Active vs Passive
This tells Windows how to react to heat:
- Active (default plugged in) — ramps up the fan first to maintain speed. Cooler chip, louder fan.
- Passive (often default on battery) — slows the CPU first to reduce heat. Quieter fan, slightly slower performance.
For a quieter laptop, set System cooling policy to Passive on both battery and plugged in. The fan will spin up far less often. For a gaming desktop where noise doesn’t matter, leave it Active.
Processor Performance Boost Mode — The Fine Control
Processor Performance Boost Mode is hidden by default, but it’s the precise way to manage boost without the blunt 99% cap.
Once revealed (see below), it offers modes such as Disabled, Enabled, Aggressive, and Efficient Aggressive. For a quiet-but-capable laptop, Efficient Aggressive gives you a boost only when it’s genuinely worth the heat.
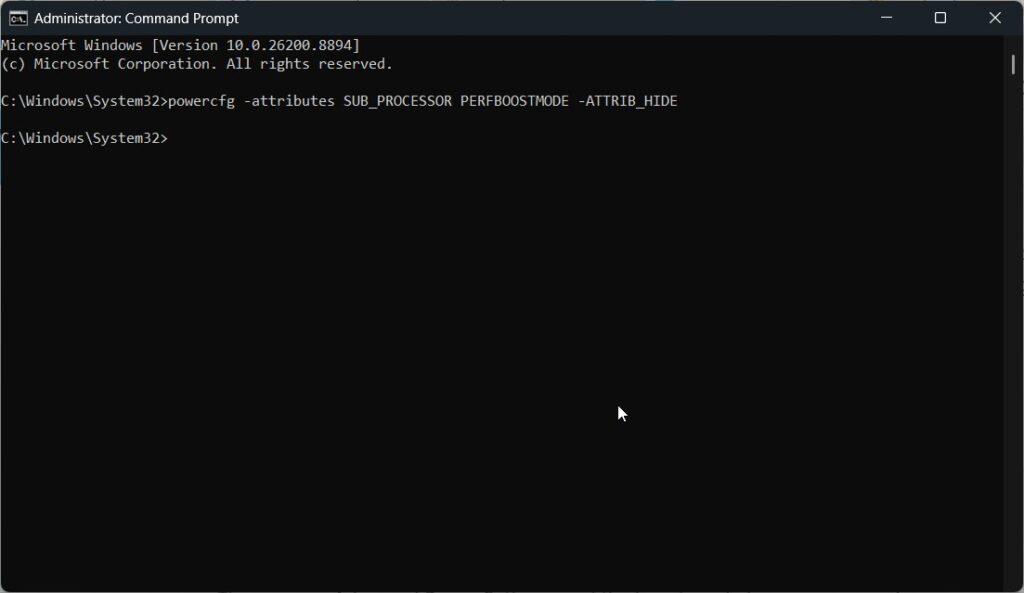
To unhide it, run this in an admin Command Prompt:
powercfg -attributes SUB_PROCESSOR PERFBOOSTMODE -ATTRIB_HIDE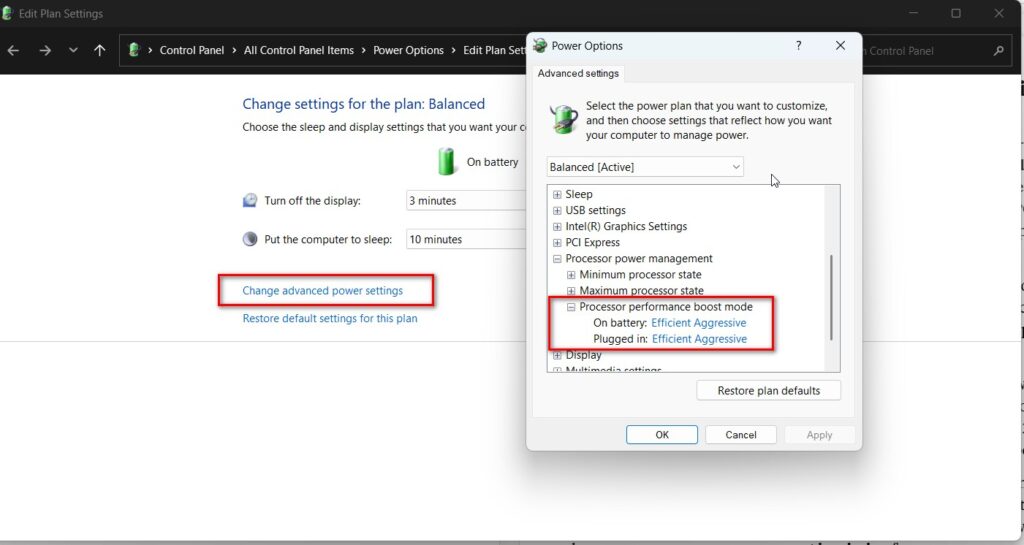
Then reopen Advanced Power Settings, and the boost mode for processor performance appears under processor power management. Here’s what each mode does, from coolest to hottest:
| Mode | What it does | Best for |
|---|---|---|
| Disabled | No boosting at all—CPU stays at base clock | Maximum coolness and silence; lowest peak speed |
| Efficient Enabled | Conservative boosting, backs off to save power | Quiet laptops, light workloads |
| Efficient Aggressive | Boosts readily but retreats when it isn’t helping | The sweet spot—cool and responsive |
| Enabled | Traditional stepwise boosting (legacy method) | Balanced default on older systems |
| Aggressive | Boosts instantly and fully on demand (modern default) | Maximum responsiveness; runs hottest |
The naming misleads people, so to be clear, “Aggressive” is the standard recommended mode on most modern PCs—it means the CPU grabs boost quickly using the fast hardware-controlled method (Intel Speed Shift), not that it overclocks or stresses your chip. It simply runs the hottest because it boosts the most eagerly.
For a laptop you want cool and snappy. Efficient Aggressive is usually the best choice—it keeps everyday tasks responsive while trimming the sustained boosting that generates heat. If you want it dead quiet and don’t mind losing peak speed, drop to Efficient Enabled or Disabled.
Honest caveat: these modes don’t behave identically across CPU generations, and on hybrid Intel P-core/E-core chips the effect varies. Set your choice, watch temperatures and responsiveness for a day, and compare—on many machines the difference between modes is modest, which is why the 99% maximum state trick remains the bigger heat lever.
Step-by-Step: Cool and Quiet Laptop Setup
Here’s the exact combination I use on overheating laptops:
- Open Processor power management (steps above).
- Minimum processor state: 5% (both battery and plugged in).
- Maximum processor state: 99% plugged in, 95% on battery for extra runtime.
- System cooling policy: Passive (both).
- Click Apply → OK.
- Run a normal workload for ten minutes and watch temperatures with a free tool like HWMonitor or Core Temp.
Most laptops drop 15–30°C with this profile, and the fan becomes noticeably quieter, while performance remains unchanged in everyday use.
Set Different Limits on Battery vs Plugged In
This is one of the most useful tricks and it’s built right in. Because every setting has separate On battery and Plugged in values, you can:
- Run at 99% max / Passive cooling on battery for a cool, quiet, long-lasting laptop.
- Run 100% max / Active cooling when plugged in for full performance.
Set each value independently in the same menu. No third-party software, no scripts — Windows switches automatically when you plug in or unplug.
Best Maximum Processor State for Gaming
For gaming, the honest answer is nuanced. Turbo Boost genuinely helps CPU-bound games, so capping at 99% can cost frames on titles that lean on single-core speed. But if your laptop thermal throttles under load—meaning it overheats and slows itself down anyway—a 99% cap that prevents the overheating can produce smoother, more consistent frame rates than an uncapped CPU that keeps hitting its thermal limit.
The rule: if your CPU stays under ~80°C while gaming, leave it at 100%. If it spikes into the 90s and throttles, try 99%—stable-but-slightly-lower often beats fast-but-throttling. Test both and watch your 1% low frame rates, not just the average.
Processor Power Management Missing or Greyed Out
If Processor power management is absent, showing only a couple of options, or greyed out, there are two causes:
Modern Standby hides it. Most 2024+ laptops use Modern Standby (S0), which trims the advanced power menu by design. Unhide the processor options from an admin Command Prompt:
powercfg -attributes SUB_PROCESSOR -ATTRIB_HIDEReopen the menu, and the category returns. Our Advanced Power Settings guide covers the full unhiding process and restoring missing power plans.
Group Policy greys it out. If you’re using a work laptop, a policy may lock these controls intentionally; please check with IT. On your PC, review gpedit.msc under Computer Configuration → Administrative Templates → System → Power Management.
Best Practices
- Change one setting at a time and test temperatures before the next—stacked changes are impossible to diagnose.
- Keep the minimum at 5% unless you have a specific reason; anything higher just wastes power at idle.
- Use 99% max plugged in as your first anti-heat move; it’s reversible in seconds.
- Monitor with Core Temp or HWMonitor so you’re tuning by real numbers, not guesswork.
- Note your original values before changing anything, so you can revert cleanly.
Common Mistakes to Avoid
- Setting the minimum processor state to 99%. Forces full speed at idle—the opposite of cool and quiet.
- Expecting 99% to disable Turbo on every CPU. It works on most, but hybrid Intel chips vary; verify with a temperature monitor.
- Capping the CPU won’t fix a fan problem that’s really just dust. Clean the vents first; settings won’t fix a clogged heatsink.
- Gaming at a low max state is blind. Below ~95% you start losing real performance; 99% is the sweet spot, not 70%.
- Forgetting the battery/plugged-in split. Set both, or your tweak only applies half the time.
Recommended Tools
- powercfg.cpl — the Advanced Power Settings menu.
- Core Temp / HWMonitor — free CPU temperature monitoring, essential for tuning by data.
- powercfg -attributes—unhides boost mode and missing processor options.
- Your BIOS/UEFI—the definitive Turbo Boost control when Windows settings aren’t enough.
Everything here except the monitoring tool is built into Windows 11.
Does setting maximum processor state to 99% disable Turbo Boost?
On most CPUs, yes — dropping below 100% disables Intel Turbo Boost or AMD Precision Boost, which lowers heat and fan noise for a small performance cost. It is not universal, though; some modern Intel hybrid processors respond partially. Test with a temperature monitor, and use BIOS for guaranteed control.
How do I limit my CPU to a percentage in Windows 11?
Open powercfg.cpl → Change plan settings → Change advanced power settings → Processor power management. Set Maximum processor state to your desired percentage—99% to disable boost, lower for a harder cap. Apply separately for battery and plugged-in. Changes take effect immediately without a restart.
Why is my CPU running at 100% when idle?
The most common cause is Minimum processor state set too high. Open Processor power management and set Minimum processor state to 5% for both battery and plugged in. This lets the CPU drop to low speeds when idle. If it persists, check Task Manager for a background process using the CPU.
Why is Processor power management missing from my advanced power settings?
Your PC likely uses Modern Standby, which hides these options by default. Open an admin Command Prompt and run powercfg -attributes SUB_PROCESSOR -ATTRIB_HIDE, then reopen the menu. On work laptops, a Group Policy may hide or grey it out instead — that’s controlled by your IT department.
How much can I reduce CPU temperature with these settings?
It varies by CPU and cooling, but disabling Turbo Boost via the 99% maximum state commonly drops temperatures 15–30°C on hot-running systems. Users have reported swings from 90°C down to the high 50s. Pair it with Passive cooling policy for the biggest reduction in both heat and fan noise.
Conclusion
Processor power management is the most underused fix in Windows 11 for a hot, loud, or throttling PC. Two settings do most of the work: Maximum processor state at 99% disables the boost that generates most of your heat, and Minimum processor state at 5% keeps the CPU cool at idle. Add Passive cooling policy, and the fan finally goes quiet.
The honest rules to remember: 99% disables Turbo on most but not all CPUs, so tune by temperature, not faith; never set the minimum high; and keep separate battery and plugged-in values so the fix always applies.
Open Processor power management today, set it to 99% when plugged in, and watch your temperatures with a free monitor. Then tell us in the comments how many degrees you dropped — the range across different laptops is wide, and your number helps the next overheating reader know what to expect.