
Last Updated:
Key Takeaways (HDMI connect in laptop)
- Connecting is two steps; looking decent is five. Plug in and press Windows + P, and you have a picture. The blur, cut-off edges, and choppy motion people fight afterwards are all settings—and every one has a named fix below.
- There is no “HDMI” page in Windows. The HDMI settings on a laptop live in three places: Display settings for the picture, the sound output picker for audio, and Windows + P for the projection mode. Knowing that ends the settings hunt.
- Cut-off edges are the TV’s fault, not the laptop’s. When the taskbar disappears past the screen edge, that is overscan—fixed in the TV’s own picture menu (look for Just Scan, Fit to Screen, or Screen Fit, not in Windows).
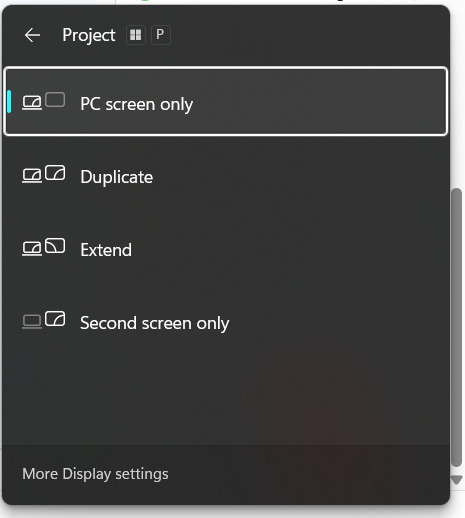
Quick answer: To connect the HDMI in the laptop to the TV, plug the cable into the laptop’s HDMI port and a TV HDMI input, select that input with the TV remote, then press Windows + P and choose “Duplicate” or “Extend.” Fix a blurry picture by setting the display resolution to the TV’s native one and cut-off edges via the TV’s Just Scan setting.
Introduction
The HDMI connection in the laptop part takes thirty seconds—cable in, TV on, done. Then reality arrives. The picture is soft. The taskbar has vanished off the bottom edge. The movie stutters. And the sound is still coming from the laptop.
Here is the frustrating truth: most guides stop at “plug it in and press Windows + P.” The problems people actually search for begin after the connection works.
This guide covers both halves. First, the clean five-step setup for connecting a laptop to a TV with HDMI on Windows 11. Then the part competitors skip—where the HDMI settings on a laptop really live and the named fix for every common picture problem: blur, cut-off edges, choppy motion, and sound stuck on the wrong device. Home users and office users can follow every step.
HDMI Connect in Laptop – Settings in Windows 11?
Windows has no single HDMI settings page. HDMI on a laptop is controlled in three places: Windows + P selects the projection mode (Duplicate, Extend, Second screen only), Settings → System → Display controls resolution and refresh rate, and the taskbar sound output picker routes audio to the TV. The TV’s own menu controls the input source and overscan.
That four-location map is the answer to the settings hunt. Nothing on your laptop is labeled “HDMI”—and now you know why searching for it finds nothing.
That four-location map answers the settings hunt — and our full overview of HDMI settings on a laptop and PC goes deeper on each one.
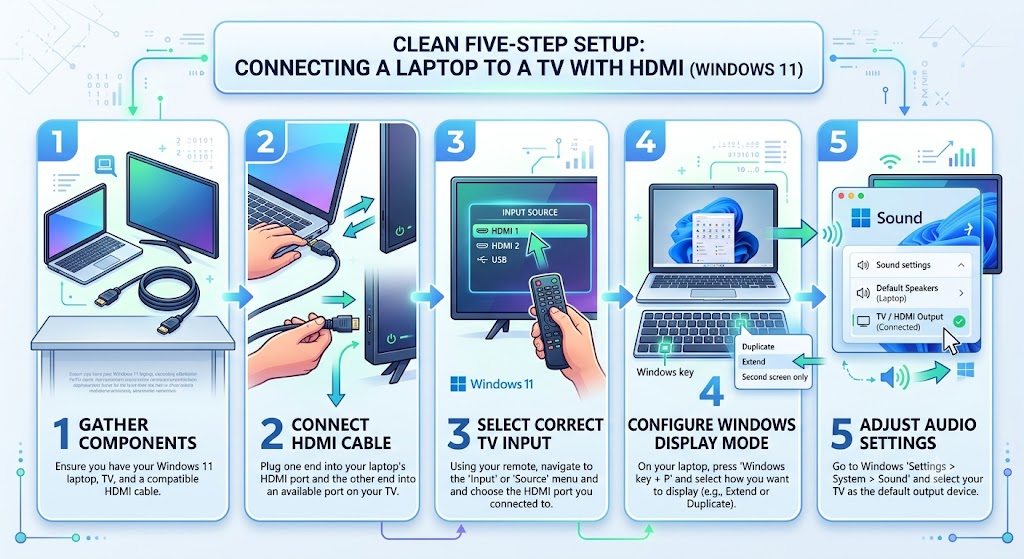
How to Connect a Laptop to a TV with HDMI: 5 Steps
The clean setup, in order:
Step 1: Connect the Cable
Plug one end into the laptop’s HDMI port and the other into any HDMI input on the TV. Note which one you choose; the label will matter in a moment. Any HDMI High Speed cable handles 1080p at 60Hz; you only need an Ultra High Speed cable for 4K at high refresh rates.
Step 2: Select the Input on the TV
Press the Input or Source button on the TV remote and pick the HDMI number matching the port you used. HDMI 2 on the remote means the jack labeled HDMI 2. A black “No Signal” screen at this stage is almost always the wrong input selected—not a broken connection.
Step 3: Choose the Projection Mode
On the laptop, press Windows + P. Four options appear:
- Duplicate — the same picture on both screens. Best for presentations.
- Extend — the TV serves as additional desktop space. Best for working.
- Second screen only — laptop screen off, TV only. Best for movies.
- PC screen only — please ignore the TV.
This shortcut is the master switch for HDMI setup on a laptop. Memorize it.
Step 4: Route the Sound to the TV
Click the speaker icon on the taskbar, open the output picker (the small arrow next to the volume slider), and select the TV’s name. Sound now plays through the TV. Windows sometimes connects automatically, but other days it stubbornly does not, so the output picker is the first place to check when audio stays on the laptop.
If the TV never appears in the output picker, see our full guide to HDMI sound not working in Windows.
Step 5: Check the Picture
Look at the TV. Sharp text, visible taskbar, smooth motion? You are done. Anything off? The next section is the actual value of this guide.
Fix the Picture: The Problems Everyone Hits After Connecting
Each fix below maps to a real complaint. Find yours.
Blurry or Soft Picture → Match the TV’s Native Resolution
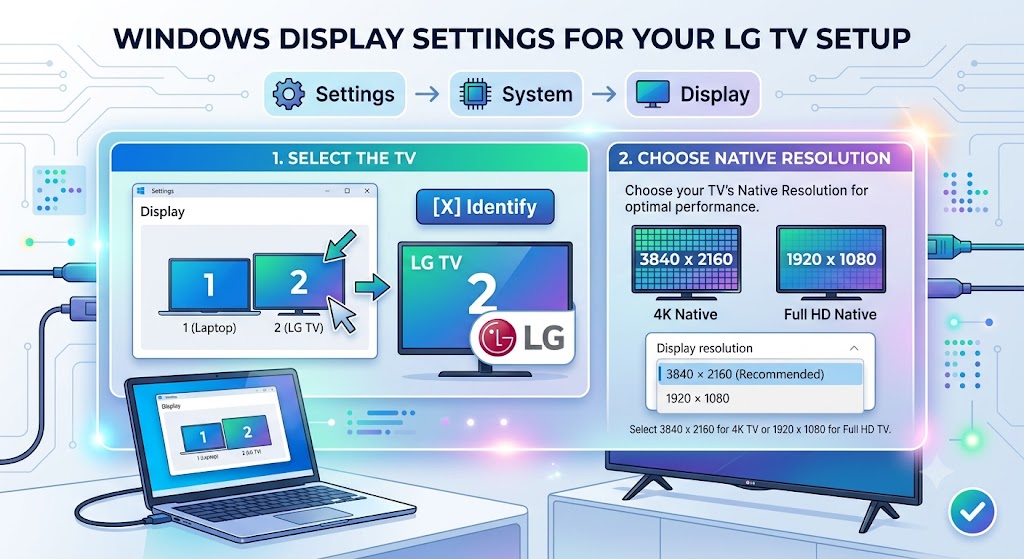
A fuzzy picture on the TV almost always means Windows is sending a resolution that the TV has to stretch. To get better quality on your TV when connected via HDMI:
- Settings → System → Display.
- Select the TV (click Identify if you’re unsure which number it is).
- Under Display resolution, choose the TV’s native resolution—1920 × 1080 for a Full HD TV and 3840 × 2160 for 4K.
Native resolution means every pixel maps one-to-one. Anything else is scaled, and scaling is where sharpness dies. If text is sharp but tiny, fix that with Scale on the same page—not by lowering the resolution.
If native resolution still leaves the picture soft, or the option you need is missing entirely, our dedicated guide on how to change the HDMI output resolution works through every failure mode.
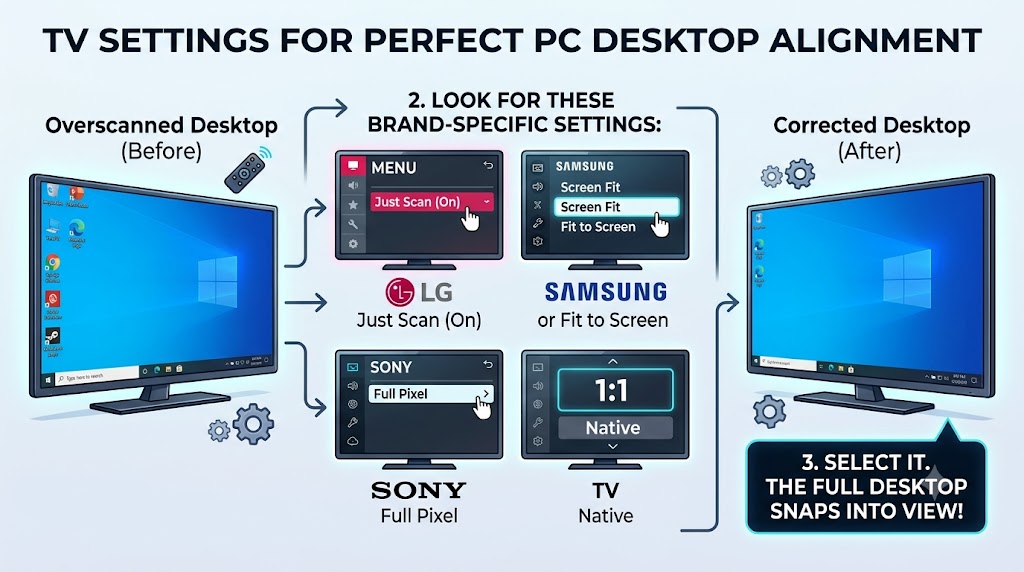
Edges Cut Off / Taskbar Not Visible → Turn Off Overscan on the TV
If the screen is not fully visible on the TV over HDMI—the taskbar is below the edge, and window corners are missing—the TV is zooming into the image. The habit is called overscan, a leftover from broadcast TV, and the solution lives in the TV’s menu, not Windows:
- Open the TV’s picture or aspect ratio settings.
- Look for Just Scan (LG), Screen Fit / Fit to Screen (Samsung), Full Pixel (Sony), or “”1:1″—naming varies by brand, but every modern TV has it.
- Select it. The full desktop snaps into view instantly.
If your TV genuinely lacks the option, the fallback is GPU scaling: open the NVIDIA Control Panel, AMD Software, or Intel Graphics Command Center, find the desktop scaling/underscan slider for the TV, and shrink the image to fit. Use the TV menu first, as it maintains full sharpness; the GPU underscan sacrifices a little.
Choppy or Stuttering Motion → Refresh Rate and Power
Two causes; check both.
Refresh rate: Go to Settings → System → Display → Advanced display, select the TV, and set it. Choose a refresh rate that is the highest available—usually 60Hz, or 120Hz on gaming TVs. A connection stuck at 30Hz feels laggy everywhere, and it happens more than you would think with long or old cables.
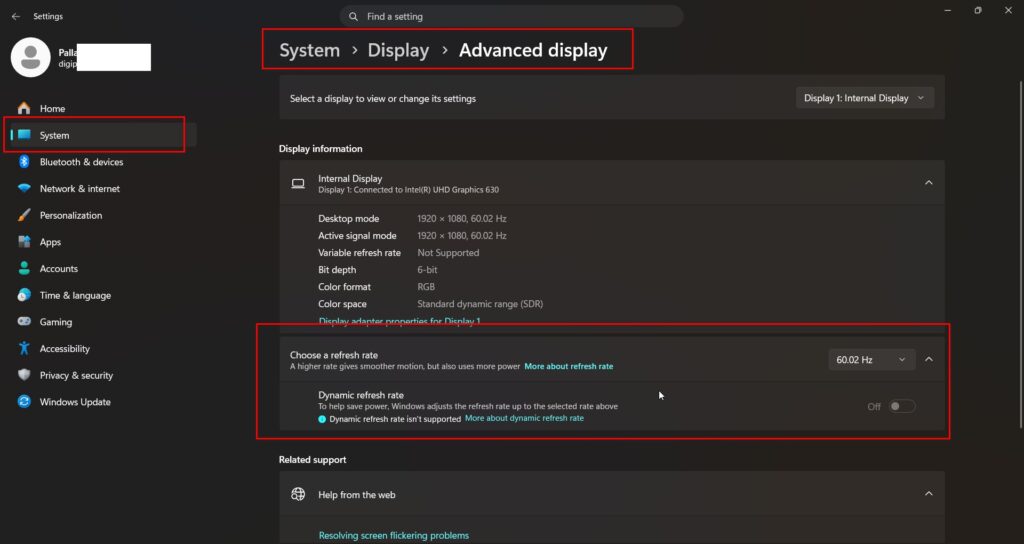
Power: To make your laptop smoother when connected to a TV, plug in the charger. On battery, laptops throttle the processor and GPU to save power, and driving a second display is precisely the load that makes throttling visible. Battery + HDMI + video = stutter; the charger fixes it embarrassingly often.
Windows Rearranged After Unplugging → One Checkbox
The quiet annoyance nobody covers: you disconnect the HDMI cable, and all your windows pile onto the laptop screen—then replugging scrambles the layout again.
Windows 11 has a real setting for this. Go to Settings → System → Display → Multiple displays (click to expand) and check the box for “Remember window locations based on monitor connection.”
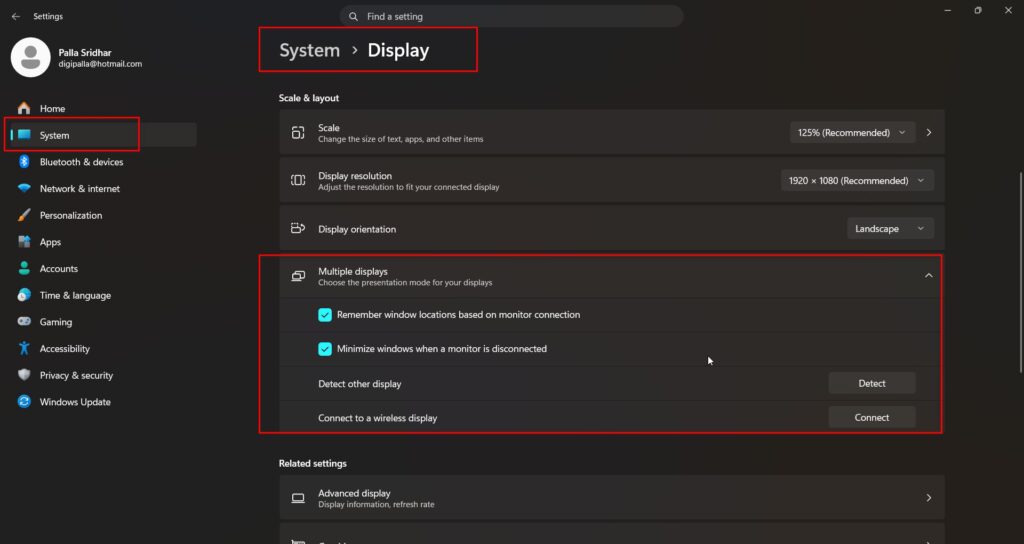
With it on, reconnecting the TV puts every window back where it was. The companion checkbox, “Minimize windows when a monitor is disconnected,” stops the pile-up when you unplug. Windows 11 only — Windows 10 never had this feature.
Screen Looks Wrong Only Sometimes → Let It Re-Detect
If the picture misbehaves after sleep or cable swaps, force a re-detection: unplug the HDMI cable, wait five seconds, replug — or press Windows + Ctrl + Shift + B to restart the graphics driver (the screen flashes black for a second; that is normal). Cheap auto-adjustment, no reboot.
Best Practices
- Plug the charger in for anything beyond light desktop use on the TV.
- Match resolution to the TV’s native panel, and fix size with scale, not resolution.
- Set the TV to Just Scan / Fit to Screen once—it will survive future connections.
- Label or remember which HDMI input you use, so Step 2 is instant next time.
- Keep the Windows + P and speaker-picker habits — they solve 80% of daily HDMI friction.
Common Mistakes to Avoid
- The TV may be set to the wrong input. The number one cause of “no signal” is checking the remote’s source button before anything else.
- Lowering resolution to make text bigger. Use a scale instead; lowering resolution blurs everything.
- Fighting overscan in Windows. The solution is in the TV’s picture menu; Windows cannot see the problem.
- Watching video on battery. Throttling causes the stutter people blame on the cable.
- Trying to show a console or set-top box on the laptop. The laptop’s HDMI is an output — it cannot receive a picture. See our HDMI input vs. output guide for the real options.
The laptop’s HDMI is an output — it cannot receive a picture. See our HDMI input vs output guide for the real options.
Recommended Tools
- Windows + P — the projection switch.
- Settings → System → Display — resolution, refresh rate, scale, and the window-location checkbox.
- The TV remote’s Source and picture menus—input selection and overscan.
- Press Windows + Ctrl + Shift + B to restart the graphics driver if you experience odd behavior.
Everything here is built into Windows 11 and your TV. No downloads needed.
Where do I find the HDMI settings on my laptop?
There is no page labeled HDMI. Picture settings live under Settings → System → Display, projection modes under Windows + P, and audio in the taskbar sound output picker. The input source and overscan are controlled on the TV itself, through its remote and picture menu.
Why is my TV blurry when connected to my laptop via HDMI?
Windows is sending a resolution the TV must stretch to. Open Settings → System → Display, select the TV, and set Display resolution to the TV’s native one—1920 × 1080 for Full HD, 3840 × 2160 for 4K. If text becomes too small, raise Scale rather than lowering resolution.
Why is the full screen not visible on my TV when using HDMI?
Your TV is overscanning — zooming in on the image and pushing the edges off-screen. Open the TV’s picture or aspect settings and choose Just Scan, Screen Fit, or Full Pixel, depending on the brand. The complete desktop, taskbar included, appears immediately. Windows settings cannot fix this issue.
Why do my windows move around when I unplug the HDMI cable?
Windows relocates them to the remaining screen. On Windows 11, you can open Settings → System → Display → Multiple displays and enable Remember window locations based on monitor connection to restore your layout when you reconnect. The Minimize windows when a monitor is disconnected option tames the unplug behavior too.
Can I connect a set-top box to my laptop with an HDMI cable?
No. A set-top box outputs video, and your laptop’s HDMI port is also an output—two outputs cannot connect. The laptop cannot act as the TV. The workarounds are a USB capture card or a real display; our HDMI input vs output guide explains both options.
How do I make video smoother when my laptop is connected to a TV?
Two fixes. Set the refresh rate to 60Hz or higher in Settings → System → Display → Advanced display. Then plug in the charger—on battery, laptops throttle performance, and driving a TV plus video playback is exactly the load that makes it stutter.
Conclusion
The HDMI connection in the laptop step was never the challenging part—the cable and Windows + P handle that in half a minute. The picture you actually want comes from five settings: the right TV input, the native resolution, Just Scan on the TV, the proper refresh rate, and sound routed through the output picker.
Set the window-location checkbox once, and even the unplug-replug shuffle stops. And when something misbehaves after sleep, Windows + Ctrl + Shift + B resets the graphics driver faster than any reboot.
Connect your laptop tonight and run the five checks in order—resolution, overscan, refresh, power, and sound. Then tell us in the comments which fix your setup needed; it’s almost always one of the five, and knowing which helps the next reader jump straight to it.
ENJOYING OUR CONTENT?
Stay up to date with our latest guides, insights, and news. Tap below to follow us directly via your search feed.
