
Last Updated:
Key Takeaways
- Native resolution is the ceiling and the target. Set your TV’s exact panel resolution in Settings → System → Display, and sharpness is instantly better. Nothing “enhances” past native—upscaling adds pixels, never detail.
- A sharp-but-stuttery picture is a refresh rate problem, not a resolution one. Check Advanced display—connections silently stuck at 30Hz are far more common than people think, and an old cable is the usual culprit.
- When the resolution you need is missing, it is fixable. A grayed-out or absent option usually means a generic display driver, a bandwidth-starved cable, or the TV’s compatibility mode—and the GPU panel’s custom resolution tool covers the rest.
Quick answer: To change HDMI output resolution on Windows 11, open Settings → System → Display, select the HDMI-connected screen, and set Display resolution to the TV’s native resolution—1920 × 1080 for Full HD, 3840 × 2160 for 4K. Then check the refresh rate under Advanced display. If the right option is missing, update the GPU driver first.
Introduction
I have connected a lot of laptops to a lot of TVs over the years, and the same complaint comes back every time: the connection works, but the picture looks worse than the laptop screen. Soft text. Fuzzy icons. Sometimes a subtle stutter that ruins video.
Nine times out of ten, the fix is the same one: change the HDMI output resolution to the TV’s native resolution, then check the refresh rate. Two settings, five minutes.
Resolution is one piece of the picture — our overview of HDMI settings in Windows 11 maps everything else, from projection modes to audio.
The tenth case is the interesting one — the resolution you need is greyed out, missing from the list, or Windows stubbornly caps the connection at 30Hz. Those failure modes have real causes too, and almost nobody explains them.
This guide covers the whole ladder: the basic change, the sharpness checklist when native still looks soft, the refresh rate fix, and how to manually force a resolution Windows refuses to offer. Home users and office users can follow every step.
What Changing HDMI Resolution Actually Does
Changing the HDMI output resolution sets how many pixels your PC sends to the connected screen. For the sharpest picture, it must match the TV or monitor’s native panel resolution—1920 × 1080 for Full HD and 3840 × 2160 for 4K. Any other value forces the screen to scale the image, which softens everything. It is set in Settings → System → Display on Windows 11.
One honest fact up front, because a query I see often asks about “resolution enhancement” from PC to TV: there is no such thing past native. A 1080p TV cannot be made to show more detail than 1080p, no matter what the PC sends. What you can do — and what this guide does — is stop the picture being worse than the hardware allows.
Step 1: Change the HDMI Output Resolution to native.
The core task, on Windows 11:
- Right-click the desktop → Display settings (or Settings → System → Display).
- If two screens show, click Identify and select the TV—the HDMI display settings you change apply per screen, so make sure the right one is selected.
- Scroll to Display resolution.
- Choose the TV’s native resolution. For most TVs, that is 1920 × 1080; for a 4K set, 3840 × 2160. Windows usually marks the native one (recommended).
- Click Keep changes when the picture settles.
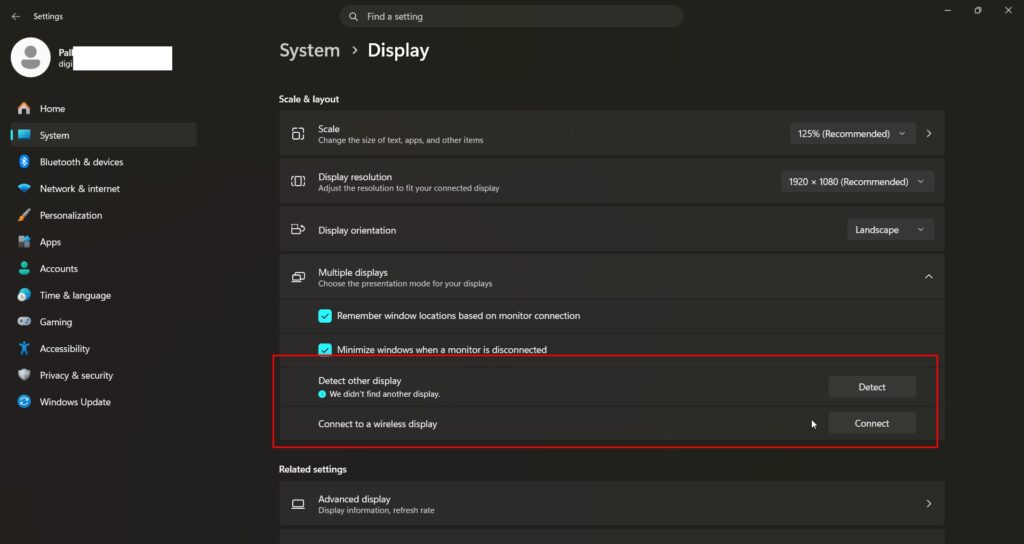
That is how you change your PC’s HDMI output to 1080p — or to whatever your screen’s panel really is. If you are not sure of the native resolution, the TV’s spec sheet or the sticker on the box settles it; going by “what looks okay” is how mismatches survive for years.
If text is now sharp but too small: raise the scale on the same page—125% or 150%—instead of lowering the resolution. Lowering resolution to enlarge text is the single most common way people blur their own picture.
Step 2: Still Soft at Native? Work the Sharpness Checklist
Native resolution set, TV still not crisp when projecting from Windows 11? In my experience the cause is one of these four, in this order:
The TV’s own picture processing. Most TVs apply sharpness, noise reduction, and motion smoothing meant for broadcast video—on a PC desktop, they smear text. Open the TV’s picture menu and either select the PC or Game picture mode or set sharpness to its neutral value and disable noise reduction for that input. This one change fixes more “poor sharpness” complaints than anything in Windows.
Duplicate mode mismatch. In duplicate mode, Windows sends one resolution to both screens—usually the laptop’s, not the TV’s. If sharpness on the TV matters most, switch to Extend (Windows + P) or Second screen only so the TV gets its own native signal.
Scale-induced blur in some apps. Fractional scaling (125%, 150%) can soften older applications. Test at 100% scale for a moment—if everything snaps crisp, the blur is scaling-related, and per-app compatibility settings (Properties → Compatibility → Change high DPI settings) fix the stragglers.
Overscan. If the picture is soft and slightly cropped, the TV is zooming the image. That fix lives in the TV’s Just Scan / Screen Fit setting—covered fully in our laptop-to-TV connection guide.
Step 3: Fix the Refresh Rate (The Stuck-at-30Hz Problem)
Resolution is right, picture is sharp, but motion feels laggy or video stutters? That is refresh rate, and here is how to change the HDMI refresh rate on Windows 11:
- Settings → System → Display → Advanced display.
- Select the TV in the dropdown at the top.
- Under “Choose a refresh rate,” pick the highest listed—60Hz for most TVs and 120Hz on gaming sets.
The trap worth knowing: 4K connections silently stuck at 30Hz. Everything works, nothing errors, and the whole desktop just feels faintly wrong—the mouse trails and video judder. 60Hz vs. 30Hz over HDMI is the difference between normal and miserable, and Windows will happily run at 30 forever without telling you. Check this even if nothing seems broken.
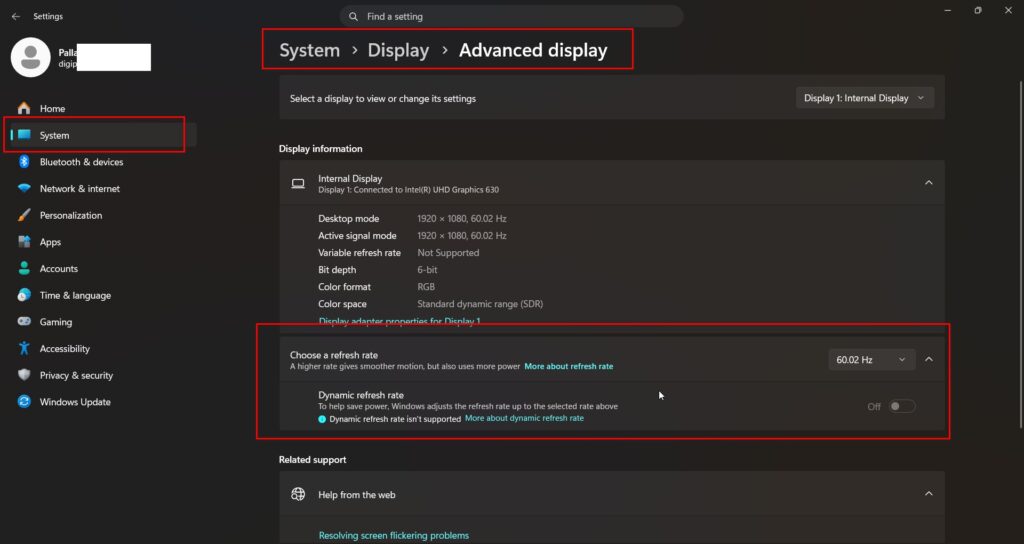
If 60 Hz simply is not offered at 4K, the connection is bandwidth-starved—which is the next section.
Step 4: When the Resolution or Refresh Rate Is Missing
The differentiator cases: the option you need is greyed out or absent. Four real causes, checked in order of likelihood:
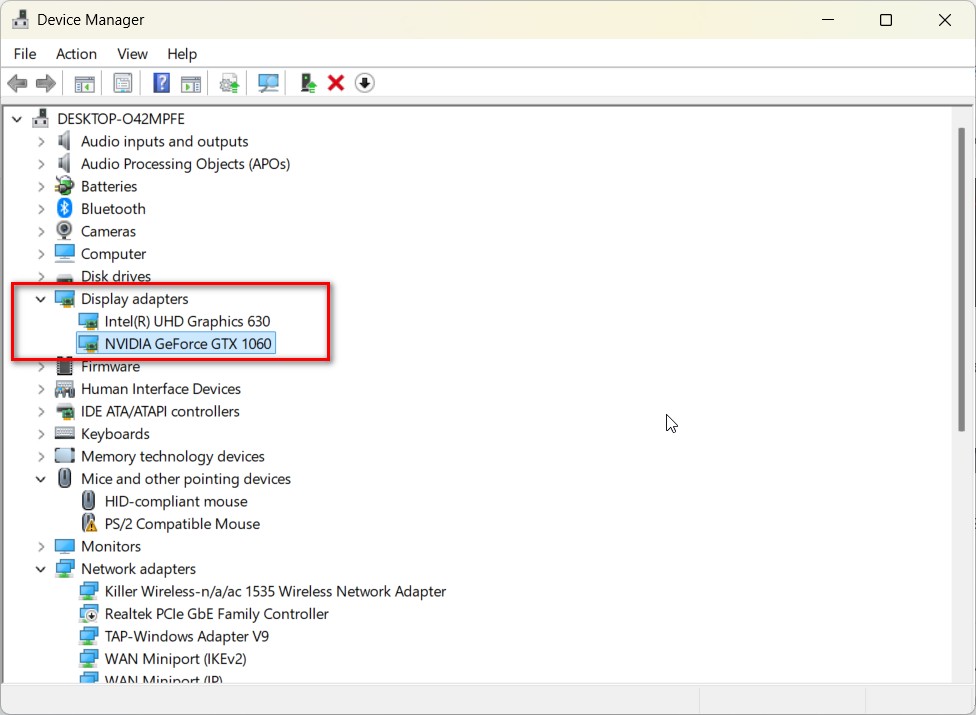
A generic display driver. If Device Manager shows “Microsoft Basic Display Adapter,” Windows is running without the real GPU driver, and the resolution list collapses to a few generic modes. Update the graphics driver from NVIDIA, AMD, or Intel — or via Windows Update — and the full list returns. This is the first thing I check when a resolution list looks suspiciously short.
A bandwidth-starved cable. Cables are digital: they either carry the bandwidth or they do not. An old high-speed cable tops out around 4K/30—so 4K/60 literally cannot appear as an option through it. A premium high-speed cable covers 4K/60; ultra-high speed covers 4K/120. Swapping the cable is the two-minute test.
The TV’s compatibility mode. Many TVs ship HDMI inputs bandwidth-limited and hide a per-port toggle—HDMI Deep Color (LG), Input Signal Plus (Samsung), and Enhanced Format (Sony)—that must be enabled on your specific port before 4K/60 appears on the PC side. This is a screen setting, not a Windows one, and it is the most-missed step in forcing 4K over HDMI.
A passive adapter in the chain. Dongles and older AV receivers between a PC and a screen inherit the weakest link’s limits. Test with a direct cable to isolate it.
That per-port toggle is the one true port-level setting in the whole chain—our HDMI port settings guide explains the three-layer split it belongs to.
Manually forcing a resolution. If the mode you want is valid but unlisted, the GPU panel’s custom resolution tool creates it: NVIDIA Control Panel → Change Resolution → Customize, or the equivalent in AMD Software and Intel’s app. One honest caution from experience: forcing a mode the screen cannot handle blacks it out until the test times out—so use the built-in test function, change one parameter at a time, and never tick “enable modes not exposed by the display” casually. It is a precision tool, not a cheat code.
Best Practices
- Set native resolution and check refresh rate together — they are one job, not two.
- Put the TV in PC or game mode for desktop use; broadcast processing exists to smear text.
- Fix text size with scale, never by lowering resolution.
- Keep one known-good premium high-speed cable for testing; it isolates half these problems.
- After driver updates, re-check advanced display—refresh settings occasionally reset.
Common Mistakes to Avoid
- Chasing “resolution enhancement.” Nothing adds detail past native; anything promising it is upscale marketing.
- Lowering resolution to enlarge text. Use a scale. Every time.
- Ignoring a working-but-30Hz connection. No error will ever tell you; only advanced display will.
- Blaming Windows for a missing 4K/60 option. First, check the cable and the TV’s Enhanced Format toggle.
- Forcing custom resolutions carelessly. Untested modes may black-screen; use the test function.
Recommended Tools
- Settings → System → Display — resolution, scale, and per-screen selection.
- Advanced display — refresh rate and the active signal mode readout.
- Device Manager — spot the generic driver problem.
- GPU panel custom resolution tools—NVIDIA, AMD, and Intel—for unlisted modes.
Everything here is built into Windows and your GPU software. No downloads needed.
Frequently Asked Questions
Why is my TV still blurry even though the resolution is correct?
Usually the TV’s own processing. Switch the TV to its PC or game picture mode, or zero the sharpness and disable noise reduction for that input. Also, check that you are not in duplicate mode, as this setting sends the laptop’s resolution to both screens. Extend mode gives the TV its own native signal.
Why is my HDMI connection stuck at 30Hz?
Bandwidth. At 4K, an older high-speed cable cannot carry 60Hz, and many TVs ship ports in a limited compatibility mode. Use a premium high-speed or better cable, enable the TV’s Enhanced Format or Input Signal Plus toggle for that port, then reselect 60Hz under Advanced Display.
What if my resolution is not listed in Display settings?
Check Device Manager first—a Microsoft Basic Display Adapter entry means a missing GPU driver, which collapses the list. Update the driver, test a known-good cable, and enable the TV’s full-bandwidth port mode. For valid modes still unlisted, the GPU panel’s custom resolution tool can create them.
Can I manually change the HDMI resolution type?
Yes, through your GPU software: NVIDIA Control Panel → Change Resolution → Customize, or the equivalents in AMD Software and Intel’s app. Always use the built-in test function—a mode where your screen cannot display blackouts until the test times out, so change one parameter at a time.
Does a better HDMI cable improve picture quality?
Not sharpness — HDMI is digital, so a working cable at a given mode delivers a perfect signal. What a better cable changes is which modes are possible: an insufficient cable silently limits you to 4K/30 or reduced color. Buy for bandwidth certification, never for “picture quality” claims.
Conclusion
Changing the HDMI output resolution is a two-minute job—settings, display, native resolution, done. What separates a fine picture from a frustrating one is the ladder above it: the TV’s PC mode for real sharpness, Advanced display for the silent 30Hz trap, and the driver-cable-toggle checklist when the option you need refuses to appear.
And keep the honest rule in mind: native is the ceiling. No setting, cable, or “enhancement” adds detail past what the panel physically has—the goal is simply to stop losing quality you already paid for.
Run the four steps on your setup tonight—native resolution, sharpness checklist, refresh rate, and the missing-option checks, if needed. Then tell us in the comments which rung of the ladder your fix was on. In my experience, the refresh rate is more often the issue than anyone expects, and knowing this helps the next reader look there first.
ENJOYING OUR CONTENT?
Stay up to date with our latest guides, insights, and news. Tap below to follow us directly via your search feed.
