
Key takeaways
- Use an empty USB flash drive of at least 8 GB. A 16 GB USB 3 stick is the sensible buy, because everything on it is erased.
- The Media Creation Tool at Microsoft’s download page is the official route and handles everything for you.
- Rufus is the better route when you need a local account, want to skip setup prompts, or are installing on older hardware.
- The Media Creation Tool builds x64 media only. Arm-based PCs need the separate Arm64 ISO.
- Windows 11 ISOs contain an
install.wimlarger than 4 GB, which FAT32 cannot hold. That single fact explains most hand-copied USB sticks that refuse to boot. - The tool’s version number never changes, but the build it downloads does. Always check what your media actually contains.
Quick answer
To create a bootable USB for Windows 11, plug in an empty 8 GB or larger USB flash drive, open Microsoft’s Download Windows 11 page and select Download Now under Create Windows 11 Installation Media.
Run MediaCreationTool.exe, choose USB flash drive, select your stick and let it download and write the files.
To boot from it, restart the PC and press the boot menu key for your brand, usually F12, F9, F11 or Esc, then pick the UEFI entry for the USB device.
Introduction
I keep a bootable Windows 11 USB in my laptop bag the way other people keep a spare phone cable.
It has rescued more machines than any diagnostic tool I own, because when a PC will not start, everything you want to do next begins with booting from something other than the broken drive.
Making one is genuinely simple.
The trouble is that half the guides online describe a manual drag-and-drop method that quietly stopped working years ago, and the other half skip the details that decide whether your stick boots or throws a black screen.
This guide covers how to create a bootable USB for Windows 11 three ways, which one suits your situation, the file-size limit that breaks hand-made drives, and what to do when the PC refuses to boot from the stick you just built.
It is written for home users doing a clean install and for office users who need repeatable media across a fleet.
What you need before you start
Five things, and none of them are expensive.
- An empty USB flash drive, 8 GB minimum. Microsoft’s download page states 8 GB, but buy 16 GB and use a USB 3 stick. The write speed difference is the difference between ten minutes and forty.
- A working PC with an internet connection. The download is roughly 6 GB.
- Administrator rights on the machine you build the media on.
- A valid Windows 11 licence, or a device with an existing digital licence. The tools are free; the licence is not.
- The right architecture. Almost every PC is x64. If yours is an Arm-based machine such as a Snapdragon laptop, read the Arm64 note below before you start.
Two warnings before you click anything.
Everything on the USB stick is erased, so check the drive letter twice.
And if the target PC has BitLocker enabled, get the recovery key from account.microsoft.com/devices/recoverykey first, because a boot change can trigger a recovery prompt you cannot answer.
Step-by-step guide: create a bootable USB with the Media Creation Tool
This is the official method and the one I recommend for most people.
Step 1 — Open Microsoft’s download page.
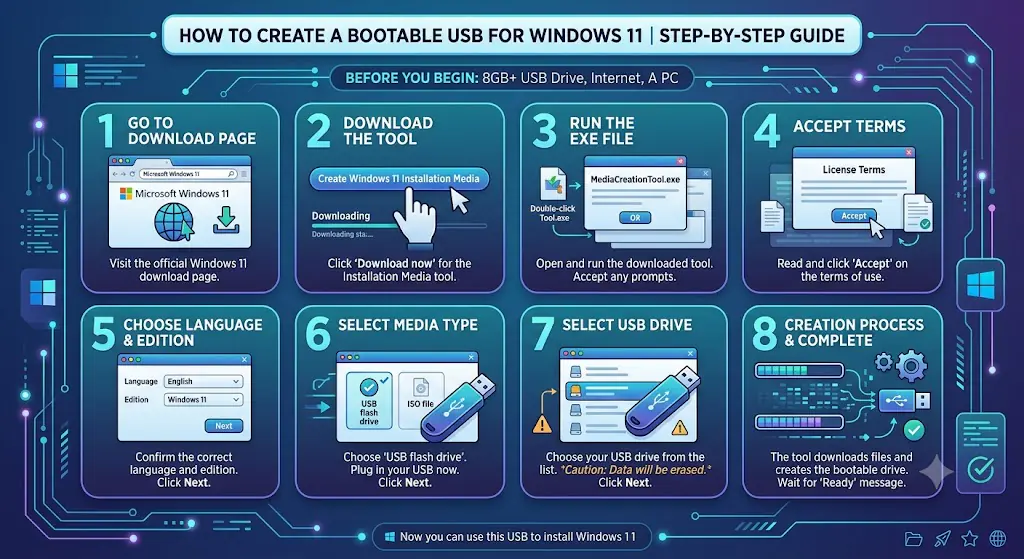
Go to Download Windows 11.
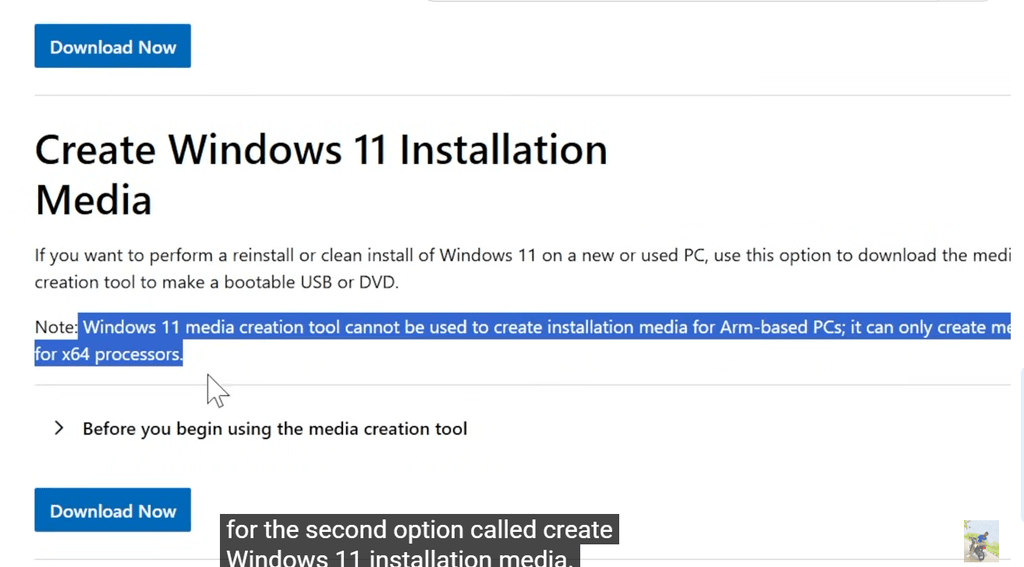
Scroll to the section headed Create Windows 11 Installation Media and select Download Now.
Step 2 — Check which release you are getting.
The page names the release the tool will fetch.
As of August 2026 it lists Windows 11 2025 Update, version 25H2.
Note that down, because it matters when you are building media to repair a specific machine.
Step 3 — Run the tool.
Launch MediaCreationTool.exe and accept the licence terms.
Wait while it prepares, which takes a minute or two.
Step 4 — Choose the language and edition.
Leave “Use the recommended options for this PC” ticked if you are building media for the machine you are sitting at.
Clear it if you need a different language or you are building for another PC.
Windows 11 is 64-bit only, so there is no architecture choice to make here.
Step 5 — Select USB flash drive.
Pick USB flash drive rather than ISO file, then click Next.
Choosing ISO instead gives you a file you can write with Rufus later, which is the route to take if you want the customisation options covered further down.
Step 6 — Select the correct drive.
Connect the stick if you have not already, refresh the list, and select it.
Confirm the drive letter and capacity before clicking Next, because this step is not reversible.
Step 7 — Wait for the download and write.
The tool downloads roughly 6 GB and then writes it to the stick.
On a USB 2 drive this can take the best part of an hour, which is the main reason I suggest a USB 3 stick.
Step 8 — Finish, then verify.
Click Finish, then open the drive in File Explorer.
You should see folders including boot, efi and sources, and inside sources an install.wim or install.esd file.
If those are there, the stick is built correctly.
The better route for control: build it with Rufus
Rufus does everything the Media Creation Tool does and then adds the options Microsoft leaves out.
Download the Windows 11 ISO first, either from Microsoft’s download page under Download Windows 11 Disk Image, or by choosing ISO file in the Media Creation Tool.
Then open Rufus, select your USB stick under Device, and choose the ISO under Boot selection.
Set the partition scheme to GPT for a UEFI machine, which covers essentially every PC made in the last decade.
Choose MBR only if the target boots in legacy BIOS mode.
Click Start, and Rufus presents a Windows User Experience dialog with options worth understanding:
- Remove requirement for 4GB+ RAM, Secure Boot and TPM 2.0. For installing on hardware that does not meet Microsoft’s requirements.
- Remove requirement for an online Microsoft account. Lets you finish setup with a local account.
- Create a local account with username. Seeds that account during setup.
- Skip privacy questions. Shortens the out-of-box experience.
- Disable BitLocker automatic device encryption. Stops Windows silently encrypting the drive on first boot.
One honest note on the hardware bypass.
Rufus does not patch Windows binaries to achieve this.
It changes registry settings inside the Windows preinstallation environment so the setup checks are skipped, which is why the resulting boot.wim can have a different hash from the one in the original ISO.
It also does not turn unsupported hardware into supported hardware.
The machine still lacks TPM 2.0, and Microsoft still classes it as unsupported.
The manual method, and the 4 GB trap that breaks it
You will find guides that tell you to format a USB stick as FAT32 and copy the contents of the ISO across.
That worked for years.
It fails on modern Windows 11 media, and here is exactly why.
FAT32 cannot store a single file larger than 4 GB.
The install.wim file inside a current Windows 11 ISO is bigger than that.
So the copy fails partway through, or completes with a missing file, and the stick either will not boot or throws an error during setup.
UEFI firmware traditionally boots from FAT32, which is why people reach for it in the first place.
There are two ways out.
Split the image. Format the stick as FAT32, copy everything except sources\install.wim, then split that file across smaller chunks:
dism /Split-Image /ImageFile:D:\sources\install.wim /SWMFile:E:\sources\install.swm /FileSize:3800
Replace D: with your mounted ISO and E: with the USB drive.
Windows Setup reads install.swm files natively, so nothing else changes.
Use NTFS instead. Format as NTFS and copy everything across.
Most modern firmware boots NTFS, but on some machines you will need to disable Secure Boot first.
This is precisely the work Rufus does for you automatically, which is the strongest argument for using it rather than doing this by hand.
Arm-based PCs need different media
This catches people out on Snapdragon and other Arm laptops, and almost no guide mentions it.
Microsoft states plainly that the Windows 11 media creation tool cannot be used to create installation media for Arm-based PCs, and creates media for x64 processors only.
If your target machine is Arm-based, download the Arm64 ISO from Microsoft’s separate Arm64 download page and write it with Rufus.
Building x64 media for an Arm laptop produces a stick that simply will not boot on it, and the error gives you no clue why.
Fix a Windows 11 bootable USB that will not boot
Work through these in order.
Use the one-time boot menu, not the BIOS boot order.
Restart and press the boot menu key for your brand, commonly F12, F11, F9 or Esc.
If two entries appear for the same USB device, pick the one labelled UEFI.
Check the partition scheme matches the firmware.
GPT media will not boot a machine running in legacy BIOS mode, and MBR media will not boot in pure UEFI mode.
Rebuild the stick with the correct scheme rather than fighting the firmware.
Disable Secure Boot temporarily if the stick uses NTFS.
Re-enable it after the install completes.
Try a USB 2 port.
Some older firmware cannot initialise USB 3 controllers before Windows loads, so a rear USB 2 port succeeds where a front USB 3 port fails.
Turn off Fast Boot in firmware.
Fast Boot skips USB enumeration on many machines, which makes the stick invisible at power-on.
If Setup starts but no drives are listed.
Your storage controller needs a driver, most often Intel RST on business laptops.
Download the driver on another PC, copy it to the same USB stick, and use Load driver on the disk selection screen.
If the stick was hand-copied, rebuild it.
Nine times out of ten this is the install.wim problem described above rather than anything wrong with the PC.
Statistics: what the numbers say about timing this job
These figures come from named sources only.
| Metric | Figure | Source and period |
|---|---|---|
| Windows 11 share of desktop Windows worldwide | 68.93% | StatCounter, July 2026 |
| Windows 10 share of desktop Windows worldwide | 29.83% | StatCounter, July 2026 |
| Minimum USB capacity for installation media | 8 GB | Microsoft Download Windows 11 page |
| Release offered by the Media Creation Tool | Windows 11 version 25H2 | Microsoft download page, checked August 2026 |
| Windows 11 24H2 end of updates, Home and Pro | 13 October 2026 | Microsoft Windows lifecycle |
| Windows 11 25H2 end of updates, Home and Pro | 12 October 2027 | Microsoft Windows lifecycle |
One caveat I always add.
StatCounter measures page views through tracking code on participating sites rather than installed devices, so treat the share figures as a trend.
The lifecycle dates are different, because those come straight from Microsoft and they are firm.
If you are still on 24H2 Home or Pro, build your media from a 25H2 source rather than an old 24H2 ISO you have lying around.
Real facts most guides get wrong
The tool’s version number is meaningless.
Microsoft refreshes what the Media Creation Tool downloads without changing the app’s own version in file properties.
The June 2026 refresh pulled KB5094126, producing build 26200.8655 media, and July media moved on again with the corresponding July cumulative update.
The only reliable way to know what you have is to inspect the resulting media.
Media Creation Tool media is x64 only.
Arm-based PCs need the separate Arm64 ISO, per Microsoft’s own note on the download page.
FAT32 cannot hold install.wim.
This is the real reason hand-copied sticks fail, not a corrupt download.
Rufus does not modify Windows binaries to bypass checks.
It adjusts registry settings in the preinstallation environment, which is why the boot.wim hash changes even though no Windows file has been patched.
The Media Creation Tool only ever offers the current release.
Once 25H2 shipped, the tool stopped offering 24H2 or 23H2, so version-specific repairs need an archived ISO instead.
Media built in mid-2026 drew community bug reports.
Users on the Eleven Forum reported that sticks built from the June 2026 tool did not reach the recovery options when selecting Repair your computer, instead rebooting to the installed OS.
Microsoft has not published a known issue matching this, so treat it as community reporting rather than confirmed, and test your media before you rely on it.
Practical examples from two real setups
A home desktop and a hand-made stick that would not boot.
The owner had formatted a 32 GB drive as FAT32 and dragged the ISO contents across, exactly as an older guide described.
The copy stopped on install.wim because the file exceeded FAT32’s 4 GB limit, and the stick booted to a black screen.
Rebuilding it in Rufus with GPT took eight minutes and worked first time.
A twelve-desk office standardising its installs.
Building each machine by hand meant twelve rounds of Microsoft account prompts and privacy questions.
They built one Rufus stick with the local account option and the privacy prompts skipped, then documented the ISO build number alongside it.
Rebuild time per machine dropped by roughly twenty minutes, and every desk came out configured identically.
Best practices
- Use a dedicated USB stick for installation media and keep nothing else on it.
- Buy USB 3 rather than USB 2, because the write time difference is substantial.
- Write the Windows version and build number on the stick with a marker.
- Rebuild the media after each feature update, so you are not installing a year-old build and then patching for two hours.
- Boot the stick once after creating it, to confirm it works before you need it in an emergency.
- Keep the ISO file as well as the stick, so you can rebuild without downloading 6 GB again.
- Re-enable Secure Boot after any install that required disabling it.
Common mistakes
- Formatting as FAT32 and copying files by hand. The
install.wimfile will not fit. - Building x64 media for an Arm-based laptop. It will not boot, and the failure gives no useful error.
- Choosing MBR on a UEFI machine or GPT on a legacy BIOS machine. Match the scheme to the firmware.
- Assuming the Media Creation Tool gives you the newest build. It gives you the current feature release, refreshed monthly and silently.
- Starting an install without the BitLocker recovery key. A boot configuration change can trigger a prompt you cannot answer.
- Using the same stick for a recovery drive and installation media. They are different things and each wants the whole drive.
- Downloading Rufus or an ISO from a mirror site. Use Microsoft’s page and the Rufus project’s own release.
Recommended tools
- Media Creation Tool. Microsoft’s official utility, and the right default for most people.
- Windows 11 ISO from Microsoft’s download page. Needed for Rufus, virtual machines, or archiving a specific release.
- Rufus. Free, fast, and the only practical way to get local accounts, skipped prompts and hardware bypasses.
- DISM. Built into Windows, and the way to split
install.wimwhen you must use FAT32. - Ventoy. Worth knowing if you carry several ISOs, since it boots them from one stick without rewriting it.
- A USB 3 flash drive, 16 GB or larger. The cheapest performance upgrade in this entire process.
Bootable media planning for office users and IT
For a fleet, treat installation media as a controlled artefact rather than something a technician improvises.
Keep one archived ISO per feature release, so version-specific repairs remain possible after Microsoft stops offering that release through the tool.
Build one Rufus stick per configuration you actually deploy, with the same options every time, and record the ISO build number against it.
Store storage-controller drivers alongside the media, because a laptop that shows no drives during Setup will otherwise stop the job dead.
Refresh the whole set after each feature update, and retire the old sticks rather than leaving them in a drawer to confuse someone next year.
And separate this from your recovery planning.
Installation media reinstalls Windows on any compatible PC, while a recovery drive is tied to the machine that made it.
A complete plan has both.
Questions and answers
How big does the USB drive need to be?
Microsoft’s download page specifies at least 8 GB.
Use 16 GB in practice, because it leaves room for storage drivers and avoids the tight fit entirely.
Do I need a product key?
Not to create the media, and not during setup on a machine that already has a digital licence.
Choose “I don’t have a product key” and Windows activates once it is online.
Can I use the Media Creation Tool for an Arm laptop?
No.
Microsoft states the tool creates media for x64 processors only, so Arm-based PCs need the separate Arm64 ISO.
Why did my hand-copied USB fail to boot?
Almost certainly the install.wim file exceeded FAT32’s 4 GB limit.
Split it with DISM or rebuild the stick with Rufus.
Is Rufus safe to use?
It is a long-established open-source tool, and downloading it from the project’s own release page avoids the bundled installers that mirror sites attach.
The hardware bypass it offers is a separate question, since it leaves you running Windows 11 on hardware Microsoft classes as unsupported.
Can I use the same USB stick as a recovery drive?
No.
Both tools take the entire drive, and the two serve different purposes, so use separate sticks.
Which build will my media contain?
Whatever the tool currently downloads, which changes monthly while the tool’s own version number stays the same.
Check Microsoft’s download page for the release name, then verify the build after creating the media.
Conclusion
Creating a bootable USB for Windows 11 is a twenty-minute job that saves you an entire afternoon later.
For most people, the Media Creation Tool is the answer: plug in a 16 GB stick, run it, choose USB flash drive, wait.
If you want a local account, fewer setup prompts, or you are installing on older hardware, download the ISO and build it with Rufus instead.
If you are a home user, make one this week and boot it once to be sure.
A stick you have tested is worth ten you assume will work.
If you manage machines at work, standardise on one Rufus configuration, archive the ISO for each release, and store the storage drivers alongside it.
And whatever you do, stop formatting sticks as FAT32 and dragging files across.
That method died the day install.wim outgrew 4 GB, and it is still the single most common reason a Windows 11 USB refuses to boot.
ENJOYING OUR CONTENT?
Stay up to date with our latest guides, insights, and news. Tap below to follow us directly via your search feed.
