
Last Updated:
Key Takeaways (Error INACCESSIBLE_BOOT_DEVICE Windows 11 )
- Your data is probably fine. This error affects how Windows boots, not the files on your drive. Repeated repair attempts and resets are what actually risk data loss — which is why the fix order below matters.
- Recent changes cause most cases. A Windows update, a new driver, a cloned drive, or a BIOS storage-mode change. If something changed just before the blue screen, that is your suspect.
- Try the safe fixes first, in order. Force-restarting into Automatic Repair fixes a surprising number of cases with zero risk. Save BCD rebuilds and registry edits for last.
Quick answer: To resolve INACCESSIBLE_BOOT_DEVICE on Windows 11, force-shut down twice to trigger Automatic Repair, then unplug all USB devices. If it persists, boot into WinRE, uninstall the latest quality update, run Startup Repair, then check your BIOS storage mode (AHCI vs. RAID). Rebuild the BCD only if those fail.
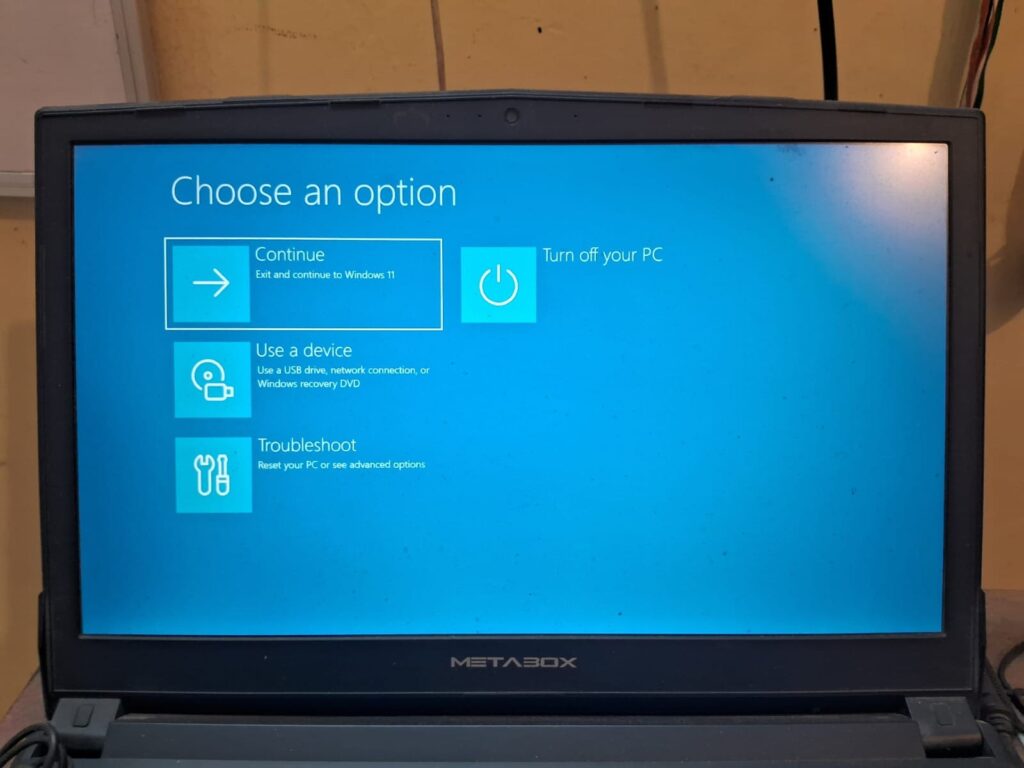
This guide targets Windows 11, but the underlying repair logic is nearly identical on Windows 10. If you’re still running Windows 7 or 8/8.1, see the legacy method further down—the tools differ, but the troubleshooting order still applies.
Introduction
Your PC will not start. Instead you get a blue screen, a sad face, and the words INACCESSIBLE_BOOT_DEVICE. It restarts, tries again, and lands in the same place. You are reading this on your phone.
Take a breath. This looks like the worst kind of failure, but it rarely is. INACCESSIBLE_BOOT_DEVICE on Windows 11 means Windows lost contact with the drive holding its system files. Think of Windows standing at a locked door with the wrong key — the room is intact, the key is the problem.
Your files are almost certainly still there. What matters now is which order you try things in, because some fixes are harmless and others can make recovery harder.
This guide walks the safe path first. You will learn what caused it, the ten fixes that work, and when to stop and protect your data instead. Home users and office users can follow every step.
What Does INACCESSIBLE_BOOT_DEVICE Windows 11 Mean?
INACCESSIBLE_BOOT_DEVICE (stop code 0x0000007B) means Windows lost access to the system partition during startup. The drive itself is usually fine — Windows cannot communicate with it because of a storage driver problem, a BIOS mode change, a corrupt boot configuration, or a recent update. Files on the drive are typically unaffected.
Microsoft classifies the issue as bug check 0x7B. You will see it written as 0x7B, 0x0000007B, or Stop error 7B”—all the same thing.
Do not confuse it with 0xc000007b. That code has a “c” in it and is an entirely different, unrelated application error. If Windows is running and only one app fails, you are on the wrong guide.
What Causes It on Windows 11
Almost every case traces back to something that changed. The usual suspects:
- A Windows update. The most common trigger in 2026. Microsoft confirmed the January 2026 Security Update (KB5074109) caused boot failures on 25H2 and 24H2 and that two emergency patches did not resolve it.
- Storage driver problems. Missing, corrupt, or incompatible drivers for your disk controller.
- BIOS/UEFI storage mode changed. Switching between AHCI, RAID, and IDE after Windows is installed. One Microsoft support engineer called verifying the SATA controller mode the most likely solution.
- Cloned or migrated drives. Cloning to a new NVMe SSD or restoring an image to different hardware is a classic trigger—the new controller’s driver is disabled by default.
- Corrupted BCD (Boot Configuration Data) or a damaged system partition.
- Loose or failing hardware. This could be due to a disconnected SATA cable or a failing drive.
- A recently installed driver. One user traced their blue screen to a touchpad driver installed the previous day.
A real example worth knowing: one user hit the error on a one-hour-old Windows installation immediately after restarting to install updates. This is a brand new PC with a brand new Windows installation, and it is still showing the same error. It is not a sign your hardware is dying.
Before You Start: Protect Your Data First
This step is the part most guides skip, and it matters more than any single fix.
Your data is probably safe right now. This error affects booting, not the files themselves. But repeated repair attempts and system resets increase the risk of data loss. Every aggressive fix you try adds some risk.
So work in this order:
- Try the harmless fixes first (Steps 1–4 below). Most people never need to go further.
- If those fail and you have irreplaceable files, recover them before attempting BCD rebuilds, resets, or reinstalls. You can pull files off the drive using recovery media, a Linux live USB, or by connecting the drive to another PC.
- Only then try the advanced fixes.
One critical warning about BitLocker. If your drive is encrypted, you need your BitLocker recovery key before doing anything in the Recovery Environment — it is tied to your Microsoft account at account.microsoft.com/devices/recoverykey. Without it, some repairs will lock you out permanently. Get it on your phone now, before you begin.
How to Fix INACCESSIBLE_BOOT_DEVICE on Windows 11
Work through these in order. The first four carry essentially no risk.
Step 1: Force Automatic Repair (Start Here)
Genuinely the first thing to try, and it fixes more cases than you would expect.
Hold the power button until the PC switches off. Power it back on. When you see the Windows logo or the blue screen, force it off again. Repeat two or three times.
Windows detects the repeated failures and launches Automatic Repair on its own. One user with a one-hour-old installation reported that this method alone fixed it—no command line, no recovery tools, nothing manual.
Let it run. It can take a while.
Step 2: Unplug Every External Device
It is cheap, instant, and sometimes the whole answer.
Disconnect USB drives, external hard disks, printers, docking stations, and card readers—everything except your keyboard and mouse. Restart.
A stray USB drive can confuse the boot order enough to trigger this error.
Step 3: Uninstall the Latest Windows Update
If the blue screen appeared immediately after an update, this procedure is your fix—and it is the step that most guides overlook.
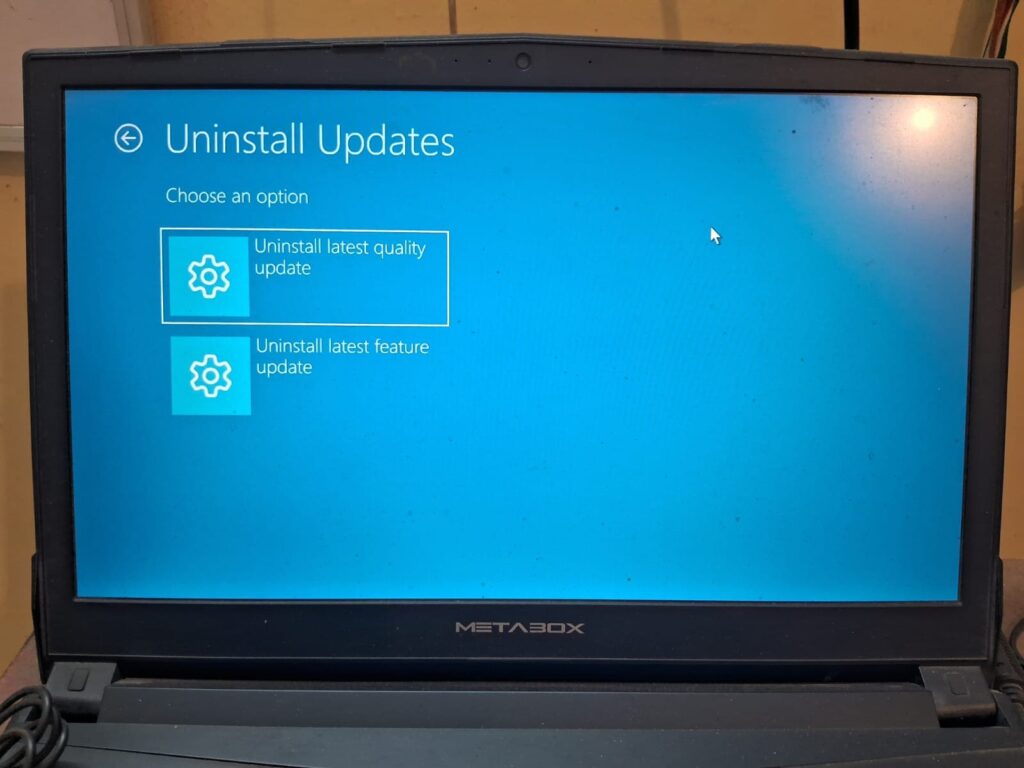
From the Recovery Environment: Troubleshoot → Advanced options → Uninstall Updates → Uninstall latest quality update.
Microsoft’s own guidance for affected users in 2026 was exactly this: manually uninstall the offending update from WinRE, because you cannot reach the desktop to do it normally.
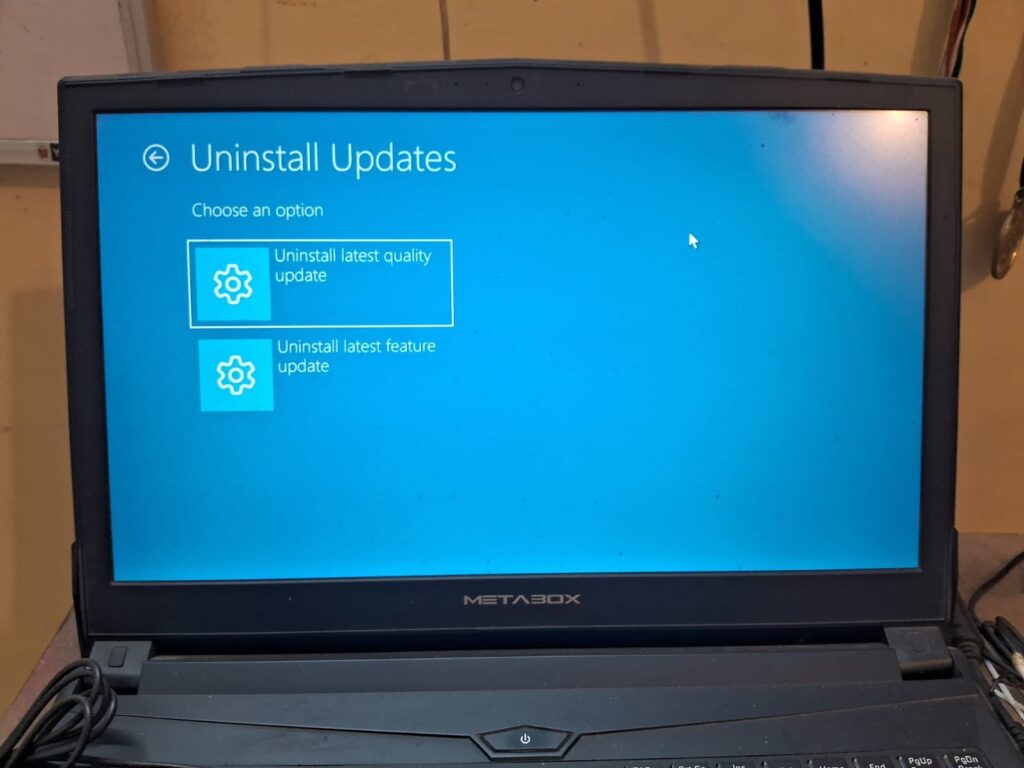
If you reach WinRE another way (see below), the path is the same.
Step 4: Run Startup Repair
Microsoft’s standard recommendation for this error.
In the Recovery Environment: Troubleshoot → Advanced options → Startup repair.
It scans for boot problems and fixes them automatically. Low risk, reasonable success rate.
Step 5: Boot into Safe Mode
Safe Mode loads only essential drivers, which tells you whether a driver is the culprit.
Troubleshoot → Advanced options → Startup Settings → Restart, then press the number for Enable Safe Mode.
If Windows boots in Safe Mode, a recently installed driver or program is almost certainly to blame. Uninstall whatever you added most recently, then restart normally.
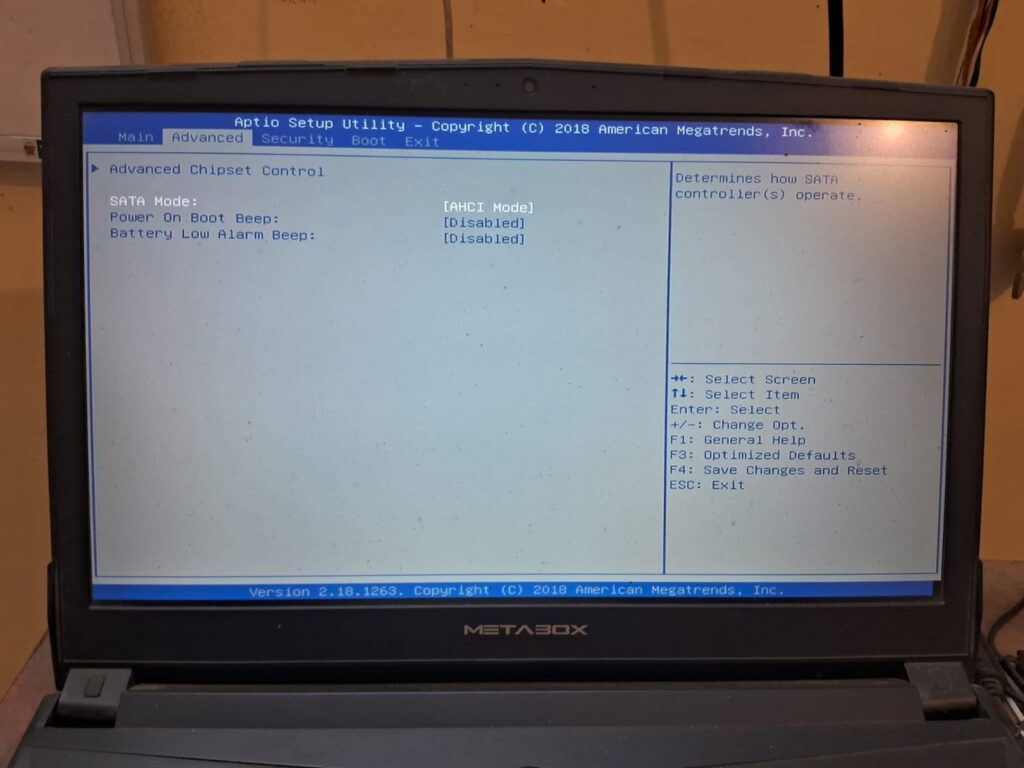
Step 6: Check Your BIOS/UEFI Storage Mode
Restart and press the BIOS key during startup—usually Del, F2, F10, or F12, depending on your manufacturer.
Find the SATA or storage configuration and check whether it is set to AHCI, RAID, or IDE. If someone changed it — or a BIOS update reset it — switch it back.
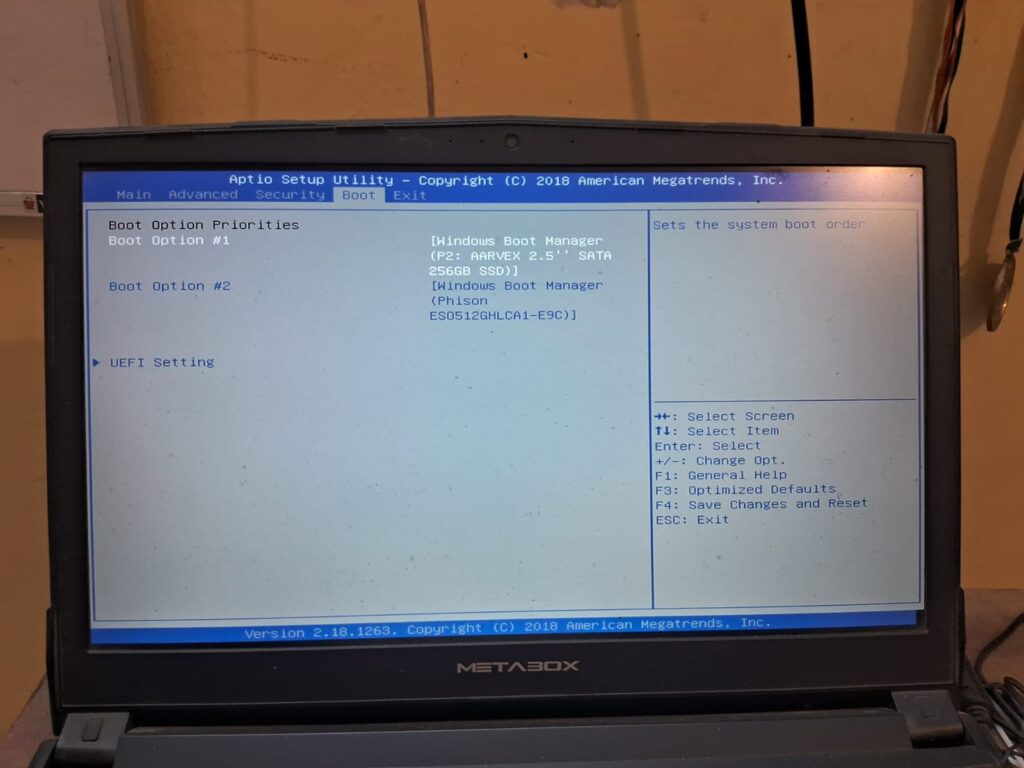
This matters enormously on cloned drives and migrated systems. When you move Windows to a machine with a different disk controller, the required driver’s service is often disabled by default, so Windows cannot load the controller and stops at boot.
Step 7: Run CHKDSK from the Recovery Environment
Troubleshoot → Advanced options → Command Prompt, then:
chkdsk /f /r C:Replace C: with your actual Windows drive letter if it differs in WinRE (it often does—use itlist vol to check).
This repairs file system errors and recovers readable data from bad sectors.
Step 8: Run SFC and DISM Offline
Still in Command Prompt:
sfc /scannow /offbootdir=C:\ /offwindir=C:\WindowsThen:
DISM /Image:C:\ /Cleanup-Image /RestoreHealthAgain, adjust the drive letter to match your system.
Step 9: Rebuild the BCD
This step is where risk starts. Only proceed if Steps 1–8 failed and your data is backed up.
In Command Prompt:
bootrec /fixmbr
bootrec /fixboot
bootrec /scanos
bootrec /rebuildbcd
A known problem: bootrec /rebuildbcd sometimes reports “no Windows installations” even when Windows is clearly present. Microsoft says this is a recognized issue in the recovery environment and has been addressed in a recent cumulative update—so do not panic if you see it.
Tom’s Hardware notes that imaging tools like Macrium Reflect includes automated boot-repair utilities that rebuild a clean BCD matching your actual disk configuration and recommends trying those before manual approaches. That is sensible advice if you have such a tool on rescue media.
Step 10: Repair Install (In-Place Upgrade)
A repair install is the last resort before a clean install, and it keeps your files.
The catch nobody mentions: you cannot run a repair install from the recovery environment. You can only perform an in-place upgrade while Windows is booted. If you can reach Safe Mode (Step 5), mount a Windows 11 ISO and run setup.exe from there, keeping everything.
If you cannot boot at all, a repair install is not available to you — which is exactly why Steps 1–9 matter.
When to Stop and Get Help
Some situations call for a professional rather than another command:
- Your drive is not detected in BIOS at all. That points to hardware, not software.
diskpartcannot see the disk even though BIOS can—one user hit exactly this point after reseating an SSD.- You are in a BitLocker loop without your recovery key.
- Every WinRE option returns you to the same boot loop. Documented on Microsoft Q&A, and further attempts risk worsening it.
- The data matters more than the PC. Please prioritize retrieving the files first.
There is no reason to feel bad about stopping. A recovery shop can pull data off a drive that will not boot; a botched BCD rebuild can make that harder.
Best Practices to Prevent It
- Keep an image backup with bootable rescue media. This process turns a catastrophe into a twenty-minute restore.
- Save your BitLocker recovery key somewhere outside the PC. Print it.
- Pause updates for a few days after Patch Tuesday if your PC is critical. The 2026 boot failures hit early adopters.
- Note your BIOS storage mode before changing anything or updating firmware.
- Create a restore point before installing storage drivers.
Common Mistakes to Avoid
- Jumping straight to Reset This PC. It is destructive, and Steps 1–4 often work.
- Repeatedly retrying repairs. Each attempt adds risk — the error mainly affects booting, but repeated repair attempts and resets can cause real data loss.
- Confusing this error with 0xc000007b. Different error, entirely different fixes.
- Starting BitLocker-encrypted repairs without the key. You can lock yourself out permanently.
- Assuming the drive is dead. It happens on hour-old installations. Software first, hardware last.
- Clean install to “fix” it. You lose everything, and the BIOS mode may still be wrong.
For Windows 7/8 Users (Legacy Method)
If you’re seeing a similar inaccessible-boot or 0xc0000034-style error on Windows 7 or Windows 8/8.1, the core cause is the same — Windows lost its path to the boot files — but your recovery environment and tools look different.
Reach WinRE differently. Windows 7/8 don’t force Automatic Repair the way Windows 11 does after repeated failures as reliably. Boot from your original installation DVD or a recovery USB, then choose Repair your computer to reach the same Command Prompt environment.
The bootrec sequence still applies, with one addition readers have confirmed works when the standard commands fail:
bootrec /fixmbr
bootrec /fixboot
bootrec /rebuildbcd
If rebuildbcd reports it can’t find any Windows installations, or Command Prompt returns “the requested system device cannot be found,” try bootrec /scanos first, then rerun /rebuildbcd — this sequence has resolved the issue for readers who hit that specific error message.
Dual-boot and triple-boot setups need extra care. If you’re running Windows alongside another OS (Linux, an older Windows version), a broken BCD is often the result of one installer overwriting the other’s boot files. Tools like EasyBCD can rebuild a working boot menu without wiping either OS — this is the same fix a reader used after accidentally corrupting their BCD through EasyBCD’s own “Install BCD” option, so treat that particular menu item with caution if you’re using the tool for repairs.
Your files are still safe, same as on Windows 11 — these commands rebuild the boot configuration, not your data. The recovery sequence doesn’t reformat or touch your files unless you deliberately choose a reset option.
One honest note for 2026: both Windows 7 and Windows 8/8.1 are years past end of support, with no security updates and — unlike some Windows Server versions — no paid Extended Security Updates option available for consumers. If your PC is capable, this is a reasonable moment to move to Windows 10 or 11 rather than keep repairing an unsupported system, especially if it connects to the internet.
Recommended Tools
- Windows Recovery Environment (WinRE) — built in; your main workspace.
- Windows 11 installation USB — made on another PC via the Media Creation Tool; gives you WinRE when the local one fails.
- Macrium Reflect (or AOMEI Backupper, EaseUS Todo) — image backups plus automated boot repair.
- A Linux live USB — a free, read-only way to copy files off before risky fixes.
What is the fastest fix for INACCESSIBLE_BOOT_DEVICE on Windows 11?
Force-shut down the PC during the blue screen two or three times. Windows detects repeated boot failures and launches Automatic Repair itself. One user with a fresh Windows 11 install reported that this method alone fixed the error without any command line work. Try it before anything else.
Can a Windows update cause INACCESSIBLE_BOOT_DEVICE?
Yes. Microsoft confirmed the January 2026 Security Update (KB5074109) triggered boot failures on Windows 11 versions 25H2 and 24H2, with two emergency patches failing to resolve it. If your blue screen started right after an update, uninstall the latest quality update from the Recovery Environment.
Is INACCESSIBLE_BOOT_DEVICE the same as 0xc000007b?
No, they are unrelated. INACCESSIBLE_BOOT_DEVICE is stop code 0x0000007B — a blue screen error where Windows cannot reach the system partition. 0xc000007b has a “c” in it and is an application error caused by a faulty DLL, appearing while Windows runs normally.
Does BIOS mode cause INACCESSIBLE_BOOT_DEVICE?
Frequently. Switching between AHCI, RAID, and IDE after Windows is installed stops Windows loading the correct storage driver. A Microsoft support engineer identified verifying the SATA controller mode as the most likely solution. Verify if your BIOS storage setting matches what Windows was installed with.
Why does bootrec /rebuildbcd say no Windows installations were found?
This is a known issue in the Windows Recovery Environment, and Microsoft has addressed it in a recent cumulative update. The message can appear even when Windows is clearly present on the drive. Try bootrec /scanos first, or use an imaging tool’s automated boot repair utility instead.
Can I do a repair install if my PC won’t boot?
Not directly. A repair install requires Windows to be running — you cannot perform an in-place upgrade from the Recovery Environment. If you can reach Safe Mode, mount a Windows 11 ISO and run setup.exe from there. If that doesn’t work, please try the WinRE fixes first.
Legacy Comments
Author: Ilo
Comment: “Thank you so much for taking time to post this article. It helped me a lot, since I broke the BCD with an application called EasyBCD and couldn’t load into the OS by trying many different manipulations with the Installation DVDs, Windows Live CDs, Linux Live CDs, and lots of other utilities.”
Reply (Palla Sridhar): “Thanks for your comment. To my knowledge, BCD backup is available in the same EasyBCD tool, on the main interface. Were you able to solve the above problem? Please share your experience for other readers.”
Follow-up (Ilo): “Yes, I definitely solved the problem. It happened because I accidentally applied the ‘Install BCD’ option to my C: partition from the BCD Deployment section of EasyBCD — that option is only meant for external USB drives, and using it on the main drive broke the BCD.”
Author: Duncan
Comment: “Will this method keep all of my files or will it format my drive and lose all my work?”
Reply (Palla Sridhar): “This will keep your files and the OS.”
Author: Marc
Comment: “Thanks for the tutorial, but when I get to the import command I get a ‘The requested system device cannot be found’ error. Can’t wrap my head around this one.”
Reply (Palla Sridhar): “Make sure you’re running these commands on the actual Windows installation/boot drive — generally C:, but in some cases it can show up as D:, E:, etc. depending on how the recovery environment assigned it.”
Author: Dusan
Comment: “One question, if I may — is this method/commands applicable on Windows 10? If not, would you be able to note the differences?”
Reply (Palla Sridhar): “The boot loader logic in Windows 10 (and 11) isn’t fundamentally different from Windows 8 — the bootrec commands still apply the same way. The recovery environment is just reached differently on newer builds.”
Conclusion
INACCESSIBLE_BOOT_DEVICE on Windows 11 looks like the end of your PC. It almost never is. Windows has simply lost the key to a room that is still perfectly intact.
Start with the harmless fixes: force Automatic Repair, unplug your USB devices, uninstall the last update, and run Startup Repair. That sequence resolves most cases, and none of it puts your files at risk.
If it persists, check Safe Mode and your BIOS storage mode before touching the BCD. And if the data matters more than the machine, stop and rescue the files first—a boot failure is recoverable, and a botched repair sometimes is not.
The one habit worth building afterwards: keep an image backup with bootable rescue media. It turns this entire article into a twenty-minute story next time.
Work through the list in order, and let us know in the comments which step got you booting again—it helps the next reader start in the right place.
ENJOYING OUR CONTENT?
Stay up to date with our latest guides, insights, and news. Tap below to follow us directly via your search feed.
