
Key takeaways
- A recovery drive holds the Windows Recovery Environment and, optionally, the system files needed to reinstall Windows. It is not a backup of your documents.
- Run
recoverydrive.exeor open Control Panel > Recovery > Create a recovery drive. You need administrator rights. - Leave Back up system files to the recovery drive ticked. Without it, the Recover from a drive option is missing when you boot from the stick.
- Buy a 64 GB USB stick, not a 32 GB one. A “32 GB” drive usually shows around 28.8 GB usable, and the wizard greys out Next.
- If creation fails with a missing-files message, check
reagentc /infofirst. A disabled Windows Recovery Environment is the usual cause. - Microsoft advises recreating recovery media roughly once a year, and after every feature update.
Quick answer
To create a recovery drive in Windows 11, plug in an empty USB flash drive of 32 GB or larger, press Windows + R, type recoverydrive.exe and press Enter.
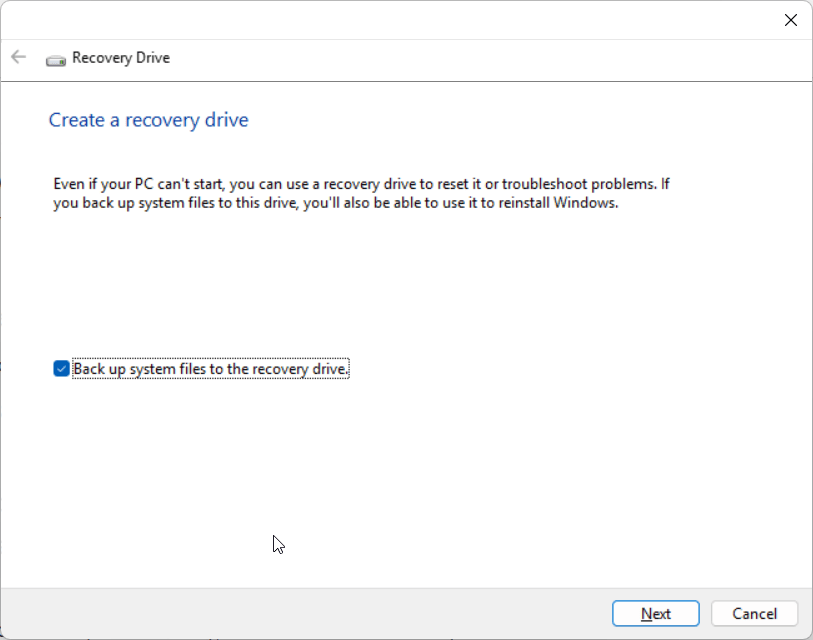
Leave Back up system files to the recovery drive ticked, select your USB drive, then choose Create.
The drive is erased and the process usually takes 20 to 60 minutes depending on how much OEM recovery content your PC carries.
Introduction
Every machine I have rescued over the years falls into one of two groups.
The ones where the owner had recovery media ready, and the ones where they did not.
The first group is back at work in an hour, and the second group is hunting for a spare PC to build a USB stick on while their own laptop sits at a blue recovery screen.
Making a recovery drive takes about half an hour and costs the price of a USB stick.
It is the single cheapest insurance policy in computing, and almost nobody does it until after something breaks.
This guide shows you exactly how to create a recovery drive in Windows 11, what size USB you really need rather than what the wizard claims, how to fix the creation errors that stop most people, and how the recovery picture changed in 2026 with quick machine recovery.
It is written for home users with one laptop and for office users looking after a room full of them.
What a recovery drive actually is, and what it is not
A recovery drive is a bootable USB stick containing the Windows Recovery Environment, known as WinRE.
That environment gives you Startup Repair, System Restore, Command Prompt, uninstall of a bad update, and firmware settings.
If you tick the system files option, the drive also carries the files needed to reinstall Windows on that PC.
Here is the distinction that trips people up.
A recovery drive does not back up your documents, photos or installed applications.
It restores Windows, not your data.
| Media type | What it does | When you need it |
|---|---|---|
| Recovery drive | Boots WinRE, can reinstall Windows on that PC using its own files | PC will not boot, or you need to reset a machine with no working desktop |
| Installation media | Generic Windows 11 installer built with the Media Creation Tool | Any PC, clean installs, replacing a failed drive |
| System image | Full snapshot of the drive including apps and settings | Rolling a machine back to a known-good state |
| File backup | Copies of your documents, usually to OneDrive or an external drive | Recovering individual files |
You want at least two of these.
A recovery drive plus a file backup covers most home situations, and an office should add a system image.
Before you start: what you need
Get these four things in place first and the process runs without drama.
- An empty USB flash drive, 64 GB if you can. Everything on it is erased. More on the size trap below.
- Administrator rights. The Recovery Drive tool will not run from a standard account.
- Mains power. A laptop that sleeps or dies mid-write leaves you with an unbootable stick.
- Time. Budget 20 to 60 minutes. OEM recovery content on Dell, HP, Lenovo and ASUS machines pushes it to the long end.
One more thing worth doing before you touch the wizard.
If your drive is encrypted with BitLocker, find your recovery key now and save it somewhere off the machine.
It lives at account.microsoft.com/devices/recoverykey when it is tied to a Microsoft account.
Without that key, some recovery paths will lock you out permanently, and that is a far worse day than the one you were trying to prevent.
Step-by-step guide: create a recovery drive in Windows 11
Work through these in order.
Do not plug the USB stick in until the wizard asks for it, because the tool sometimes latches onto the wrong device if several are connected.
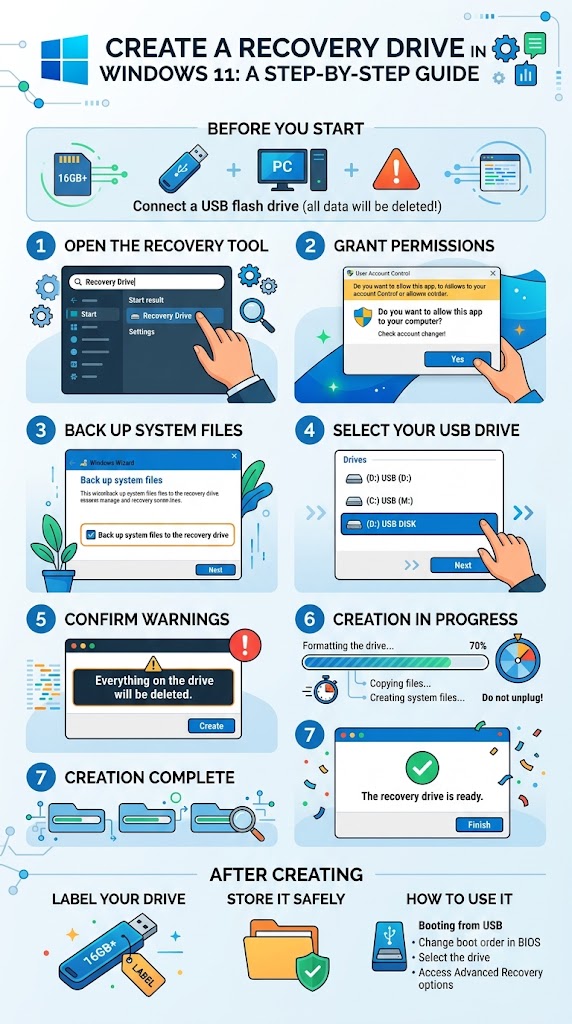
Step 1 — Open the Recovery Drive tool.
Press Windows + R, type recoverydrive.exe and press Enter.
You can also open Control Panel in icons view, click Recovery, then click Create a recovery drive.
Accept the User Account Control prompt when it appears.
Step 2 — Tick the system files option.
Leave Back up system files to the recovery drive selected, then click Next.
This is the setting that matters most.
With it ticked, the finished drive offers Recover from a drive, which reinstalls Windows on that PC.
Without it, you get the WinRE repair tools only, and the reinstall option is simply absent when you need it.
Step 3 — Wait while Windows scans.
The wizard now works out how much space it needs.
This step can sit still for several minutes on a machine with a lot of manufacturer recovery content, which is normal.
Step 4 — Connect and select the USB drive.
Plug the stick into a port on the PC itself rather than a hub or dock.
Select it from the list and click Next.
If it does not appear, skip ahead to the troubleshooting section below.
Step 5 — Confirm the erase and create.
Windows warns that everything on the drive will be deleted.
Click Create.
You do not need to format the stick as FAT32 beforehand, because the tool partitions and formats it itself.
Step 6 — Leave it alone.
Do not unplug anything, do not let the machine sleep, and do not run a heavy backup at the same time.
The progress bar pauses for long stretches while it copies the recovery image, which is normal rather than a hang.
Step 7 — Finish and label it.
Click Finish when the drive is ready.
Write the PC model and the date on the stick with a marker.
A year from now you will not remember which laptop it came from, and recovery drives are largely device-specific.
Step 8 — Test it before you need it.
Restart the PC and press the boot menu key, usually F12, F9, Esc or F2 depending on the manufacturer.
Select the USB device and confirm that the blue recovery screen appears with Troubleshoot options.
Then exit and boot back into Windows.
A recovery drive you have never booted is a guess, not a plan.
How big does the USB really need to be? The 32 GB trap
This is where most people get stuck, and almost no guide explains it properly.
The wizard tells you it needs a drive of at least 32 GB.
So you buy a 32 GB stick, plug it in, and the Next button stays greyed out.
The reason is that a “32 GB” flash drive is not 32 GB of usable space.
Manufacturers count in decimal gigabytes while Windows counts in binary, so a 32 GB stick typically formats to around 28.8 GB, and a 16 GB stick to about 14.7 GB.
Users have raised exactly this on Microsoft’s own community forums, showing the drive rejected because the real capacity sits just under the stated requirement.
Two practical rules follow.
Buy one size up from whatever the wizard asks for.
If it asks for 32 GB, use a 64 GB drive and stop fighting it.
Microsoft does not publish a single universal capacity for this tool, because the requirement depends on your Windows build, drivers, updates and the manufacturer’s recovery content.
That is why two laptops bought the same week can demand different sizes.
Fix “We can’t create the recovery drive on this PC”
If creation fails, the message usually points at missing files.
Work through these checks in order.
Check whether WinRE is actually enabled.
Open Terminal as administrator and run:
reagentc /info
Look at the Windows RE status line.
If it says Disabled, or the Windows RE location is blank, that is your cause.
Enable it.
reagentc /enable
If that returns success and reagentc /info now shows Enabled with a valid location, retry the recovery drive wizard.
If the WinRE image is missing.
The environment lives in a file called winre.wim under C:\Windows\System32\Recovery.
Cloning a system to a new drive is the classic way to lose it, because the recovery partition often does not survive the clone.
You can restore the file from Windows 11 installation media by mounting install.wim and copying winre.wim across, then pointing Windows at it:
reagentc /setreimage /path C:\Windows\System32\Recovery
reagentc /enable
Back up your data before doing this.
You are editing boot-critical configuration, and a mistake here turns a recovery inconvenience into a boot failure.
If reagentc reports it cannot update Boot Configuration Data.
This usually means the tool cannot work out which partition holds the boot files, most often on machines with more than one system partition after a disk clone or a manual conversion to GPT.
Community threads on Microsoft Q&A resolve this by deleting the stale ReAgent.xml and ReAgent_merged.xml files from C:\Windows\System32\Recovery and running reagentc /enable again, which writes a fresh configuration.
If the USB drive is not listed at all.
Open Disk Management, delete every partition on the stick so it shows as a single block of unallocated space, then create one simple volume.
Try a different port directly on the PC, and unplug every other USB storage device while the tool runs.
If nothing works, build installation media instead.
Download the Media Creation Tool from Microsoft and create a bootable Windows 11 USB.
It is not identical to a recovery drive, since it does not carry your PC’s own drivers or OEM content, but it boots the same repair environment and can reinstall Windows.
For a machine that refuses to produce a recovery drive, it is a perfectly good fallback.
What changed in 2026: quick machine recovery and point-in-time restore
Windows recovery stopped being purely local this year, and it is worth knowing what your PC can now do on its own.
Quick machine recovery.
This detects repeated boot failures, drops into WinRE, connects to a network, and looks to Windows Update for a fix that it then applies automatically.
Microsoft has it generally available on Windows 11 version 24H2 and later, enabled by default on Home editions.
Recent builds turn it on automatically for Professional devices that are not domain joined, and the experience was streamlined so it runs a single scan and then points you at the right recovery option rather than looping.
On managed Pro and Enterprise fleets, IT enables it by policy.
Point-in-time restore.
Available from Windows 11 version 25H2, this rolls a machine back to an earlier state including local user files.
That breadth is also the catch.
Anything created after the restore point is lost, including files, settings, passwords and certificates, so it is a bigger hammer than System Restore rather than a gentler one.
Neither feature replaces a recovery drive.
Quick machine recovery needs the machine to reach WinRE and find a network.
When the recovery partition itself is damaged, or the drive has been replaced, the USB stick in your desk drawer is still the only thing that gets you back.
How to use the recovery drive when the PC will not boot
Keep this short and follow it exactly.
Insert the recovery drive, then power the machine on and press the boot menu key for your brand.
Select the USB device from the list.
Choose your keyboard layout when prompted, then pick Troubleshoot.
From there you get Startup Repair for boot problems, System Restore if you have restore points, and Recover from a drive if you ticked the system files box when you made the stick.
Recover from a drive reinstalls Windows and removes your applications, so treat it as the last option rather than the first.
If BitLocker is active, you will be asked for the recovery key before any of this proceeds.
Statistics: the numbers behind recovery planning
Recovery is a maintenance job, and maintenance jobs get scheduled when you can see the deadlines.
These figures come from named sources only.
| Metric | Figure | Source and period |
|---|---|---|
| Windows 11 share of desktop Windows worldwide | 68.93% | StatCounter, July 2026 |
| Windows 10 share of desktop Windows worldwide | 29.83% | StatCounter, July 2026 |
| Windows 11 24H2 end of updates, Home and Pro | 13 October 2026 | Microsoft Windows lifecycle |
| Windows 11 25H2 end of updates, Home and Pro | 12 October 2027 | Microsoft Windows lifecycle |
| Quick machine recovery availability | Generally available on 24H2 and later, default on Home | Microsoft Windows IT Pro Blog, 2026 |
| Recommended recovery media refresh | About once a year | Microsoft support guidance |
One caveat I always add.
StatCounter measures page views through tracking code on participating sites, not installed devices, and its monthly figures move as panels shift.
Treat the share numbers as a trend, and the lifecycle dates as hard deadlines, because those come straight from Microsoft.
The practical point for readers on 24H2 Home or Pro is simple.
Move to 25H2 before October, then make a fresh recovery drive on the new build.
Real facts most guides get wrong
A recovery drive is not a backup.
It restores Windows and nothing else, so pair it with OneDrive or an external drive for your files.
The system files checkbox decides everything.
Skip it and the Recover from a drive option will not exist when you boot the stick, which people discover at the worst possible moment.
A 32 GB stick is not 32 GB.
Usable capacity lands near 28.8 GB, which is why the wizard rejects it.
Recovery drives are largely device-specific.
One made on a Dell will not carry a Lenovo’s drivers or OEM recovery content, so make one per model rather than assuming a spare will do.
Cloning a system drive often destroys WinRE.
The recovery partition frequently does not survive the clone, and the missing winre.wim only surfaces later when you try to create recovery media or reset the PC.
Quick machine recovery does not remove the need for a stick.
It relies on reaching WinRE and finding a network connection, neither of which is guaranteed after a failed drive or a damaged recovery partition.
Practical examples from two real setups
A home laptop with a rejected USB stick.
The owner bought a 32 GB drive because the wizard asked for 32 GB, and spent an evening convinced the tool was broken.
File Explorer showed 28.8 GB usable, just under the threshold, so Next stayed greyed out.
A 64 GB stick completed the job in about forty minutes, most of that spent copying the manufacturer’s recovery content.
A twelve-desk office with three laptop models.
The temptation was to make one recovery drive and call the job done.
Because recovery drives carry device-specific drivers and OEM content, the team made one per model instead, labelled with model and build number, and stored them with the BitLocker recovery keys printed and sealed.
They also added quarterly image backups, because a recovery drive reinstalls Windows but does not bring back the line-of-business application or its settings.
Best practices
- Create the drive when the PC is healthy, not when it starts misbehaving.
- Remake it after every feature update, and at least once a year.
- Label each stick with the PC model, Windows version and the date it was made.
- Store the BitLocker recovery key separately from the machine it unlocks.
- Boot the drive once after making it, so you know it works before you depend on it.
- Keep a file backup as well, since a recovery drive restores Windows rather than your work.
- Use a dedicated stick and leave nothing else on it, because the tool erases the whole drive anyway.
Common mistakes
- Unticking Back up system files to save time. You lose the reinstall option entirely.
- Buying a stick exactly the size the wizard asks for. Usable capacity is always lower than the label.
- Making one recovery drive for a mixed fleet. Drivers and OEM content differ per model.
- Assuming the drive is a backup. It restores Windows and deletes your applications when used to reinstall.
- Creating it years ago and never refreshing it. Old media misses drivers and updates your current build depends on.
- Starting a reset without the BitLocker key to hand. That single omission turns a recoverable machine into a paperweight.
- Running the wizard through a USB hub or dock. Direct ports are far more reliable for this tool.
Recommended tools
- Recovery Drive tool (
recoverydrive.exe). Built into Windows and the correct first choice. - Media Creation Tool. Builds generic Windows 11 installation media as a fallback when the recovery wizard refuses.
reagentc. The command-line tool for checking, enabling and repointing the Windows Recovery Environment.- Disk Management or diskpart. For clearing stubborn partitions off a USB stick the wizard will not accept.
- Windows Backup and OneDrive. For the files a recovery drive deliberately does not carry.
- Third-party imaging tools such as Macrium Reflect or AOMEI Backupper. Useful for full system images with bootable rescue media, which is what an office should add on top of a recovery drive.
Recovery planning for office users and IT
For a managed fleet, per-machine USB sticks do not scale, and they are not meant to.
Build the layered plan instead.
Make one recovery drive per hardware model and store it with that model’s documentation.
Enable quick machine recovery by policy on managed Pro and Enterprise devices, so boot-critical failures can be remediated from WinRE without a technician touching the machine.
Keep system images for anything with a line-of-business application that would take hours to rebuild by hand.
Record the Windows build number each recovery drive was created against, and refresh the set after every feature update.
Finally, audit BitLocker key escrow before you need it, because a recovery plan that cannot unlock its own disks is not a plan.
Questions and answers
How big does the USB drive need to be?
The wizard usually asks for 32 GB when system files are included.
Because usable capacity is lower than the label, buy a 64 GB stick and avoid the rejection entirely.
Does a recovery drive back up my files?
No.
It carries the recovery environment and, optionally, the files to reinstall Windows, so keep a separate file backup.
Can I use one recovery drive for several PCs?
Not reliably.
Recovery drives carry device-specific drivers and manufacturer recovery content, so make one per model.
How often should I make a new one?
Microsoft’s guidance is roughly annually, and I would add after every feature update.
Media made on an older build can miss drivers and components your current install depends on.
What if Windows says it cannot create the recovery drive?
Run reagentc /info in an administrator Terminal and check whether Windows RE is enabled.
A disabled or missing recovery environment is the most common cause, and reagentc /enable fixes many cases.
Is a recovery drive the same as installation media?
No.
Installation media built with the Media Creation Tool is generic and works on any compatible PC, while a recovery drive is tailored to the machine that made it.
Do I still need one now that quick machine recovery exists?
Yes.
Quick machine recovery needs the PC to reach WinRE and find a network, so it cannot help when the recovery partition is damaged or the drive has been replaced.
Conclusion
A recovery drive is thirty minutes of work that buys you a way back into a machine that will not start.
Plug in a 64 GB stick, run recoverydrive.exe, leave the system files box ticked, and let it finish.
Then boot it once to prove it works, label it with the model and date, and put it somewhere you will find it in a panic.
If you are a home user, do this today rather than at the weekend.
The people who need recovery media never get any warning that today was the day.
If you manage machines at work, build the layered version.
One drive per model, quick machine recovery enabled by policy, system images for anything hard to rebuild, and BitLocker keys escrowed and tested.
And if you are still on Windows 11 24H2 Home or Pro, move to 25H2 before updates stop in October, then make a fresh recovery drive on the new build.
Make yours this week and tell me in the comments which USB size your PC actually demanded, because that number varies more than Microsoft’s documentation suggests.
ENJOYING OUR CONTENT?
Stay up to date with our latest guides, insights, and news. Tap below to follow us directly via your search feed.
