Your profile picture is one of the first things people notice when they view your user account on Windows 10. Choosing an attractive, professional profile photo can give you a great first impression.
In this comprehensive guide, we’ll walk you through everything you need to know about setting, customizing and troubleshooting your Windows 10 profile picture.
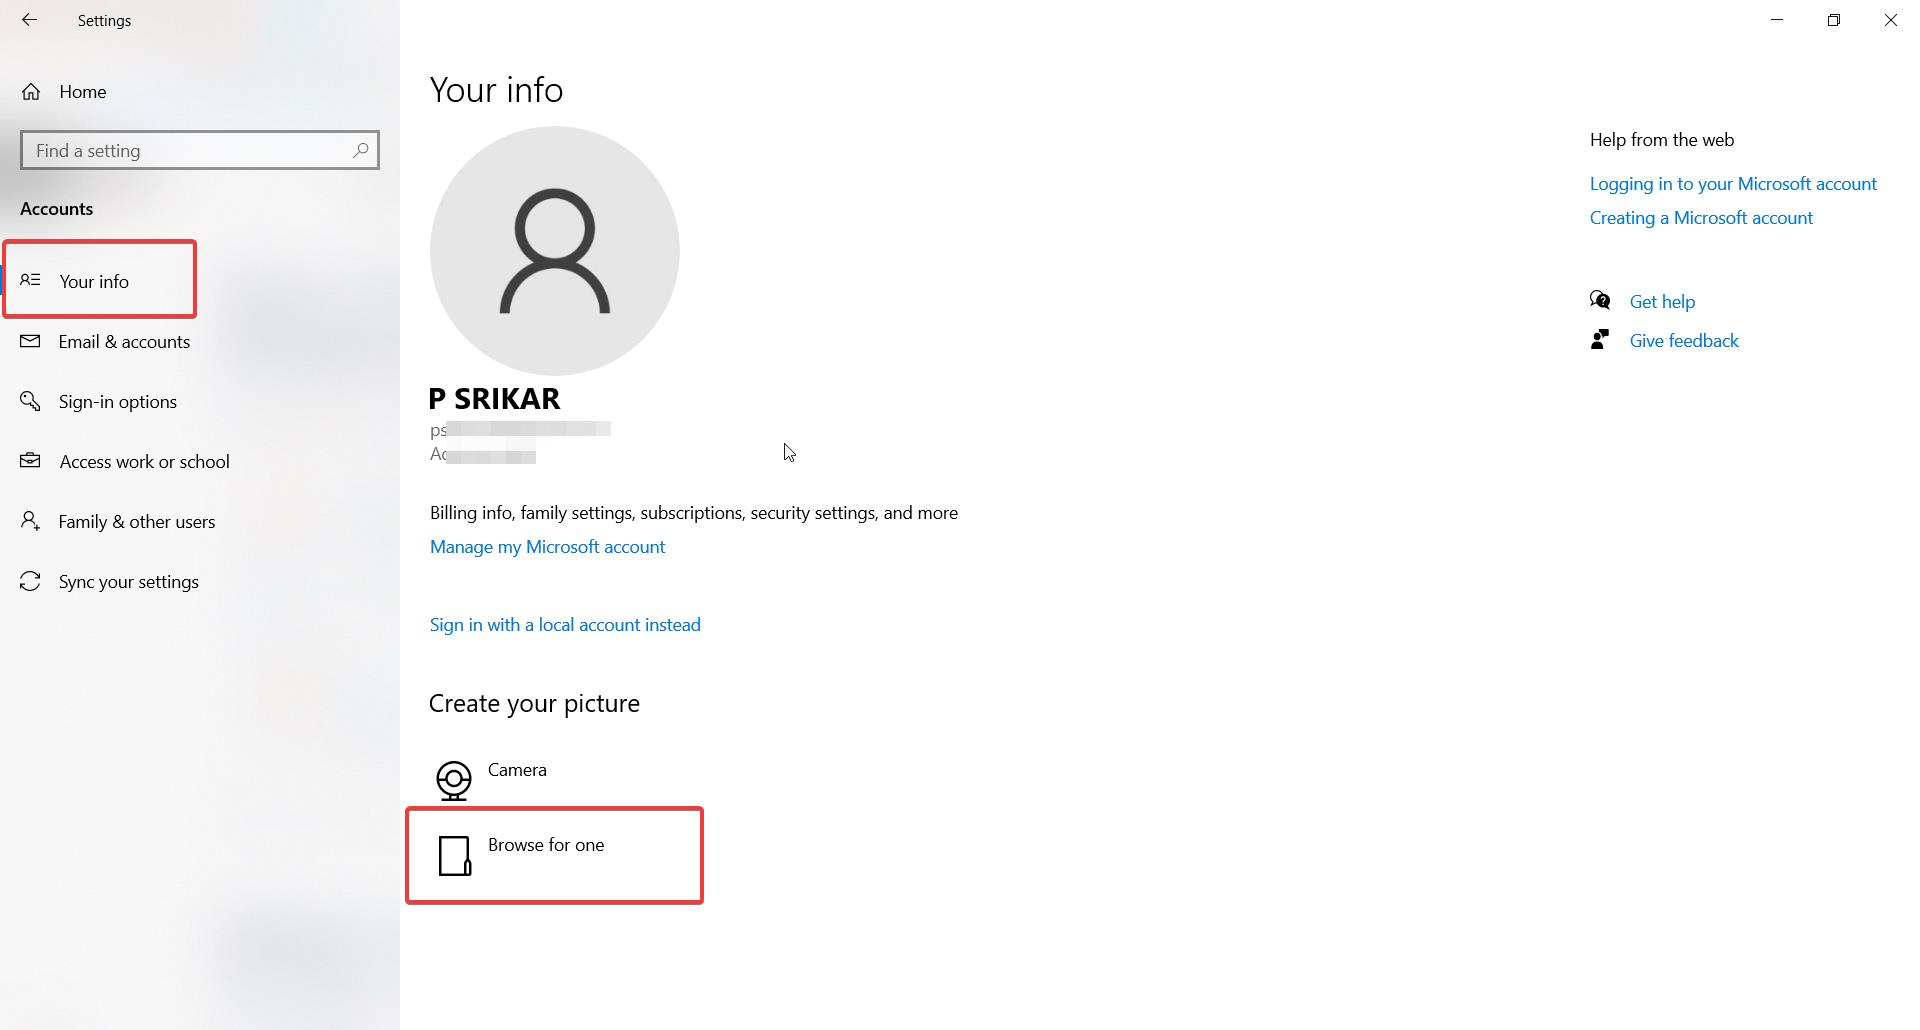
How to Change Your Profile Picture on Windows 10
Changing your profile photo on Windows 10 is simple:
- Click on the Start menu and select Settings.
- Click on Accounts.
- On the Accounts page, click on Your info.
- Under Create your picture, click on Browse to select a new picture from your files.
- Select a picture you want to use as your new profile photo. The recommended dimensions are 200 x 200 pixels.
- Click on Choose Image.
- Finally, click on Done to set your new profile picture.
It’s that easy! Windows will immediately update your profile photo across the operating system.
What is the Ideal Size for a Windows 10 Profile Picture?
Windows 10 will automatically crop and resize any image you choose into a circle that fits its layouts and interface elements.
However, for the best looking profile pictures, you’ll want to start with an image that meets these ideal dimensions:
- Width and height: 200 x 200 pixels
- File type: JPG or PNG
- Size: Less than 256 KB
A 200 x 200 pixel profile picture ensures your image won’t get excessively distorted when it gets cropped into a circle.
This size also keeps file sizes small, which helps your profile pictures load faster across Windows.
Where is Your Profile Picture Stored on Windows?
Once you set a new profile photo, Windows will save copies of it in two main folders on your hard drive:
User Profile Folder
Your original profile picture file is saved in your user account’s profile folder at:
C:\Users\YourUserName\AppData\Roaming\Microsoft\Windows\AccountPictures
This allows Windows to access and reuse your original photo as needed in the OS.
Hidden System Folders
Windows also generates resized and optimized versions of your profile photo in hidden system folders like:
C:\ProgramData\Microsoft\User Account Pictures
These allow Windows to quickly load appropriately sized versions of your profile pic in different contexts across the OS.
The copies in these hidden folders should not be directly edited.
Choosing the Best Profile Pictures for Windows 10
Picking an attractive, appropriate profile photo for Windows 10 requires choosing:
- A high-quality photo
- Appropriate image content
- Ideal dimensions of 200 x 200 pixels
Some best practices for selecting a great Windows 10 profile picture include:
- Use a sharp, well-lit photo – Avoid blurry, low-resolution images. A sharp photo shows care.
- Face the camera – Facing the camera makes you look more approachable.
- Smile naturally – A light smile looks friendly and sincere.
- Wear professional or casual attire – Dress as you would for an office or social setting.
- Avoid distracting backgrounds – A neutral or natural background keeps focus on you.
- Be authentic – Choose a photo that reflects your true personality.
Following these tips will ensure your profile picture makes a fantastic first impression!
Troubleshooting
Why Does My Windows 10 Profile Picture Keep Reverting?
If you change your Windows 10 profile photo but notice it keeps reverting back to your previous picture, don’t panic! This issue is usually easy to fix.
Here are some common reasons your profile picture reverts on Windows 10 and how to troubleshoot them:
- Cached profile photo – Windows may be loading a cached older profile pic that hasn’t been updated. Log out and back in to clear the cache.
- Corrupted image file – A corrupted profile photo file may cause Windows to revert to an older file. Try a new photo file instead.
- Group policy settings – Network group policies may override your photo. Ask your system admin about policy settings.
- Multiple user accounts – The wrong user account may be loading. Log into the account where you changed your picture.
- OS customization apps – Some customization apps override profile pics. Uninstall problematic apps.
Following these tips should get your new profile picture to properly load on Windows 10.
How to Customize Your Profile Picture on Windows
Beyond just changing the photo, Windows 10 also lets you customize how your profile picture looks and behaves in the OS.
Under Accounts > Your Info in Settings, you can:
- Add an account picture frame – Applies a customizable frame around your profile photo.
- Make it a tile – Converts photo into a mosaic-style tile pattern.
- Center it – Centers aligns your photo in frames.
- Show my display name – Shows/hides your display name on your profile pic.
These options let you tailor your profile picture to match your personal style on Windows 10.
What to Do If Your Profile Photo is Too Large to Upload
If you select a profile picture that’s too large, Windows will notify you that the “Picture is larger than expected” during upload.
This happens if your image exceeds the 256 KB maximum file size.
To fix this, open your photo in an editing program like Paint and go to Resize or Scale Image. Change the dimensions to 200 x 200 pixels to reduce the file size.
Save your edited picture and try uploading it again. This should compress your photo to a small enough size to use as your profile picture.
How to Change the Aspect Ratio of Profile Photos
By default, Windows 10 crops profile pictures into a 1:1 perfect square aspect ratio.
If you want your profile photo to maintain a different aspect ratio like 5:4 or 16:9, you can change an option in the registry:
- Open Registry Editor
- Browse to
HKEY_LOCAL_MACHINE\SOFTWARE\Policies\Microsoft\Windows NT\Explorer - Change the DWORD value
LockScreenCustomImageAspectRatioto 0 (zero). - Restart your computer.
This will stop Windows from forcing a square crop on your profile photo.
You can now set a professionally taken portrait photo with a classic aspect ratio as your uncropped profile picture.
Conclusion
Your profile photo is an important part of representing yourself on Windows 10. Following this guide’s tips on sizing, storage, troubleshooting and customizing your profile picture will ensure you always put your best face forward!
Choosing an appropriately sized, high quality profile photo that reflects your personality and professionalism will give you an excellent first impression across your Windows 10 devices.