Last Updated:
Need to enable remote desktop Windows 10 to access your PC from another location? Whether you’re working from home, supporting a family member’s computer, or managing an office machine remotely, Windows 10 remote desktop is one of the most powerful built-in tools available.
The issue is that Windows 10 Home does not include the Remote Desktop host feature by default. Windows 10 Pro and Enterprise do — but many users don’t know where to find the setting or how to configure it correctly. And when remote desktop won’t connect, troubleshooting can feel frustrating without a clear guide.
The remote settings in Windows 10 are a little different compared to Windows 8.1 and 7.
Remote desktop feature is useful for technical support from a remote location.
You can connect to/from your friend’s or an expert’s computer, like Microsoft technical support, to fix problems on your computer.
The remote desktop feature is useful if an MVP in India wants to troubleshoot a client in the United States with a “Windows update error.”
By default, Remote Desktop Protocol (RDP) is disabled.
To enable remote desktop in Windows 10 Pro, go to Settings → System → Remote Desktop and toggle Enable Remote Desktop to On. For Windows 10 Home, which lacks this setting natively, use the free RDP Wrapper tool or a registry edit to unlock and activate RDP functionality.
This article covers all three methods to enable remote desktop on Windows 10—for both Pro and Home editions—including Settings, Registry, and PowerShell. Every step is tested and verified for 2026 Windows builds.
What Is Remote Desktop and Why Should You Enable It?
Remote Desktop Protocol (RDP) is Microsoft’s built-in technology that lets you control one Windows PC from another—over a local network or the internet. When you enable remote desktop in Windows 10, you can:
- Access your work PC from home or while travelling
- Provide technical support to family members or colleagues
- Manage Windows Server machines or office desktops remotely
- Run resource-heavy applications on a powerful desktop from a lightweight laptop
Stat: According to Microsoft (2025), RDP is used by over 600 million Windows devices globally for remote access—making it the most widely deployed remote access protocol in enterprise and home environments combined.
Whether you call it “enable remote access Windows 10,” “activate remote access Windows 10,” or “simply allow remote access Windows 10″—they all refer to the same RDP host feature covered in this guide.
There are two key terms to understand before you start:
- Remote Desktop Host—the PC you want to connect to (must be Windows 10 Pro/Enterprise, or Home with a workaround)
- Remote Desktop Client — the PC you connect from (any Windows, Mac, iOS, or Android device with the RDP client app)
Which Windows 10 Edition Do You Have?
Before choosing your method, confirm your edition:
- Press
Win + Pause/Breakor go to Settings → System → About. - Under Windows specifications, check the Edition field.
| Edition | Remote Desktop Host Support | Method |
|---|---|---|
| Windows 10 Pro | ✅ Built-in | Method 1 (Settings) |
| Windows 10 Enterprise | ✅ Built-in | Method 1 (Settings) |
| Windows 10 Education | ✅ Built-in | Method 1 (Settings) |
| Windows 10 Home | ❌ Not built-in | Method 3 (RDP Wrapper) |
Note: All Windows 10 editions include the Remote Desktop Client (for connecting from). The limitation is only on the host side. Enabling remote desktop on Windows 10 Home requires a third-party workaround covered in Method 3.
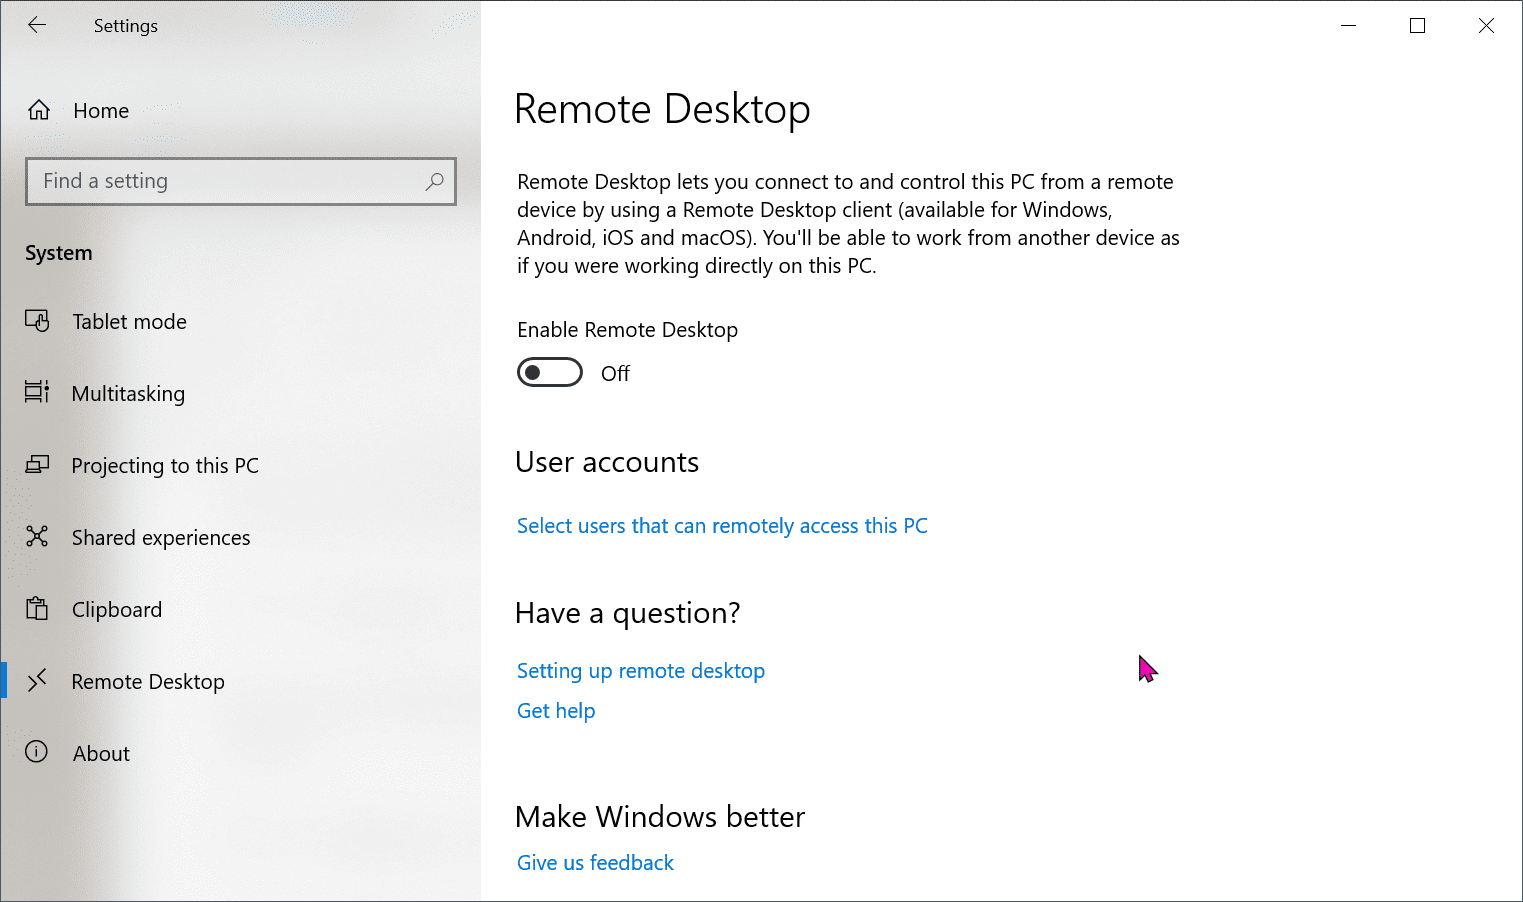
Method 1: Enable Remote Desktop Windows 10 via Settings (Pro & Enterprise)
This is the fastest way to turn on remote desktop Windows 10 for Pro and Enterprise users. It takes under 60 seconds.
Steps:
- Press
Win + Ito open Settings. - Click System.
- In the left sidebar, click Remote Desktop.
- Toggle Enable Remote Desktop to On.
- A confirmation dialog appears — click Confirm.
- Note your PC name shown below the toggle (you’ll need this to connect).
Optional — Configure additional settings:
- Keep my PC awake for connections when it is plugged in—Enable this to prevent the PC from sleeping while a remote session is active.
- Make my PC discoverable on private networks—Enable for local network access without a VPN.
To find your connection details:
- Still in Settings → System → Remote Desktop, click Advanced settings.
- Note the Remote Desktop port (default: 3389).
- To connect from outside your local network, you’ll need to set up port forwarding on your router or use a VPN.
Remote desktop settings in Windows 10 can also be accessed via the classic Control Panel: Control Panel → System → Remote settings → Remote tab → Allow remote connections to this computer.
Method 2: Enable RDP Windows 10 via PowerShell (Any Edition — Fast for IT Admins)
This method lets you enable RDP on Windows 10 from the command line — useful for IT admins managing multiple machines, remote automation, or situations where the GUI is unavailable. It covers Windows 10 enabled RDP, Windows 10 RDP enabled, RDP enabled Windows 10, and remote desktop enabled Windows 10 in a single script run.
Open PowerShell as Administrator:
- Press
Win + X→ select Windows PowerShell (Admin) or Terminal (Admin). - Click Yes at the UAC prompt.
Run these three commands in order:
powershell
# Step 1: Enable Remote Desktop via Registry
Set-ItemProperty -Path 'HKLM:\System\CurrentControlSet\Control\Terminal Server' -name "fDenyTSConnections" -Value 0

# Step 2: Allow RDP through Windows Firewall
Enable-NetFirewallRule -DisplayGroup "Remote Desktop"

# Step 3: Confirm the change (should return 0)
Get-ItemProperty -Path 'HKLM:\System\CurrentControlSet\Control\Terminal Server' -name "fDenyTSConnections"
All three commands run in under 5 seconds. RDP is now enabled and the firewall rule is active—no restart required.
To turn on RDP via Command Prompt (CMD) instead:
cmd
reg add "HKEY_LOCAL_MACHINE\SYSTEM\CurrentControlSet\Control\Terminal Server" /v fDenyTSConnections /t REG_DWORD /d 0 /f
netsh advfirewall firewall set rule group="remote desktop" new enable=Yes
This method is equivalent to enabling a remote desktop connection in Windows 10 via the Settings app. The registry value
fDenyTSConnections = 0is what the settings toggle writes behind the scenes when you activate remote desktop Windows 10 using the GUI.
Method 3: Enable Remote Desktop Windows 10 Home Edition (RDP Wrapper)
Windows 10 Home does not include the Remote Desktop host service. The built-in RDP service exists in the system files but is blocked from running as a host. The most reliable solution to enable remote desktop on Windows 10 Home is RDP Wrapper Library—a free, open-source tool that patches the RDP service to allow incoming connections without modifying system files.
Important: This is a third-party tool. Use it on personal or home machines. For business environments, upgrade to Windows 10/11 Pro, which includes full native RDP host support.
Steps to enable RDP on Windows 10 Home using RDP Wrapper:
- Go to github.com/stascorp/rdpwrap and download the latest release ZIP.
- Extract the ZIP to a folder (e.g.).
- Run install.bat as Administrator (right-click → Run as administrator).
- After installation, run RDPConf.exe to open the configuration tool.
- Confirm the listener state shows [Listening] in green.
- If it shows [not supported], download the updated
rdpwrap.inifile from the RDP Wrapper GitHub issues page and replace the existing one. - Run RDPCheck.exe to verify the local RDP connection works.
After installation:
- Go to Settings → System → Remote Desktop — you will now see the toggle available (it was previously missing or grayed out on Home).
- Toggle Enable Remote Desktop to On.
- Windows 10 Home enabled remote desktop is now active.
Stat: RDP Wrapper has over 3 million downloads on GitHub and is the most widely used solution for enabling remote desktop on Windows 10 Home edition in home and SOHO (small office/home office) environments.
Enable Remote Assistance Windows 10 (Different from Remote Desktop)
Many users confuse Remote Desktop with Remote Assistance. They are different features:
| Feature | Remote Desktop | Remote Assistance |
|---|---|---|
| Who controls the PC | You (remote user) logs in alone | The helper and user share the screen together |
| Login required | Yes—with your Windows credentials | No, user sends an invitation |
| Best for | Unattended remote access | Live technical support |
| Available on the home | No (without RDP Wrapper) | Yes—built into all editions |
To enable remote assistance in Windows 10:
- Go to Control Panel → System → Advanced system settings.
- Click the Remote tab.
- Check Allow Remote Assistance connections to this computer.
- Click OK.
How to Allow Remote Desktop Through Windows Firewall
Even after you enable remote desktop connection in Windows 10, you may find that connections are blocked by Windows Firewall. This is a common reason users cannot remote desktop to Windows 10 even when RDP appears to be on.
Check and allow RDP through the firewall:
- Open Control Panel → Windows Defender Firewall → Allow an app or feature through Windows Defender Firewall.
- Click Change settings.
- Scroll to Remote Desktop and check both the Private and Public checkboxes.
- Click OK.
Or via PowerShell (fastest):
powershell
Enable-NetFirewallRule -DisplayGroup "Remote Desktop"If you’re using a third-party firewall (Norton, Bitdefender, or ESET), you must also allow RDP on Windows 10 through that firewall separately—Windows Firewall rules don’t apply to third-party firewall software.
How to Connect to a Remote Desktop on Windows 10
Once you’ve completed enabling remote desktop Windows 10 on the host PC, connect from another device:
From Windows (built-in RDP client):
- Press
Win + R, typemstsc, press Enter. - In the Remote Desktop Connection window, enter the computer name or IP address of the host PC.
- Click Connect.
- Enter the username and password of the host PC account.
- Click OK. The remote session opens.
Remote Desktop Connection settings in Windows 10—useful options in mstsc:
- Display tab — Set remote screen resolution
- Local Resources tab—Share local drives, printers, and the clipboard
- Experience tab — Adjust connection quality for slow networks
From other platforms:
- Mac: Download Microsoft Remote Desktop from the Mac App Store
- iOS/Android: Download Microsoft Remote Desktop from App Store or Google Play
- Web: Use Windows 365 or Azure Virtual Desktop for browser-based access
Fix: Cannot Remote Desktop to Windows 10
If you cannot remote desktop to Windows 10 after enabling it, here are the most common causes and fixes:
| Problem | Fix |
|---|---|
| PC is sleeping or hibernating | Enable “Keep PC awake” in Remote Desktop settings |
| Firewall blocking port 3389 | Enable RDP in Windows Firewall (see above) |
| Wrong username or password | Use the exact local account name, not Microsoft account email |
| RDP disabled after Windows Update | Re-enable via Settings → System → Remote Desktop |
| Network Level Authentication mismatch | In mstsc → Advanced → uncheck NLA requirement |
| PC not on same network (no VPN) | Set up port forwarding on router or use a VPN |
| Windows 10 Home — toggle missing | Use RDP Wrapper (Method 3 above) |
Pro tip: Run
qwinstain Command Prompt on the host PC to confirm the RDP service is listening. If you seerdp-tcpin the output, the service is active. If not, re-run Method 1 or Method 2.
Best Practices for Remote Desktop Security
When you allow remote desktop Windows 10, security becomes important — especially if connecting over the internet.
- Use a strong password — RDP brute-force attacks are common. Use a 12+ character password with numbers and symbols. This applies whether you used Settings, the Registry, or PowerShell to enable remote access to Windows 10 on the host machine.
- Enable Network Level Authentication (NLA) — NLA requires authentication before a session is established. It’s enabled by default in Windows 10 remote desktop settings. Keep it on.
- Change the default RDP port—Attackers scan for port 3389. Change it to a non-standard port via the Registry:
HKLM\System\CurrentControlSet\Control\Terminal Server\WinStations\RDP-Tcp → PortNumber. - Use a VPN — Instead of exposing port 3389 to the internet, use a VPN and keep RDP on the local network only. If you need to allow remote access to Windows 10 from outside your home or office, a VPN is non-negotiable. Windows 10 allowing RDP through the firewall is only safe when paired with VPN access.
- Limit RDP access to specific users — In Settings → System → Remote Desktop → User accounts, add only the accounts that need remote access. Avoid leaving the administrator account enabled.
- Enable Windows Defender Firewall — Never disable the firewall just to make RDP work. Fix the specific firewall rule instead.
Common Mistakes When Enabling RDP on Windows 10
- Trying to enable remote desktop on Windows 10 Home via Settings — The toggle doesn’t exist on Home. Use Method 3.
- Forgetting to allow RDP through the firewall — Enabling RDP in Settings doesn’t automatically create the firewall rule on all builds.
- Using the Microsoft account email as the username—When connecting via mstsc, use the local account name (e.g.,
.\John“or”), not the email address. - Leaving the PC on sleep mode—Enable “Keep my PC awake for connections” in Remote Desktop settings.
- Not noting the PC name or IP — Write down the host PC name or set a static IP before leaving the office.
- Opening RDP to the internet without a VPN — This is the single biggest security mistake. Use a VPN or Azure Bastion instead.
- Confusing Remote Assistance with Remote Desktop—Enabling remote access to Windows 10 via Remote Assistance does not enable full unattended RDP login. They are separate features requiring separate setup steps.
What is a Remote Host?
The computer that is currently having issues or the computer you want to connect to.
This is the remote PC to which you want to connect so that you can have access to its resources.
Generally, the remote session is hosted by this PC. You can see the screen of this computer when the Remote Desktop function starts working.
What is a Remote Client?
It is the PC from which you want to connect to.
This is basically another computer located in a remote location from which you will connect to the remote host PC.
This is free of problems or issues. This can be any computer like Windows 10 Home Premium or Windows 7 Ultimate.
There are two methods to activate remote desktop Windows 10.
How to Enable Remote Desktop Windows 10
Follow these steps.
- Press the Win + I keys to open Windows Settings.
- Click on the “System” setting.
- Scroll through on the left-hand side and find “Remote Desktop.”
- On the right-hand side, you can see the option “Enable Remote Desktop.”
- Move the slider to On. It will turn blue.
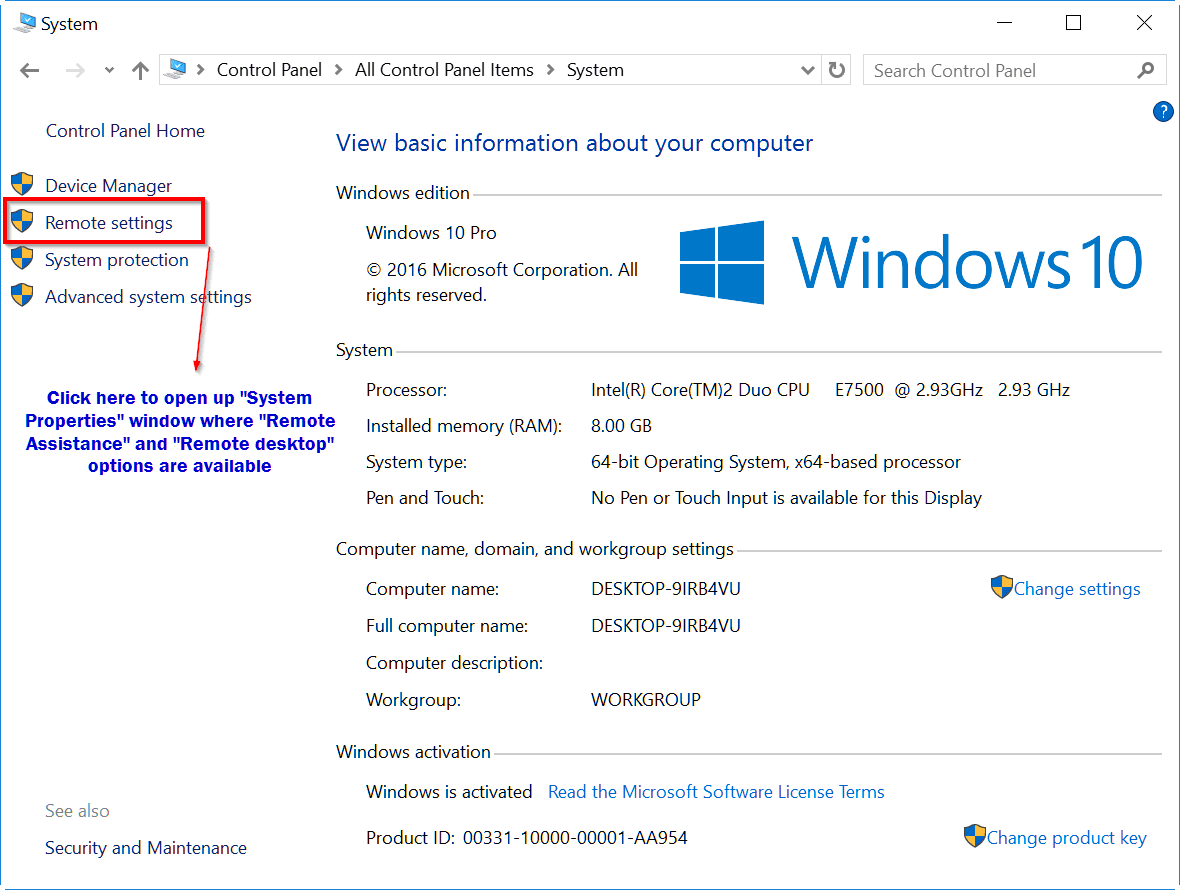
To fine-tune further options, you can open the remote desktop settings available in the “System Properties” window.
To access this pop-up window, you can do it two ways.
First Method – Windows 10 Settings
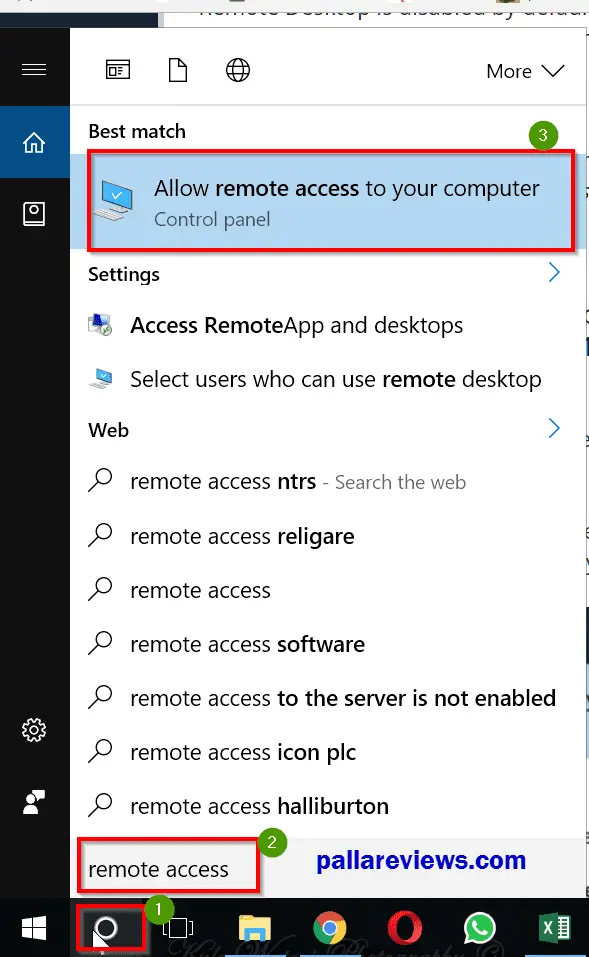
For example, in Windows 10 you can type “Remote Access” in the Cortana search box.
In the 1909 Windows 10 version, you can just press the Win key and type the above search string. This is because Cortana and Search are separated in the latest version.
Out of the search results available, you can click on the “Allow remote access to your computer” option.
This will show the pop-up windows containing the “remote desktop” settings.
Second Method – Control Panel
In this method, you can use the Control Panel to access the same window.
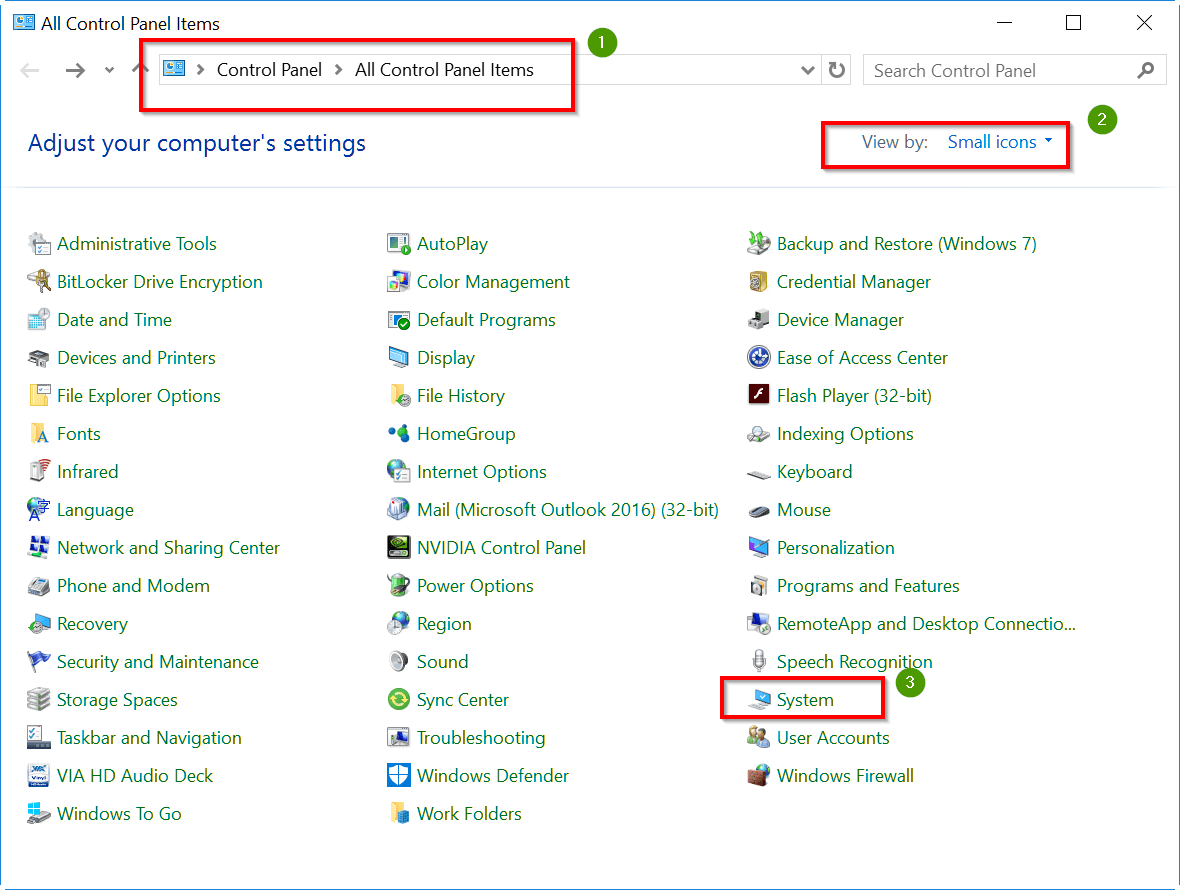
This is the key part to enable remote desktop in Windows 10 or 8.1 or 8.
Enable Remote Desktop Settings – Further Steps
Once the “System Properties” window opens, you will find two options here.
- Remote Assistance
- Remote Desktop
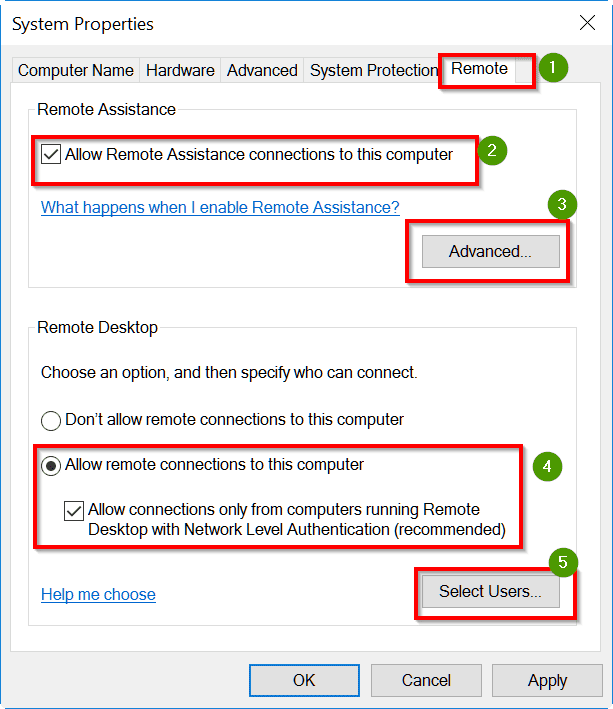
- In the first item, you have to check the option “Allow remote assistance connection to this computer.”
- In the second item, you have to check the option “Allow remote connections to this computer.”
This will automatically enable the option “Allow connections only from computers running Remote Desktop with Network Level Authentication (recommended).”
If not, you just enable that option also.
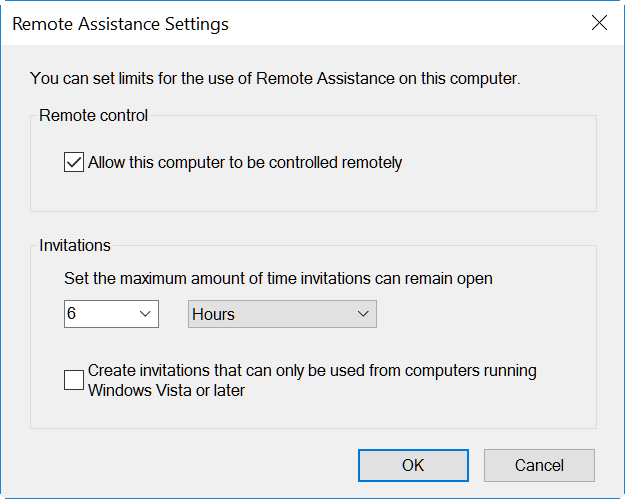
In the “Remote Assistance Settings” there are some advanced options also, which are available when you click the “Advanced” button.
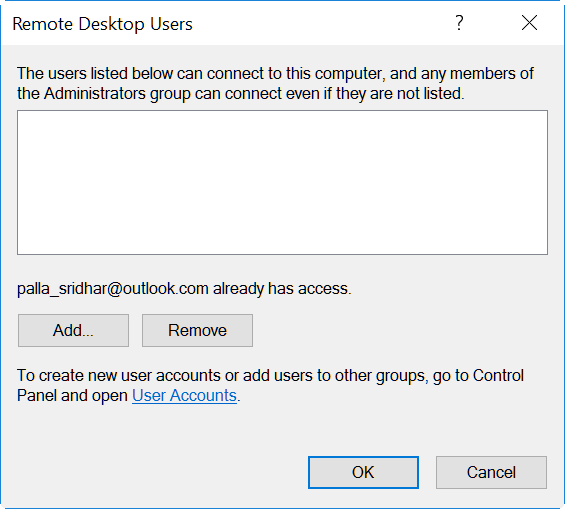
Similarly, in the “Remote Desktop” settings, you can add users to whom you want to give remote access to your PC or laptop.
Just click the “Add” button and select the users in your network to give access.
The above settings are mentioned for Windows 10.
To enable Remote Desktop for Windows 10 Home edition, you can follow the trick mentioned below.
What is the difference between Remote Desktop and Remote Assistance in Windows 10?
Remote Desktop lets you log in and fully control a PC remotely on your own—the host screen locks during the session. Remote Assistance lets a helper view and optionally control the screen while the local user stays logged in. Remote assistance is available on all Windows 10 editions, including Home. The remote desktop host is only on Pro/Enterprise without a workaround.
How do I activate remote desktop Windows 10 via the Registry?
Open Registry Editor, navigate to HKEY_LOCAL_MACHINE\SYSTEM\CurrentControlSet\Control\Terminal Server, and set the value fDenyTSConnections to 0. Then open Windows Firewall and enable the Remote Desktop rule. This is equivalent to using the Settings toggle and works on all Pro/Enterprise builds.
Is enabling RDP on Windows 10 safe?
RDP is safe when configured correctly. Key security steps: enable Network Level Authentication (on by default); use a strong password; change the default port 3389; restrict access to specific user accounts; and always use a VPN for internet-facing connections. Never expose RDP directly to the internet without these protections.
Why am I unable to remote desktop to my Windows 10 PC even after enabling it?
The most common reasons you cannot remote desktop to Windows 10 are Windows Firewall blocking port 3389, the PC going to sleep, a wrong username format, or a Network Level Authentication mismatch. Check the firewall rules first — go to Control Panel → Windows Defender Firewall → Allow an app and confirm that Remote Desktop is checked.
Statistics and Key Facts
- Microsoft (2025): RDP is active on over 600 million Windows devices globally, making it the world’s most deployed remote access protocol.
- Shodan security research (2024): Over 4 million RDP endpoints are exposed directly to the internet — a major attack surface. Always use a VPN.
- GitHub: RDP Wrapper has 3M+ downloads—the leading solution to enable remote desktop on Windows 10 Home edition without upgrading to Pro.
- Microsoft Support: The most common reason users cannot remote desktop to Windows 10 is the Windows Firewall blocking port 3389 — not the RDP service itself being disabled.
Conclusion
Enabling remote desktop in Windows 10 is straightforward for Pro and Enterprise users—a single toggle in Settings and a firewall rule check are all it takes. For Windows 10 Home, RDP Wrapper provides a reliable workaround that millions of users rely on daily.
Whichever method you use to enable remote desktop on Windows 10, the three rules that matter most are set a strong password, keep Network Level Authentication on, and use a VPN for any internet-facing connections.
Once RDP is active, you can connect from any Windows, Mac, iOS, or Android device using the free Microsoft Remote Desktop client. Whether you’re managing an office network in the US, supporting family in India, or working remotely across Europe—Windows 10 remote desktop support gives you full control without being physically present.
Found this guide useful? Share it with a colleague who’s setting up remote access on Windows 10 for the first time—and leave a comment below if you hit any specific error during setup.
👉 Also on windowstechit.com: Fix Cannot Remote Desktop to Windows 11 | Enable Remote Desktop Windows 11 | Windows 10 Network Settings Guide