You wanted to speed up Windows 10 in few simple steps. Probably many performance tweaks were tried.
Windows 10 has its pitfalls when it comes to speed. When you install it in on a new system, it is blazing fast.
But as time goes by, cookies, temp files, cache, junk files, additional programs, apps add to the burden.
Updates and third-party software can slow down your laptop or pc.
You can disable background services, disable apps, disable permissions, change privacy options, change power settings and many others.
Using a SSD can drastically speed up boot time. Removing junk and temporary files can aid in this step.
Settings is the new place where you can control different system options in Windows 10.
Truly speaking, Microsoft has fine tuned many features like updates as of 1909 version.
But in legacy hardware with 2GB RAM, Windows 10 can be a nightmare. With 8GB RAM, my Windows 10 performs quick operations on Office Excel and Video-editing software.
Does disabling Cortana improve performance? Yes, was the answer in the earlier versions of Windows 10 like 1709, 1803, 1809.
But in the latest 1909, 1903 versions, Cortana and Search have been separated. This reduce the lag caused by the Microsoft voice assistant.
These Windows 10 speed tips can save time and improve performance.
To improve Windows 10 performance, change in hardware like CPU and RAM is also important.
How to Speed Up Windows 10 for gaming? Game bar and Game Mode are two new settings available, which can improve your game performance.
If you consider playing games like Robocraft or Tera, the GPU speed is also important. In addition to that if you are using graphics software like Adobe Creative Cloud or Photoshop, 2 GB of RAM is a minimum.
The following are the complete details on how you can improve Windows 10 performance using simple tips and tricks.
- Change Power Options
- Disable Cortana
- Disable Microsoft Edge
- Disable Location Services
- Remove Unnecessary Apps
- Disable Notifications
- Disable Apps in the Background
- Disable Pinned Apps on the Taskbar
- Disable Startup Programs and Apps
- Disable Mobile hotspot
- Disable Windows Search Indexing Service
- Disable Typing Password or Pin
- Disable Sync Settings
- Delete or Uninstall Unwanted Apps and Programs
- Change Privacy Options
- Turn on Fast Startup
- Insider Preview Builds
- Change Power Settings
- Avoid Animations and Complex Themes
- Disable Shadows, Animations and Visual Effects
- Update Drivers for Hardware
- Increase Paging File Size (or) Virtual Memory
- Remove RDC
- Windows Troubleshooter
- Performance Monitor
- CCleaner and Malwarebytes
- Use Maximum Cores
In this post, we are going to see how to speed up Windows 10, for better productivity of our Office and Windows operations.
Related Post : How to Optimize Network and Internet Settings in Windows 10
Best Tip to Improve Windows 10 Speed
You need to uninstall unnecessary Windows 10 system apps and other Store apps. Disable apps running in the background from Privacy Settings in Windows 10.
This has tremendously improved my system stability, speed and performance in 2020.
Initially I also faced the similar situation of my Windows 10 computer bogging down. I re-installed the OS several times. It was quick enough in the earlier days.
But later it slowed down. I couldn’t find a solution to this problem.
Then later I checked this post from Microsoft, which helped me reach 100% performance on my Windows 10.
How to Remove Unnecessary Apps
- Press Win + I keys to open Windows Settings.
- Apps > Apps & features.
- Click the app you want to uninstall on the right-hand side.
- Click on “Uninstall“.
The app will be removed from your laptop or computer. Always, try to remove apps with large file size, if not required.

With Windows 10, lot of apps come pre-installed by Microsoft Store. These includes games, Skype, Whiteboard kind of apps. Some of them can be uninstalled and some can’t.
You can turn off “Background apps” using “Advanced options” for such kind of apps. One can also terminate them. If problem arises, you can reset them to default.
Uncheck this option
One major feature which takes lot of internet and slow down your system performance is the “Tips, Tricks and Suggestions” feature offered by Microsoft.
 This image is from Windows 10 Version 1809, Build 17763.316.
This can be disabled by going to the following setting.
System > Notifications & actions
On the right-hand side, turn off the setting that says “Get tips, tricks, and suggestions as you use Windows”.
Change Power Options
The Power Saving plan in Windows 10 Control panel will save you power, but will slow your performance. Both PCs and Laptops have this option.
To enable this option, select Control Panel > System and Security > Power options. On the right-hand side, you can see the item that says “Choose or customize a power plan”. There are three options here –
- Balanced
- Power saver
- High performance
The last option will speed up Windows 10 to the maximum. But if you want to save power and have performance at the same time, you can select “Balanced“.

Disable Cortana
Cortana is a virtual-assistant, which is an innovation for Windows 10.
You can speak into your microphone and it produces results related to your queries.
But there is a catch.
When we are among people or in office, we tend to less speak through mic and prefer typing.
Also when Cortana can’t answer your questions, it’ll take to Bing’s results for your query.
This is somewhat little irritant, as we ourselves could directly type in Bing.
Also whenever you try to speak to Cortana, it’ll take some time (may be a few seconds) to analyze your words and speech. This takes some time to get results.
Also the Cortana search box resides just beside the Start button.
This is taking valuable loading time, when you re-start your PC. So instead, you can just disable and also hide Cortana completely.
You can see this tutorial by Microsoft to disable Cortana.

To hide Cortana completely you can follow these steps.
Just right-click on the taskbar and move the mouse pointer to Cortana.
You will get additional options.
- Hidden
- Cortana Icon
- Show search box
If you select the “first” option, Cortana will be completely hidden. If necessary you can again, right-click the taskbar to get it. So now the taskbar looks less cluttered and also improves speed of Windows 10 execution.
Disable Microsoft Edge Browser
Microsoft Edge browser is another new arsenal in Windows 10 armory.
It has its own pros of lightweight design, faster surfing, super-smooth scrolling, distraction-free reading, note-taking, enterprise-grade security.
In 2020, many new updates have come to this browser. A new Microsoft Edge browser based on Chromium, has also been released.
Though you can keep both. I found that using the old version is lot better.
It is still a new browser and has its cons. It lacks cross-platform support and lacks support for extensions.
It also takes forever to load and the progress dots, are an annoying feature to the common user.
It freezes up sometimes and crashes while using YouTube on occasions.
You can disable Microsoft Edge to improve speed of your browsing experience. You can either use IE11 or Chrome or Firefox as a substitute.
Related Post : Some Solutions to Windows 10 HDMI and Sound problems
Disable Location Services
When you enable Location finding services in Windows 10, it’ll make your computer slow.
But sometimes, you are in a necessity to enable your Location.
So whenever you want to use an app, which wants to know your location, you can enable the services and disable them when you are doing common programming or office tasks.
To enable or disable Location settings, you can follow this path.
Start > Settings > Privacy > Location
Here you can toggle the options to “Off”, so that the Location service is not used.
If you are mostly using a desktop and at a single place, you can also set the default location.
This is more convenient than enabling location services permanently, as this causes Windows 10 to connect to Internet every time.
Suggested Reading: Download latest Windows 10 HD Audio Drivers for different Brands
Use Maximum Cores
Suppose your system is having a multi-core CPU. Then it’s possible that, Windows 10 is not utilizing its full potential. In some CPU high-usage games, it is required that we have the full potential of our CPU. So in order to make Windows 10 take up the full cores, you can do the following.
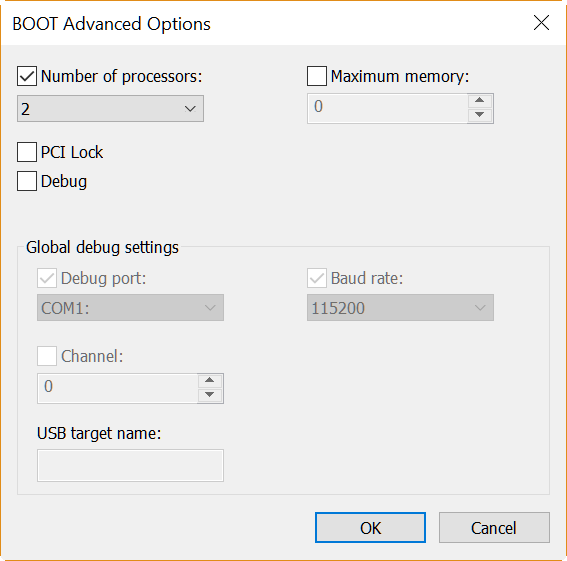
Type msconfig in the run box. Then select the “Boot” tab. Under this you can find your OS. Select the “Advanced Options”.
Then check the Number of Processors option. Here you can select the maximum possible cores your system can afford.
But don’t play with the “Maximum Memory” option.
As I found out, it is not giving permanent results and can cause problems if you have shared video memory also.
But this tweak may not cause a significant boost in your speed, if you are using less programs.
This tip will be helpful, when the CPU is working at its maximum.
CCleaner and Malwarebytes
Cleaning your system from time to time, is also a good habit.
You can use the free tool like CCleaner, to remove all the junk that got collected in your system like Internet Cache, Cookies, History, Temporary files, Windows log files, Memory dumps etc.
You can also clean the Registry from time to time, if there are too many issues. Always try to use the default options provided with the tool.
You can also clean the bloatware and adware using Malwarebytes which also has a free version.
Though the features are limited in it, you can buy the premium version to have all the features like –
- Real-time protection
- Hyper Scan mode
- Malwarebytes Chameleon technology
Keeping your system free from such adware and malware, will speed up your Windows 10 computer.
Disable Typing Password or Pin
When you are using a Microsoft account to login to your Windows 10 desktop, it generally asks for a password or pin or some other security option. This is a good option in a public place or in an office, but at home (if you are the only user) this is unnecessary.
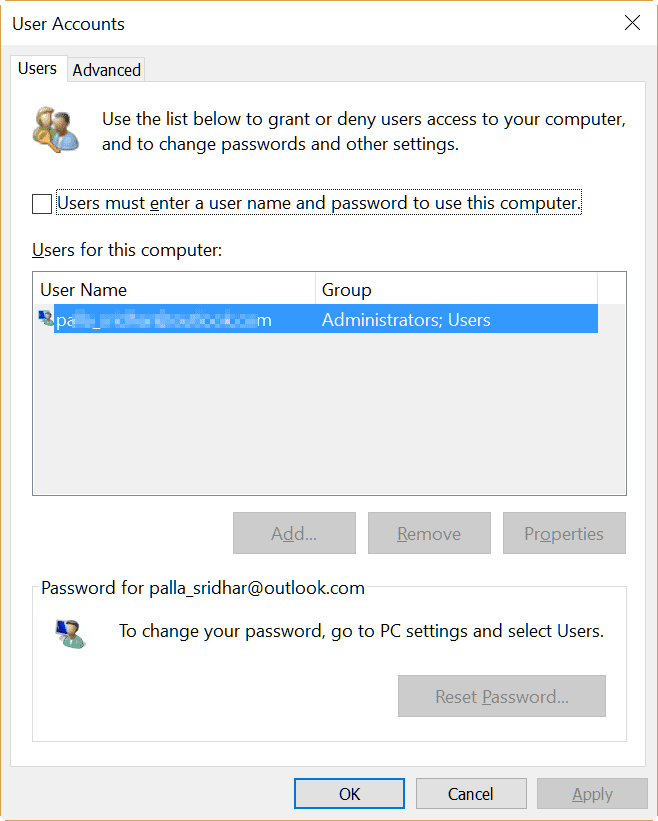
To make Windows 10 start faster, you can type netplwiz in the run box and press Enter. Un-check the option that says “Users must enter a user name and password to use this computer”. Click on Apply and enter your password twice. This reduces the time needed to login to your desktop.
Turn on Fast Startup
With Windows 10, there is a new “complex” startup mode that should cut down on bootup times.
So, instead of fully shutting down the computer, this option will put the PC into hibernate mode.
This option is generally enabled in the newest builds like Version 1607 and OS Build – 14393.5.
But if you are using an older version, you can check the option that says “Turn on fast startup (Recommended)”.
This can be found using the following path.
Control Panel > All Control Panel Items > Power Options > System Settings.
You should click the link that says “Change what the power buttons do” on the left pane and then click on “Change settings that are currently unavailable”.
Increase Paging File Size (or) Virtual Memory
- You can right-click your computer and select “Properties” from the context menu.
- Under Advanced > Virtual Memory, click Change.
- Now uncheck the option that says “Automatically manage paging file size for all drives”.
- Select the default drive (C : ) where Windows 10 is installed and choose Custom Size.

- Here set the Initial Size and Maximum Size, based upon values recommended below.
- Then click “Set” and hit OK to save settings.
Finally, reboot the computer.
If this setting causes any sluggishness or trouble, you can revert to the default settings.
Otherwise, you can play with the Initial and Maximum Size values based upon the amount of RAM you have.
(Source: http://www.ibtimes.co.uk/windows-10-how-fix-sluggish-performance-boost-overall-system-speed-1516413)
Windows Troubleshooter
Sometimes, there will be some background code or faulty system files causing slowness of your Windows 10 computer.
In that case, the first bullet to fight such issues, is using the default “Troubleshooting” option provided in the Control Panel.
Control Panel\All Control Panel Items\Troubleshooting
Here you can troubleshoot several issues.
- Programs
- Hardware and Sound
- Network and Internet
- System and Security
If you fix all these problems, generally you can see a boost in your computer speed.
Performance Monitor
If you want to dig little deep and find the root-cause of your Windows 10 slowing down, then you can make use of the Performance Monitor and Resource Monitor.
In order to launch this application, you need to type perfmon/report into your search box.
Generally it takes 1 min to several minutes to display the report.
Though these are complex statistics about your CPU, Threads, Memory, Disk, Network Activity etc, you can basically take the help of an expert, who can read this data and suggest some solutions for your slow Windows 10 system.

Disable Shadows, Animations and Visual Effects
Windows 10 has nice eye-catchy visual effects, which are more of aesthetic appearance.
But on slower PCs with insufficient CPU and RAM, they can cause performance issues.
In the Windows 10 search box, type sysdm.cpl and press Enter. This launches the System Properties dialog box.
Now navigate like this –
Advanced > Performance > Settings.
Here you have several options that can speed up your Windows 10.
If you don’t want to play with custom options, you can directly select the option that says “Adjust for best performance”.
But this limits the appearance of the screen.
So it’s better to choose the option that says “Let Windows choose what’s best for my computer”.

But if you want to still customize the options, you can uncheck the following.
- Animate controls and elements inside windows
- Animate windows when minimizing and maximizing
- Animations in the taskbar
- Fade or slide menus into view
- Fade or slide ToolTips into view
- Fade out menu items after clicking
- Save taskbar thumbnail previews
- Show shadows under mouse pointer
- Show shadows under windows
Though this will decrease the look and feel of Windows 10, it does speed up normal operations like opening a program, switching between programs, going through menus, minimizing applications etc.
Disable Notifications
You can also disable Notifications from different apps.
This can be done on an app-by-app basis or all at once.
If you are using this features for all the apps, then they will try to use your CPU and RAM resources, besides the bandwidth.
So cautiously select the few apps which you need notifications and disable the rest.
You can do this by going to through these steps.
Start > Settings > System > Notification & actions
Disable Apps in the Background
By default, there are certain apps installed with Windows 10. So they will be running in the background, without your notice.
This causes the same resource hog as earlier and makes your other programs slower. You can also check the “App history” under Task Manager.
There you can find, how much CPU time, each app is taking and also the network usage.
You can disable the running of background apps, by using the toggle “On/Off” option beside the app. You can follow this path.
Start > Settings > Privacy > Background apps
Disable Pinned Apps on the Taskbar
There are certain apps pinned to the Taskbar in Windows 10.
For example, Windows Store and Microsoft Edge.
But these can be accessed through Start button also.
So unless you find them essential to use, you can unpin them from the taskbar.
This will save lot of loading time when you do a hibernate or a re-start.
For this, you can just select the app and right-click and select “unpin from taskbar”.
Disable Startup Programs and Apps
The one common reason for slow-startup of Windows, is the number of programs that start during login.
But you may find that there are some essential programs like OneDrive which need to start-up on login, as they do some background process like “sync” when you save files.
So for this reason, you can start the “Task Manager” by pressing the Ctrl + Alt + Del button on your keyboard.
Then select “Task Manager” out of the options available.

Now go to “Startup” tab. Here you can see the list of programs that are starting during login phase.
Here you can see the “Status” and “Startup Impact” of the programs.
Try to disable all the programs which have “High” impact, provided if you need them very much.
You can safely disable programs like “Adobe Reader update” and “NVIDIA Update” etc.
Change Power Settings
The other common setting which can be used to speed up Windows 10, is the “Power Options”.
You can either access this setting from the Control Panel or through “Settings” panel. For this you need to go through –
Start > Settings > System > Power & Sleep > Additional Power Settings.
Here you can select the option that says “High Performance” which may use more energy, but favors speed.

Delete or Uninstall Unwanted Apps and Programs
While installing third-party programs there is lot of bloatware and adware that gets installed on your system.
You may fail to recognize it as time passes by.
But you can observe the slow behavior of the system which is an indication of viruses and Trojans.
For example, when you install Skype, other small tiny bloatware gets installed.
From time to time, check your “Programs and Features” section in the Control Panel, where you can observe the list of programs that are installed.
If you find any tiny application without much trust or is not useful, you can try to uninstall it.
For example, in previous days, Nero DVD Burner program used to take lot of memory and also used to slow the system.
In the same way, you can check if there are any other programs which are causing delay issues in speed.
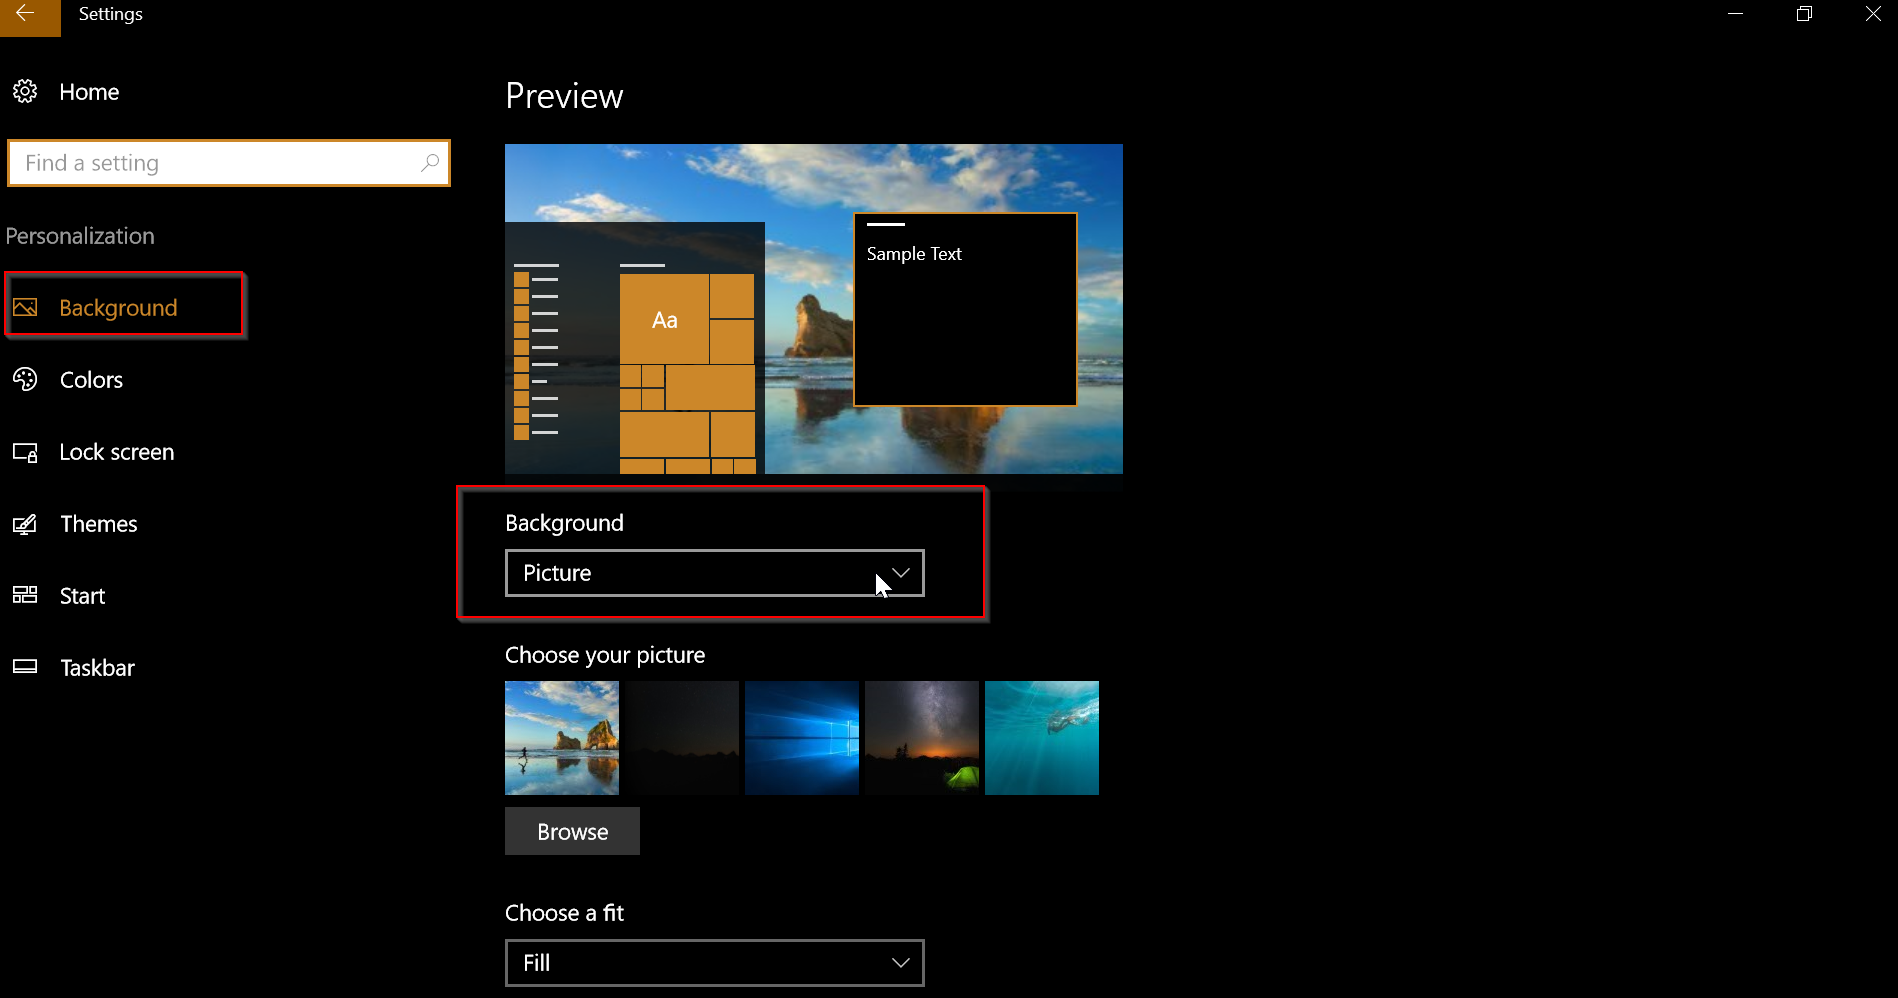
Avoid Animations and Complex Themes
If you go to –
Start > Settings > Personalization > Background, there are three options here.
“Slideshow” is one of them. So if you want to make a little more improvement to your speed performance of Windows 10, here you can select “Picture”.
So this way, only 1 picture will be set as background. Try to avoid any big graphics or GIF taking much resources.
Update Drivers for Hardware
Check the latest drivers for all of your devices.
Mostly graphic and audio cards, require the latest updates.
So either if you using the in-built motherboard hardware or third-party devices, make sure they are up-to-date with the drivers.
You should also perform a compatibility check with Windows 10.
If the current drivers are not updated, try to use Windows 8.1 drivers and use the device in compatibility mode.
Disable Sync Settings
In Windows 10, you have the option to sync several settings.
This is generally the case, if one logs to their system using their Microsoft account.
This feature is made available, so if in-case you format your system or change to a new PC, the old settings will automatically sync via your Microsoft account.
But this causes a delay in your system performance.
Every time you make a change to your theme or other settings, this will try to sync to your Microsoft account using OneDrive.
So if you are sure, that you are not in need of these sync settings, then you can disable them.
You can access this setting here –
Start > Settings > Accounts > Sync your Settings.
Here you can toggle the switch to “Off” for Theme, Internet Explorer Settings, Ease of Access etc, if you want a different scenario in each system.
Disable Mobile hotspot
If you are using a router to share your Internet Connection using Wi-Fi standard, then you can disable other Bluetooth settings.
Under Start > Settings > Network & Internet > Mobile hotspot, you can disable the option that says “Allow another device to turn on mobile hotspot. Both devices must have Bluetooth turned on and be paired”.
This way Windows 10 will not check for Bluetooth connectivity issues which may sometimes slow your connection and system.
Insider Preview Builds
If you are using a stable Windows 10 version, you can disable the updates. This can be compensated by manually checking for updates.
Otherwise, the browsing speed will decrease when the updates are downloading.
Also if you are using “Insider Preview Builds “you can totally disable them.
This will also prevent Windows 10 from unnecessarily checking and downloading updates.
Change Privacy Options
Also you can disable some privacy settings, which are accessible under –
Start > Settings > Privacy > General.
The following options can be disabled.
- Let apps use my advertising ID for experience across apps.
- Send Microsoft info about how I write to help us improve typing and writing in the future.
- Let apps on my other devices open apps and continue experiences on this device.
- Let apps on my other devices use Bluetooth to open apps and continue experiences on this device.
By setting “Off” or disabling this options you may lose some high-end experience.
But if you are more of a lay user and interested in normal tasks like Office Programs, writing documents and working with engineering software, than these options are un-necessary.
But the most notable use of the above options can be had if you are on a network and are collaborating with each other, for example, like Games.
So there is a trade-off between speed and user experience.
Disable Windows Search Indexing Service
Generally, the Windows 10 search indexing service is enabled for all hard-drives.
So when you are working on CPU resource intensive programs, this will slow your performance.
So instead of indexing all the hard-drives during peak usage, it is better to index a few usable hard-drives.
Then when the system is idle, you can then make other hard-drives also come under indexing service.
In this way, your computer will work with normal speed during operation hours and also complete indexing of the hard-drives will happen.
Remove RDC
The RDC (Remote Desktop Connection) feature available in Windows 10 allows other computer users to connect to your computer during trouble-shooting steps.
But this service is unnecessary in daily usage, when your PC is working fine. So you can disable this option for faster-working of your PC.
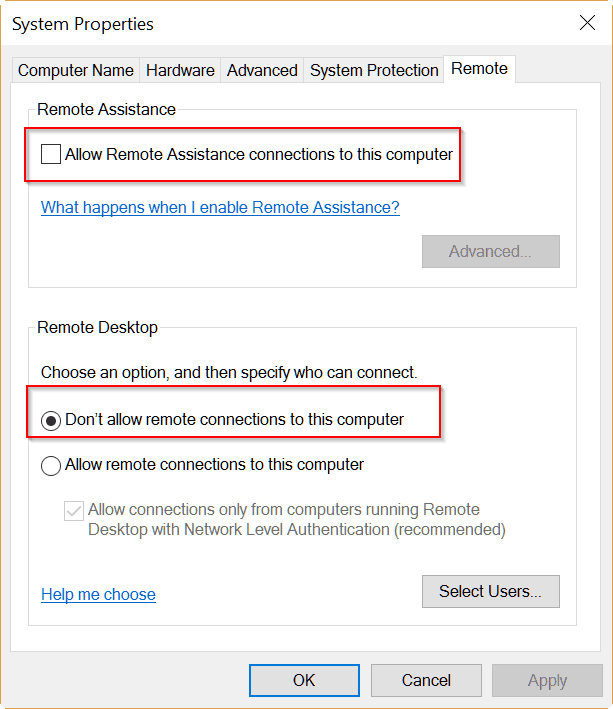
You can just type SystemPropertiesRemote.exe in the run box and press Enter. You can go to the Remote tab in the System Properties box. Here you have two options.
- Remote Assistance – Here you can uncheck the following option.
- Allow Remote Assistance connections to this computer
- Remote Desktop – Here you can check the following option.
- Don’t allow remote connections to this computer.
You can enable the RDC feature, at any-time, whenever you want other computer users to remotely connect to your PC and fix any problems.
These tips to speed up Windows 10 are only useful if used in the appropriate way.
Note: Always take a backup or create a system restore point, before you apply the above tweaks.
Conclusion
Windows 10, by default, has improved on so many features.
Third-party software and adware are one of the common culprits that slow down Windows One.
Even the “Start Menu” response time can be decreased by using some of the options in “Settings” panel.
You can make the clutter of Metro apps less, by removing the unnecessary ones and also “turning live tile off” for not-so required ones.
Also in 2020, adding an SSD to the arsenal, definitely improves the speed of Windows 10.
Even for laptops and desktops, having an Intel i3, i5 processor and 4 GB of RAM can drastically improve the performance of Windows operations.
First of all, make sure that your system configuration, meets the system requirements of Windows 10.
This is because, how many tweaks you make with old PCs with budget configurations, it is highly impossible to get the performance improvements that are seen in the latest hardware.
We have already seen the Windows 10 gaming benchmarks, which show the efficiency of this OS with regard to graphics and multiple operations at the same time.
If you still feel that your Windows 10 is slow in booting, starting up, shutting down, normal operations, please comment in the section below.
So that we can check our resources to find a solution to your problem. If you like this article, please share with your friends.
Thanks very much for this! Excellent writeup.
Greate work! Best article to speed up computer windows 10.
So basically to make Win10 good, disable everything you can and turn it into windows 3.1 😛
SO much crap running in the background of Windows10 without disabling a bunch of services, not sure you can really reduce it’s energy / CPU usage To get back to comparable levels as Win7.
The MSCONFIG BOOT options are a BAD idea to mess with, of course windows10 is going to utilize multi-core processors by default it is a modern operating system, this is just for the BOOT process, I believe changing this option could make some peoples computers unstable and un-able to boot up properly, so it’s best to leave that alone. It is not what you imply that it enabled multiprocessor in windows. That’s already enabled, which you can easily see in Task Manager while running any CPU stressing software.
@Ben: Thanks for your comment. I personally felt that after usage of Windows 10 for over 5 years, the following will speed up your pc.
1. Disable unnecessary background apps.
2. Disable diagnostic data.
3. Disable permission to advertising information.
The latest 1909 version is doing good, with some issues in the latest KB update.
It is trial and error to see – out of the 27 tips – which work and which don’t.
Also installing legacy programs can make your pc slow.
Yes, its best to keep your computer to minimum with apps . 🙂
This is an amazing article. I am using Windows 10 and facing a lot of speed-related issues. You just save my life brother.
@Santanu: Thanks for the comment. Your Facebook group is great.