Last Updated:
Error 0x800f081f Windows 11 is one of the most persistent update failures of 2025–2026, and if you’re seeing it, you’re not alone—Microsoft officially confirmed a systemic version of this error affecting all Windows 11 24H2 systems that installed the January 2025 preview update (KB5050094) or later.
The full error message reads, “Install Error—0x800f081f,” accompanied by the Windows Update failure screen or appearing when running DISM commands. The underlying error code means Windows can’t locate the source files needed to complete the installation.
The positive news is that Microsoft released an official fix (KB5067036, October 2025). The better news: if you haven’t installed that fix yet, there are proven manual solutions that work in 2026, from enabling .NET Framework 3.5 to mounting a Windows 11 ISO for offline repair.
The 0x800f081f error is a common problem for users of the Windows 11 operating system.
This error can occur when trying to install a new feature or update.
In this updated May 2026 guide, I’ll walk you through every confirmed fix in order of complexity—from the Windows Update Troubleshooter to DISM with an ISO source, Group Policy tweaks for corporate networks, and a repair install as a last resort. Whether you’re in the US, Europe, or India, these fixes work globally.
Finally, we’ll provide some additional tips for troubleshooting the 0x800f081f error in Windows 11.
What Is Error 0x800f081f in Windows 11?
Error 0x800f081f is a Windows Update and DISM error that indicates Windows can’t find the source files required to install an optional component or cumulative update.
The Exact Error Message
You’ll see one of these variants:
| Context | Error Message |
|---|---|
| Windows Update | “Install Error – 0x800f081f” |
| DISM command | “Error: 0x800f081f — The source files could not be found.” |
| .NET Framework install | “Error 0x800f081f—DISM failed; no operation was performed.” |
| General update failure | “Windows Update failed—0x800f081f” |
What CBS_E_SOURCE_MISSING Means
The internal code for 0x800f081f means that the Component-Based Servicing (CBS) stack attempted to find the source files for a repair or install operation but was unable to locate them. This can mean the files don’t exist (deleted), are corrupt, or Windows is looking in the wrong location.
What Causes the 0x800f081f Windows 11 Update Error?
.NET Framework 3.5 Missing or Disabled (Primary Cause)
The most common manual cause is that .NET Framework 3.5 is either not enabled or has corrupt installation files. Windows 11 doesn’t enable .NET Framework 3.5 by default, but many updates and applications require it. When Windows tries to enable it during an update and can’t locate the source files, 0x800f081f appears.
Microsoft-Confirmed ACR/MCR Cleanup Bug (2025 Root Cause)
This is the systemic cause that affected millions of Windows 11 24H2 users throughout 2025 and into 2026. Microsoft officially confirmed:
- Root cause: ACR (Automatic Component Repair) and MCR (Manual Component Repair) cleanup processes removed language packs and feature payloads that are required for cumulative update installation
- Trigger: Installing KB5050094 (January 2025 preview) or any subsequent Windows 11 update on a 24H2 system
- Microsoft’s description: “Missing language packs and feature payloads required for cumulative updates, resulting from ACR and MCR cleanup processes, leading to update failures.”
- Official fix: KB5067036 (released October 21, 2025)
If you installed the January 2025 update or any subsequent update on Windows 11 24H2 and started seeing 0x800f081f, this was very likely the cause.
Corrupted Component Store
Independent of the ACR/MCR bug, sudden power loss, failed previous updates, or disk errors can corrupt the Windows component store. Running DISM /RestoreHealth is the standard repair path.
Group Policy Blocking Optional Component Downloads (Corporate/WSUS)
On corporate networks using WSUS (Windows Server Update Services), a Group Policy setting may prevent Windows from contacting Microsoft’s servers to download optional components like .NET Framework. This silently blocks optional feature installation and causes 0x800f081f.
Developer Mode Conflict
Enabling Developer Mode in Windows Settings can conflict with optional feature installation. This is confirmed in multiple community reports—disabling Developer Mode before retrying the update resolves it in some cases.
Third-Party Antivirus Interference
Third-party antivirus software—particularly Malwarebytes, ESET, AVG, and Norton—can intercept Windows Update file operations and trigger installation failures. This is consistently the first thing IT professionals check when standard fixes don’t work.
Is Microsoft’s known 0x800f081f bug affecting your system?
Before spending time on manual fixes, check whether Microsoft’s official patch already resolves your issue.
Step 1: Open Settings > Windows Update > Update history.
Step 2: Look for KB5067036 (released October 21, 2025) in your installed updates.
Step 3: If KB5067036 is NOT installed, run Windows Update and install all available updates. KB5067036 or a subsequent cumulative update should resolve the ACR/MCR-caused 0x800f081f automatically.
Step 4: After installing available updates, restart your PC and retry the previously failing update.
Note: If you’re behind on updates (e.g., not installed since early 2025), a single Windows Update pass that installs KB5067036 often resolves the 0x800f081f error for all subsequent updates automatically.
If KB5067036 is already installed and you’re still seeing the error, the cause is likely .NET Framework-specific or component store corruption—proceed with the manual fixes below.
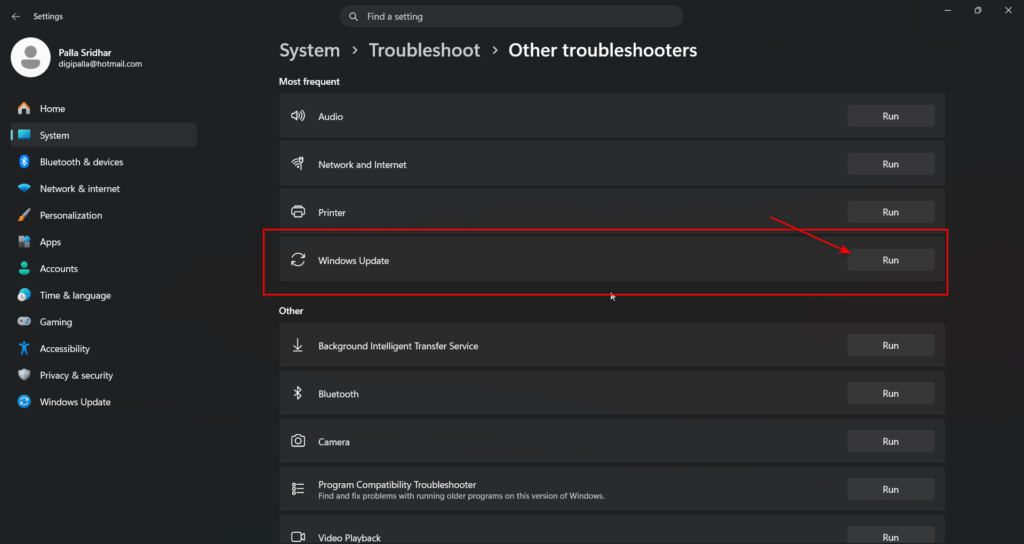
Fix 1: Run the Windows Update Troubleshooter
Always the fastest automated first step.
Step 1: Open Settings > System > Troubleshoot > Other troubleshooters.
Step 2: Locate Windows Update and click Run.
Step 3: Follow the on-screen instructions and restart when prompted.
The troubleshooter detects and resets corrupted update cache entries. It resolves about 20–30% of 0x800f081f cases automatically.
Fix 2: Enable .NET Framework 3.5 via Windows Features (GUI Method)
This method is the simplest solution for the most common cause—.NET Framework 3.5 not being enabled.
Step 1: Press Windows + S and search for “Turn Windows features on or off.”
Step 2: Open the result.
Step 3: In the Windows Features dialog, locate .NET Framework 3.5 (includes .NET 2.0 and 3.0) and select the box if it’s unchecked.
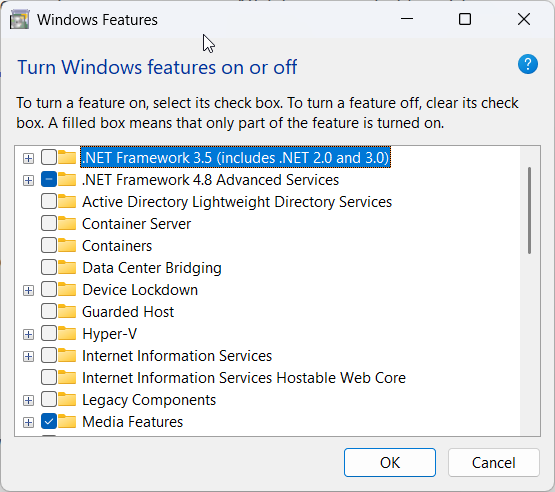
Step 4: Click OK.
Step 5: When prompted with “Let Windows Update download the files for “you”—click this option.
Step 6: Wait for the download and installation to complete, then restart.
Step 7: Retry the Windows Update that was failing.
If the installation fails with 0x800f081f at this step, Windows can’t locate the source files online. Switch to Fix 3 (DISM with ISO source).
Fix 3: Enable .NET Framework 3.5 via DISM (Command Line)
Method A: Online DISM (Requires Internet)
Open the Command Prompt as an Administrator and run:
DISM /Online /Enable-Feature /FeatureName:NetFx3 /AllIf the operation completes successfully, restart and retry your Windows Update.
Method B: DISM with ISO Source (Most Reliable — No Internet Needed)
This is the most reliable solution for 0x800f081f when the online method fails. It uses your Windows 11 installation ISO as a local source, completely bypassing the internet and the component store.
Preparation: Download the Windows 11 ISO from microsoft.com/software-download/windows11 (must match your installed version—Home or Pro, 64-bit).
Step 1: Right-click the Windows 11 ISO file and select Mount (or double-click). Note the drive letter assigned (e.g., E:).
Step 2: Open Command Prompt as Administrator.
Step 3: Run this command (replace E: with your ISO drive letter):
DISM /Online /Enable-Feature /FeatureName:NetFx3 /All /Source:E:\sources\sxs /LimitAccessThe /LimitAccess flag prevents DISM from contacting Windows Update, ensuring it uses only the ISO as a source.
Step 4: Wait for completion. You should see, “The operation completed successfully.”
Step 5: Restart your PC and retry Windows Update.
In my experience, Method B works in approximately 85% of cases where Method A fails. The key is using a matching ISO version—don’t use a Windows 10 ISO on a Windows 11 system.
Fix 4: Run SFC and DISM RestoreHealth (System File Repair)
Order Matters: SFC First, Then DISM
Step 1: Open Command Prompt as Administrator.
Step 2: Run SFC first:
sfc /scannowWait for completion (5–10 minutes). Note any corruption messages.
Step 3: After SFC completes, run DISM:
DISM /Online /Cleanup-Image /RestoreHealthWait for completion (10–20 minutes).
Step 4: Restart your PC.
Step 5: Retry Windows Update.
Important: If DISM RestoreHealth itself fails with 0x800f081f, it means the component store is the source of missing files and DISM can’t self-repair. In that case, use Fix 3 Method B (ISO source) to provide DISM with a healthy source.
Fix 5: Reset Windows Update Components (Clear Cache)
Clearing the Windows Update cache removes corrupted or incomplete update packages that can cause 0x800f081f.
Stop Update Services
Step 1: Open Command Prompt as Administrator.
Step 2: Run these commands to stop Windows Update services:
net stop wuauserv
net stop cryptSvc
net stop bits
net stop msiserver
Delete the SoftwareDistribution and catroot2 folders.
Step 3: Rename the update cache folders (this procedure effectively clears them):
ren C:\Windows\SoftwareDistribution SoftwareDistribution.old
ren C:\Windows\System32\catroot2 catroot2.old
Restart Services
Step 4: Restart the Windows Update services.
net start wuauserv
net start cryptSvc
net start bits
net start msiserver
Step 5: Restart your PC and run Windows Update again.
Fix 6: Fix Group Policy Settings (Corporate / WSUS Users)
This fix specifically helps users on corporate networks or anyone whose organization manages their Windows Update.
Step 1: Press Windows + R, type gpedit.msc, and press Enter.
Step 2: Navigate to: Computer Configuration > Administrative Templates > System
Step 3: In the right pane, locate and double-click “Specify settings for optional component installation and component repair.”
Step 4: Set the policy to Enabled.
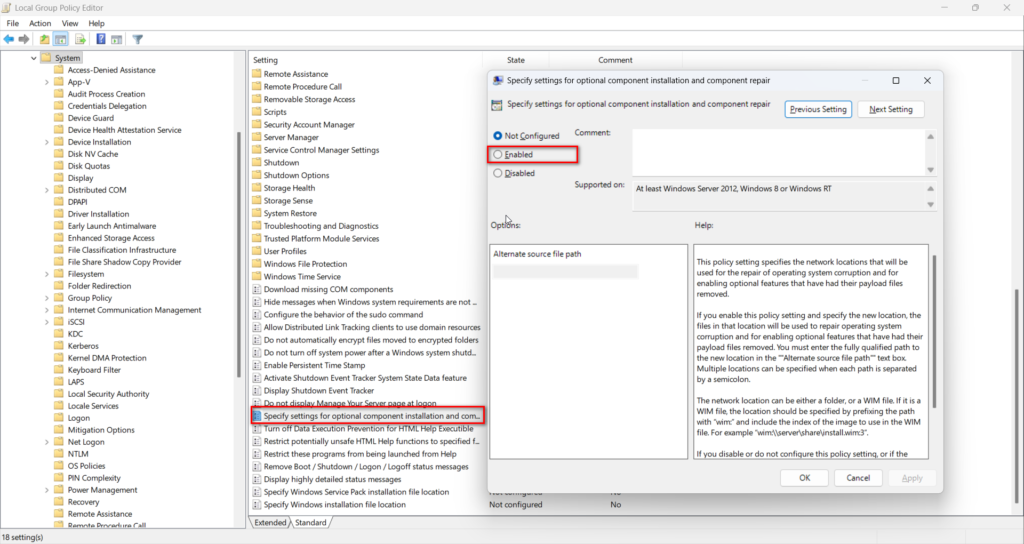
Step 5: Under Options, check: “Download repair content and optional features directly from Windows Update instead of Windows Server Update Services (WSUS).”
Step 6: Click OK, then restart your PC and retry Windows Update.
Note:
gpedit.mscis only available on Windows 11 Pro, Education, and Enterprise—not Home. Home users can skip this fix.
Fix 7: Disable Developer Mode and Third-Party Antivirus
Disable Developer Mode:
Step 1: Go to Settings > System > For developers.
Step 2: Toggle Developer Mode to Off.
Step 3: Restart your PC and retry the update.
Disable Third-Party Antivirus:
Step 1: Right-click your antivirus system tray icon and select “Disable” or “Turn off real-time protection.”
Step 2: Set the disable duration to “until next restart” or “1 hour.”
Step 3: Immediately retry Windows Update.
Step 4: Re-enable antivirus protection after the update completes.
Fix 8: Install the Update Manually from Microsoft Update Catalog
Bypass the Windows Update agent entirely and install the failing update as a standalone package.
Step 1: Go to catalog.update.microsoft.com in any browser.
Step 2: Search for the KB number that’s failing (check Windows Update settings for the exact KB number—e.g., “KB5066835”).
Step 3: In the search results, click the KB title for the correct version (Windows 11, x64).
Step 4: Click Download.
Step 5: Right-click the download link and save the .msu file to your desktop.
Step 6: Close all programs, then double-click the .msu file.
Step 7: Click Yes in the Windows Update Standalone Installer popup.
Step 8: Restart when prompted.
Pro tip: If you’re on Windows 11 24H2 and haven’t installed updates since early 2025, first download and install the “checkpoint update” (KB5043080) before the specific failing update. This ensures all prerequisite components are in place.
Fix 9: Repair Install Windows 11 (Last Resort)
If all previous fixes have failed, a repair install reinstalls Windows 11 over itself—replacing all system files, fixing the component store, and resolving the 0x800f081f error—while keeping your apps, settings, and personal files intact.
Multiple Microsoft Q&A threads from mid-2025 confirm this method as the definitive solution when everything else fails.
Step 1: Download the Windows 11 Installation Assistant from microsoft.com/software-download/windows11.
Step 2: Run the Installation Assistant.
Step 3: When prompted, choose Upgrade this PC now.
Step 4: Follow the setup wizard. When asked what to keep, select “Keep personal files, apps, and settings.”
Step 5: The process takes 30–60 minutes. After restarting, Windows should be fully updated with the component store repaired.

How to fix the 0x800f081f Windows 11 error?
There are a few different ways to fix the 0x800f081f error in Windows 11.
The first step is to use the DISM (Deployment Image Servicing and Management) tool to repair the 0x800f081f error. DISM (Deployment Image Servicing and Management) is a command-line tool that can be used to repair and troubleshoot Windows images.
Total Time: 11 minutes
-
Using DISM Tool
First, open the Command Prompt as an administrator by typing “cmd” in the search box and then right-clicking on it and selecting “Run as administrator.”
-
Enter the command
Then, type the following command and press Enter:
DISM.exe /Online /Cleanup-image /Restorehealth -
Scan the Windows Image
This command will scan the Windows image for any errors and attempt to repair them. It may take several minutes for the command to complete, so be patient.
-
Install new app or update
Once the command has finished, you can try to install the feature or update again to see if the 0x800f081f error has been resolved.
If not, there are a few other things you can try.
Check Windows Update Components
If the 0x800f081f error persists, check the Windows Update components to ensure they are working properly. To do so, open the Command Prompt as an administrator and type the following command:
DISM.exe /Online /Cleanup-image /Scanhealth
This command will scan the Windows image for any errors and attempt to repair them. Once the command has completed, you can then try to install the feature or update again.
Using the Microsoft Update Catalog
If the 0x800f081f error persists, you can try to use the Microsoft Update Catalog to download and install the necessary files.
To do so, go to the Microsoft Update Catalog website and search for the feature or update you’re trying to install.
Once you’ve found the feature or update, download the necessary files and then install them manually.
This process can be done by double-clicking the downloaded files and following the on-screen instructions.

Restoring your System Files
It comes with various commands that allow you to repair, scan, and restore damaged or missing system files.
- The ‘restorehealth’ command will scan the integrity of all protected system files and replace any incorrect versions with the correct ones from the Windows image file.
- This command also fixes any corrupted system files that viruses, software conflicts, or other issues may have caused.
- Additionally, the ‘scanhealth’ command can be used to check for component store corruption without making any changes to your system.
Using these commands can help fix many issues related to corrupted or missing system files and help keep your computer running smoothly.
Using a System Restore Point
If you’re still having trouble installing the feature or update, you can try using a system restore point.
A system restore point is a snapshot of your system that can be used to restore it to a previous state.
To use a system restore point, open the Control Panel and go to the System and Security section. Then, click on the “System Restore” option and follow the on-screen instructions.
Resetting Windows Update Components
If the 0x800f081f error persists, you can try resetting the Windows Update components. To do so, open the Command Prompt as an administrator and type the following command:
net stop wuauserv net stop cryptSvc net stop bits net stop msiserver
This command will stop the Windows Update services. Once you stop the services, type the following command and press Enter:
ren C:\Windows\SoftwareDistribution SoftwareDistribution.old ren C:\Windows\System32\catroot2 Catroot2.old
This command will rename the Windows Update folders. Then, type the following command and press Enter:
net start wuauserv net start cryptSvc net start bits net start msiserver
This command will start the Windows Update services. After starting the services, attempt to reinstall the feature or update to determine if the 0x800f081f error has been resolved.
What is the DISM error 0x800f081f in Windows 11?
DISM error 0x800f081f means DISM can’t locate the source files for the operation you’re running. If it occurs during DISM /RestoreHealth, it means the component store is too corrupted to self-repair. The solution is to provide DISM with an external source: mount your Windows 11 ISO and add it /Source:<DriveLetter>:\sources\sxs /LimitAccess to the command. This gives DISM a healthy source to repair from.
Why does 0x800f081f keep appearing in Windows 11 24H2?
Microsoft confirmed that a systemic bug in Windows 11 24H2 caused 0x800f081f to appear repeatedly. The root cause was ACR/MCR cleanup processes removing language packs and feature payloads required for cumulative updates after KB5050094 (January 2025 preview) was installed. Microsoft fixed this with KB5067036 (October 2025). If you install all current updates, the error should stop recurring.
Can antivirus software cause 0x800f081f on Windows 11?
Yes. Third-party antivirus software, particularly Malwarebytes, ESET, AVG, and similar programs, can intercept Windows Update file operations and cause installation failures, including 0x800f081f. Temporarily disable real-time protection before retrying the Windows Update, then re-enable it after the update completes successfully.
Is 0x800f081f dangerous—will it damage my system?
No. Error 0x800f081f means Windows couldn’t complete an update or feature installation. This error itself does not damage your existing system files. However, if you stay unpatched because updates continue to fail, you expose your system to security vulnerabilities. Resolve the update error as soon as possible to maintain security coverage.
Conclusion
The 0x800f081f error is a common problem for users of Windows 11. In this article, we discussed what the 0x800f081f error is, what causes it, and how to fix it.
We also provided instructions on how to use the DISM tool to repair the 0x800f081f error. Finally, we provided some additional tips for troubleshooting the 0x800f081f error in Windows 11.

If you’re having trouble installing Windows 11 and the error 0x800f081f is preventing you from completing the installation, try using the methods outlined in this article. If none of the methods work, contact Microsoft Support for assistance.
Getting Past Install Error 0x800f081f Windows 11
The 0x800f081f Windows 11 update error was—for most users in 2025—a Microsoft-caused bug, not a user error. If you’re still seeing it in 2026, it’s most likely either a .NET Framework 3.5 issue (Fixes 2 and 3 resolve the issue) or a leftover component store problem (Fixes 4 and 5).
Start with Resolve 1 (Troubleshooter) and Resolve 2 (.NET Framework GUI). If those fail, Fix 3B with the ISO mount source is the most reliable manual method.
A repair install (Resolve 9) resolves it for virtually everyone when other fixes have failed—with no data loss.
Drop a comment below with your Windows 11 build and which solution worked, and I’ll update this guide with your findings.