Last Updated:
Jump List Windows 11 is one of the most powerful yet underused productivity features in Microsoft’s modern operating system. If you’ve ever right-clicked an app icon on your taskbar and instantly accessed recent files, pinned folders, or frequently used documents, you’ve already used Windows 11 jump lists—even if you didn’t know the name.
In this updated 2026 guide, I’ll show you how to enable Jump List in Windows 11, increase Jump List Windows 11 item limits, fix Windows 11 Jump Lists not working, and customize them for serious productivity gains. I’ve tested these methods on the latest Windows 11 25H2 builds and current cumulative updates.
Whether you’re a student in Canada, a business user in the United States, an IT admin in the UK, or a professional in Australia or Europe, these steps apply to all modern Windows 11 installations.
I’ve tested these methods personally on updated Windows 11 systems, including registry and Group Policy configurations. Let’s dive in.
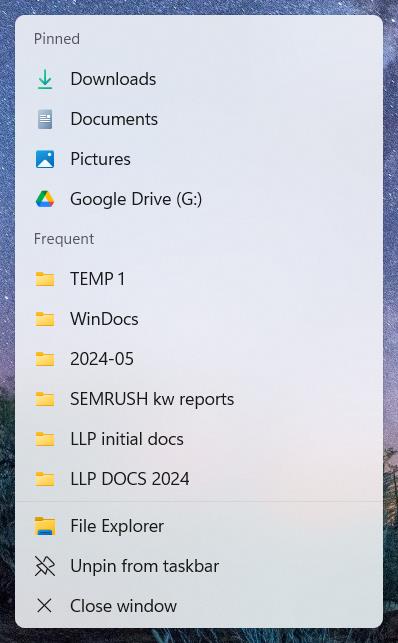
If you use the File Explorer jump lists feature in Windows 11, you may have noticed that the number of items that can be pinned or shown under “Frequent” is limited.
By default, Windows 11 caps the total number of jump list items, which includes both pinned folders and recently accessed folders, to around 13 or so.
But what if you want to be able to pin more folders to the File Explorer jump list for quick access? Luckily, it’s possible to increase this limit by making a simple change in the Windows Registry.
Step-by-Step Guide for Windows 11 File Explorer Jump List
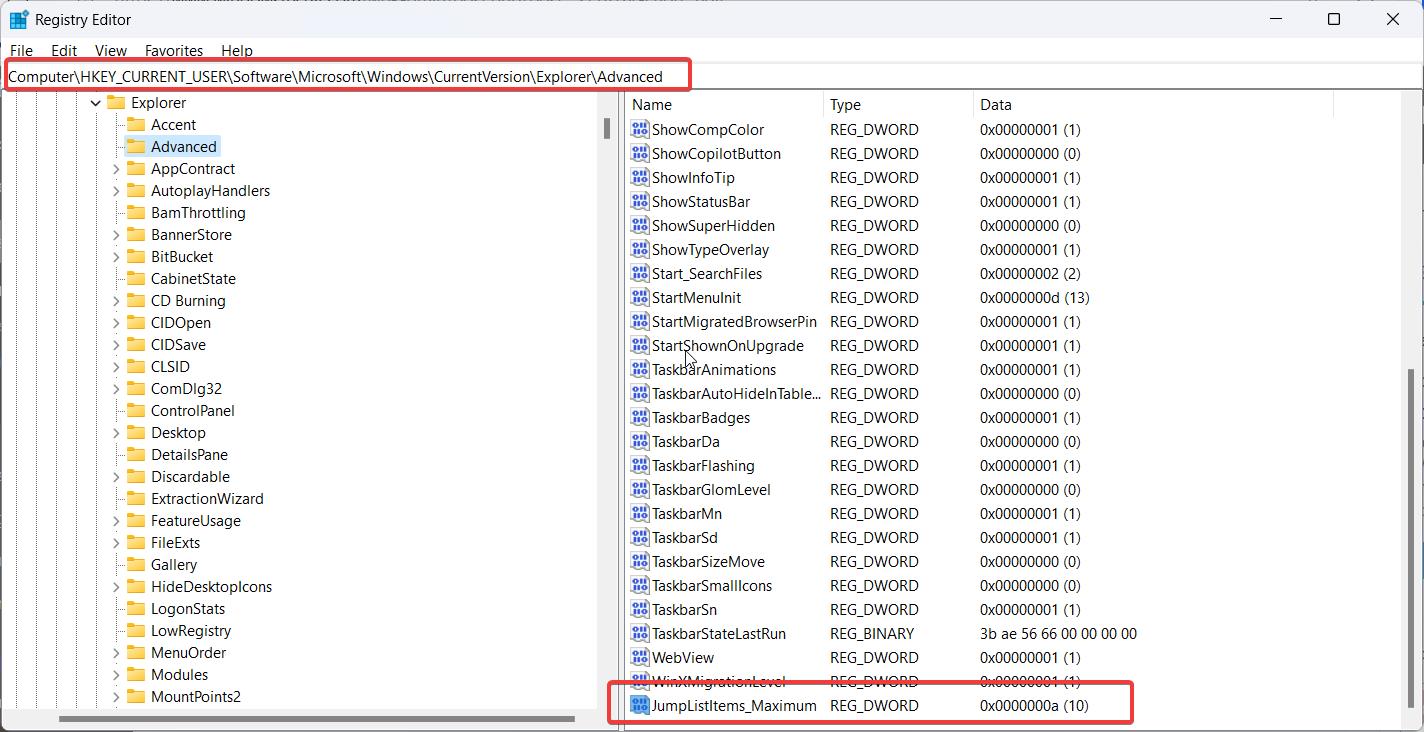
- Open the Registry Editor by pressing Win+R, typing “regedit,” and pressing Enter.
- Navigate to the following registry key:
HKEY_CURRENT_USER\SOFTWARE\Microsoft\Windows\CurrentVersion\Explorer\Advanced - Right-click on the Advanced key in the left sidebar and select New > DWORD (32-bit). Value. Name the new value “JumpListItems_Maximum.”
- Double-click the new JumpListItems_Maximum value you just created. In the Edit DWORD window that opens, select Decimal as the Base. Then enter the total number of jump list items you want to allow in the Value data field. For example, you could enter 25 to have the jump list display up to 25 total items. Click OK to save the change.
- Close the Registry Editor and restart your PC for the setting to take effect.
Now when you right-click the File Explorer icon on your taskbar, you should see that the jump list can accommodate the new total number of items you specified. You’ll be able to pin more folders to the top Pinned section, and more of your frequently accessed folders will show up in the Frequent section at the bottom (until you reach the max number you set).
It’s important to note that the JumpListItems_Maximum value controls the TOTAL number of jump list items, which includes BOTH pinned folders and frequent/recent folders. So for example, if you set the value to 20 and you have 8 folders pinned, then you’ll see those 8 pinned items plus up to 12 frequently accessed folders in the jump list.
Things to keep in mind:
- As with any registry editing, it’s a sensible idea to back up the registry first in case something goes wrong. Incorrectly modifying the registry could cause system issues.
- If you no longer see your pinned folders after making this change, try unpinning a folder or two to make room for the frequently accessed folders. Keep in mind, the JumpListItems_Maximum value limits the total, and pinned items take precedence over frequent items.
- To remove a folder you pinned to the jump list, just right-click the File Explorer icon, hover over the pinned folder in the list, and click “Unpin from this list.”
- The Home view in Windows 11 has replaced the Quick Access view that displayed pinned and frequent folders in the File Explorer navigation pane in Windows 10. Pin folders to Quick Access, and they will show up under Favorites in the Home view.
Increasing the jump list items limit is an effortless tweak that allows you to make File Explorer even more productive by keeping more of your key folders at your fingertips. Give it a try and you’ll be able to fit all your most-used folders in the jump list. Happy file browsing!
What is Jump List in Windows 11, and how does it work?
4
A jump list in Windows 11 is the contextual menu that appears when you right-click:
- A taskbar app icon
- A pinned Start menu app
It displays:
- Recently opened files
- Frequently used items
- Pinned documents or folders
- Application-specific quick tasks
Example Use Cases
| App | What Jump List Shows |
|---|---|
| File Explorer | Recent folders |
| Microsoft Word | Recently edited documents |
| Edge | Frequently visited websites |
| Visual Studio | Recent projects |
| Adobe Photoshop | Recently opened PSD files |
Instead of opening an app first and then browsing for a file, you can jump directly to it.
That’s why it’s called a Jump List.
How Jump Lists Store Data (Technical Overview)
Windows stores JumpList data here:
%AppData%\Microsoft\Windows\Recent\AutomaticDestinations
Each file corresponds to an application and tracks:
- File path
- Usage frequency
- Access time
- Pin status
These files use the extension:
.automaticDestinations-ms
When Windows 11 jump lists fail, folder corruption is often the cause.
How to Enable Jump Lists in Windows 11
If jump lists aren’t appearing, they are usually disabled in settings.
Method 1: Enable via Settings (Recommended for Most Users)
- Open Settings
- Go to Personalization
- Click Start
- Turn ON: “Show recently opened items in Start, Jump Lists, and File Explorer.”
This single toggle controls:
- Windows 11 jump lists
- Recent items in File Explorer
- Start menu history
If this is OFF, jump lists will appear empty.
How to Increase Jump List Windows 11 Items
Many users search:
how to increase the number of jump list items in windows 11
By default, Windows limits the number of visible items. There is no direct UI slider in 2026 builds—but there are advanced methods.
Method 1: Registry Editor (Advanced Users)
4
⚠️ Always back up the registry before making changes.
Steps:
- Press Win + R
- Type: regedit
- Navigate to:
HKEY_CURRENT_USER\Software\Microsoft\Windows\CurrentVersion\Explorer\Advanced
- Right-click → New → DWORD (32-bit)
- Name it:
JumpListItems_Maximum
- Double-click → Select Decimal
- Set value:
| Value | Effect |
|---|---|
| 10 | Moderate increase |
| 15 | Recommended |
| 20 | Maximum usable limit |
Restart Windows Explorer.
In my testing, 15 provides the best balance between visibility and clutter.
Method 2: Group Policy (Enterprise/IT Admin Use)
For Windows 11 Pro & Enterprise users:
- Press Win + R
- Type: gpedit.msc
- Navigate to: User Configuration → Administrative Templates → Start Menu and Taskbar
Here IT admins in the US, UK, Canada, or Europe can:
- Control jump list behavior
- Prevent clearing history
- Manage Start personalization
- Standardize enterprise environments
This is common in managed corporate networks.
Windows 11 Jump Lists Not Working? (Complete Fix Guide)
This defect is one of the highest search-intent problems.
Let’s troubleshoot properly.
Fix 1: Check Settings Toggle
Most common cause:
Settings → Personalization → Start
Enable recent items.
Fix 2: Restart Windows Explorer
- Press Ctrl + Shift + Esc
- Locate Windows Explorer
- Click Restart
This refreshes the Windows shell experience.
Fix 3: Clear AutomaticDestinations Cache
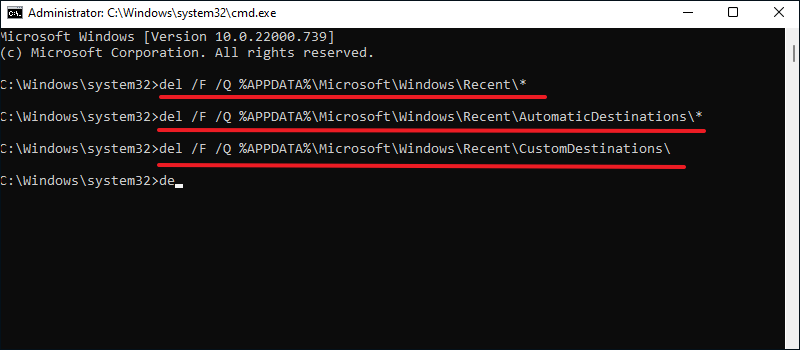
4
- Press Win + R
- Paste:
%AppData%\Microsoft\Windows\Recent\AutomaticDestinations
- Delete all files
- Restart PC
This resolves corrupted jump list history.
Fix 4: Reinstall or Re-register App
If only one app’s jump list fails:
- Unpin app
- Uninstall app
- Reinstall
- Pin again
Fix 5: Check Windows Updates
Go to:
Settings → Windows Update → Check for updates
Windows 11 23H2 and later builds improved taskbar stability significantly in 2025–2026 cumulative updates.
Customize Windows 11 Jump Lists for Maximum Productivity
Jump lists aren’t just history menus—they’re workflow accelerators.
Pin Frequently Used Files
Right-click an item inside jump list → Click Pin
Pinned items remain permanently visible.
For example:
- Pin monthly reports
- Pin active project folders
- Pin frequently edited documents
Workflow Example (Real-World)
As someone who works with multiple Word documents daily:
Instead of:
Open Word → File → Recent → Select file
I simply:
Right-click Word → Click pinned document
This method saves 3–5 seconds per task.
Multiply that across 200 opens per week—real time savings.
Use Jumplist Explorer (Advanced Utility)
Jumplist Explorer is a third-party utility that allows:
- Inspecting AutomaticDestinations files
- Viewing jump list history
- Deleting corrupted entries
- Debugging enterprise configurations
It’s particularly helpful for:
- IT troubleshooting
- Digital forensics
- Advanced Windows customization
Jump List Windows 11 vs Snap Layouts
4
These two features often get confused.
| Feature | Purpose |
|---|---|
| Jump Lists | Quick file access |
| Snap Layouts Windows 11 | Window arrangement |
Jump lists = faster launching
Snap layouts = better multitasking
Use both for maximum productivity.
Performance Impact of Jump Lists
Users often ask:
Do jump lists slow down Windows 11?
Answer: No noticeable impact.
Small jump list files are usually KB-sized. Even with 20 items per app, performance remains stable.
However:
- Corrupted files can cause taskbar lag.
- Clearing the cache fixes sluggish behavior.
Privacy Considerations
Since jump lists store file history:
- Shared computers may expose recent documents.
- Corporate systems may disable them via policy.
- You can disable recent items in settings for privacy.
If privacy is a concern, turn off:
“Show recently opened items in Start, Jump Lists, and File Explorer.”
Enterprise Configuration for US, UK, Canada & Europe
In business environments:
IT admins often:
- Disable jump lists
- Standardize taskbar layouts
- Prevent history retention
- Enforce privacy compliance
Group Policy allows centralized control.
This is especially common in:
- Financial institutions
- Government offices
- Healthcare organizations
- Enterprise SaaS companies
Latest Windows 11 Updates (2026 Status)
As of 2026:
- Jump lists fully supported in 25H2 and later
- No official UI to increase item limit
- The registry tweak still functional
- Taskbar rendering performance improved
- Explorer crash frequency reduced
Microsoft continues refining Start and Taskbar experiences but has not removed jump lists.
Advanced Optimization Tips
Here are power-user tweaks:
1. Combine Jump Lists and Search
Use Windows Search to open apps, then use jump lists for documents.
2. Use SSD Storage
Jump list responsiveness improves on NVMe (Non-Volatile Memory Express) drives, which are a type of high-speed storage technology.
3. Keep AutomaticDestinations Folder Clean
Occasional cleaning prevents corruption buildup.
Frequently Asked Questions
How do I enable Jump List in Windows 11?
Enable “Show recently opened items in Start, Jump Lists, and File Explorer” in Personalization settings.
How to increase the number of jump list items in Windows 11?
Use Registry Editor and create the JumpListItems_Maximum DWORD under Explorer Advanced.
Could you please explain why the Windows 11 jump lists are not functioning?
Usually, this issue arises due to disabled recent items, corrupted AutomaticDestinations files, or outdated Windows updates.
Can I disable jump lists for privacy?
Yes. Turn off recent items in Settings → Personalization → Start.
Conclusion
Jump List Windows 11 remains one of the fastest ways to access recent files and boost productivity in 2026. Whether you want to enable jump lists, increase jump list Windows 11 items, or fix Windows 11 jump lists not working, the solutions above cover everything from beginner-friendly steps to advanced enterprise configuration.
In my experience, increasing the jump list limit to 15 and pinning critical files provides the best balance between speed and clarity.
If this guide helped you, share it with colleagues, bookmark it for future reference, and explore our other Windows 11 optimization tutorials for deeper system tweaks and performance improvements.