Windows 11, the latest operating system from Microsoft, brings a fresh and modern user interface along with several productivity-enhancing features.
One of these features is the Jump Lists, which provide quick access to recently used files and folders, as well as customizable shortcuts to your favorite locations in File Explorer.
Jump Lists can significantly speed up your workflow by reducing the time spent navigating through folders and subfolders to find the files you need.
In this comprehensive guide, we will walk you through the process of adding items to Jump Lists in Windows 11 File Explorer. By following these step-by-step instructions, you’ll be able to personalize your File Explorer experience and make the most out of this convenient feature.
Understanding Jump Lists
Before we dive into the process of adding items to Jump Lists, let’s take a moment to understand what they are and how they work.
Jump Lists are context-sensitive menus that appear when you right-click on an app’s icon in the taskbar or Start menu.

They provide quick access to recently opened files, frequently used commands, and pinned items associated with that particular app.
In the case of File Explorer, Jump Lists allow you to access recently used folders and pinned locations without having to navigate through the file system manually.
Enabling Jump Lists in File Explorer
Jump Lists are enabled by default in File Explorer on Windows 11. However, if you have previously disabled them or they are not working as expected, you can follow these steps to enable Jump Lists:
- Open the Settings app by pressing the Windows key + I or by clicking on the Start menu and selecting “Settings.”
- In the Settings window, click on “Personalization” in the left sidebar.
- On the right side of the window, scroll down and click on “Start.”
- Under the “Start” settings, scroll down until you see the “Jump lists” section.
- Make sure the following options are toggled on:
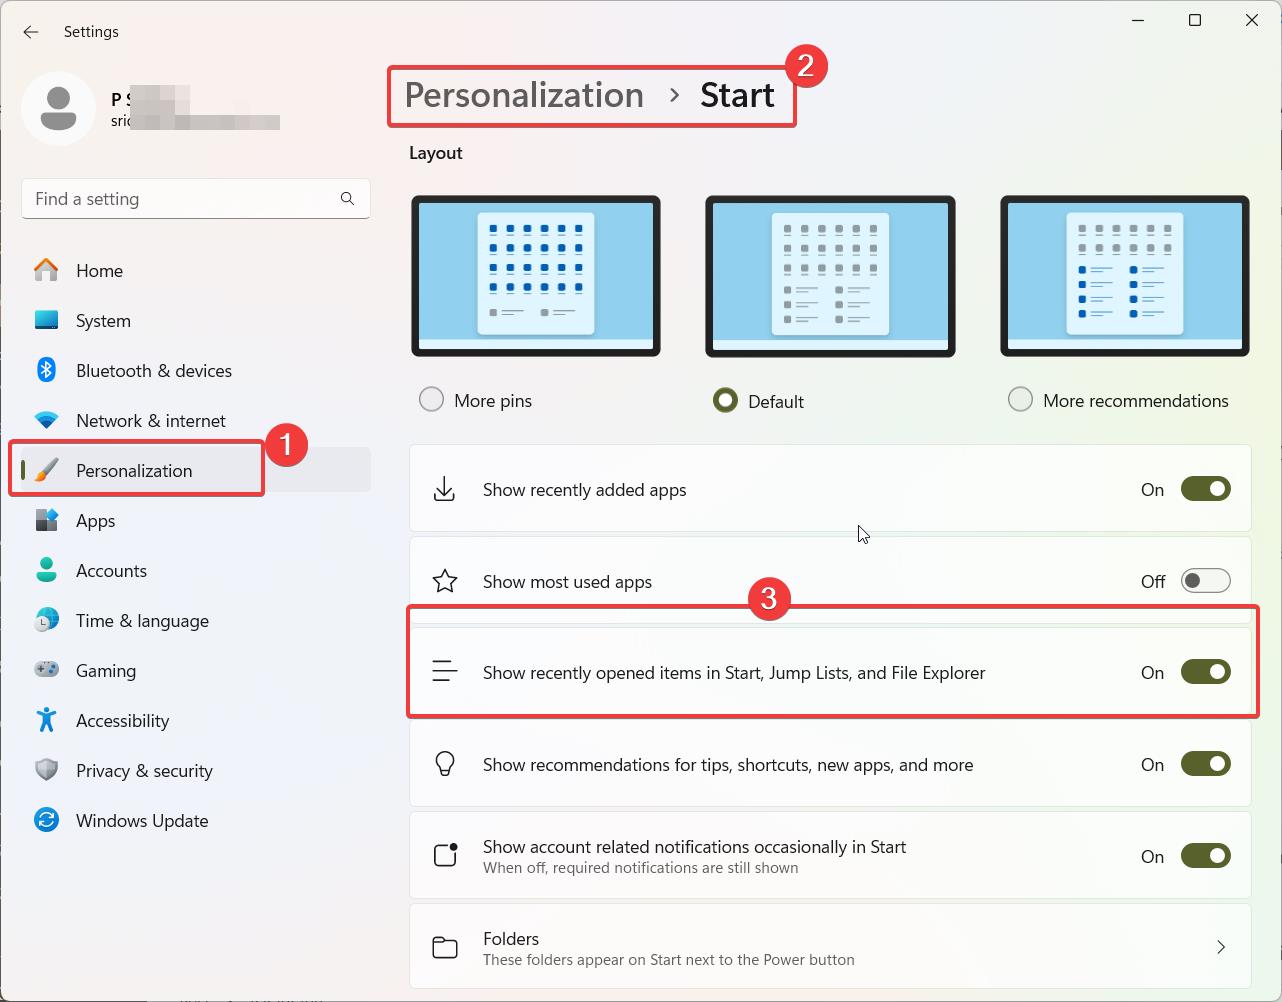
- Show recently opened items in Jump Lists on Start or the taskbar.
- Show recently opened items in Jump Lists on the Start menu.
- If the options are already toggled on, but Jump Lists are not working, you can try toggling them off and then back on again to reset the settings.
- Close the Settings app.
- Right-click on the File Explorer icon in the taskbar, and you should see the Jump List displaying recently opened items and pinned items (if any).
If the Jump Lists are still not appearing or functioning properly after enabling them, you can try the following additional steps:
- Restart your computer to ensure the changes take effect.
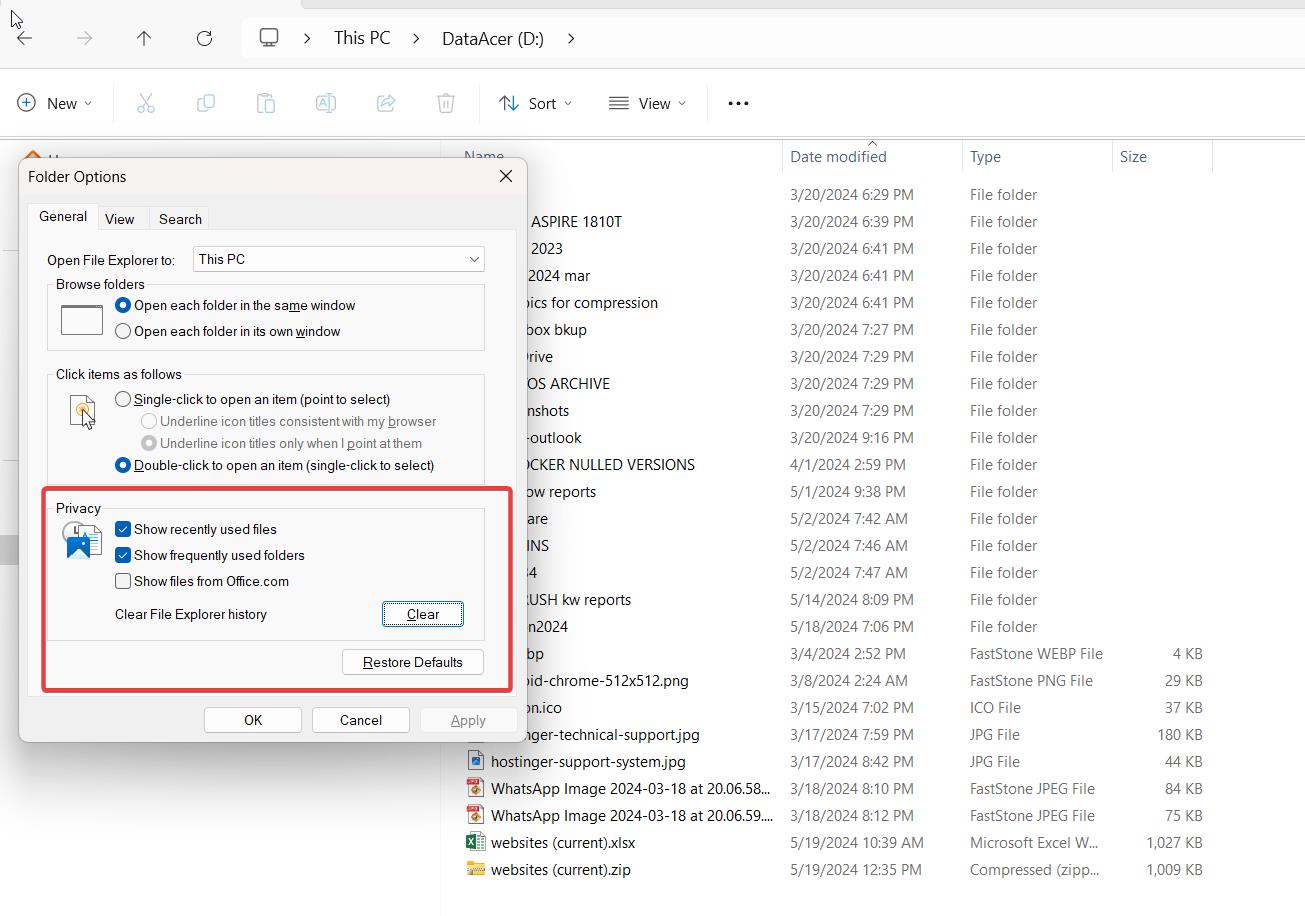
- Open File Explorer, right-click on an empty space in the file list, and select “Options” from the context menu.
- In the Folder Options window, go to the “View” tab.
- Scroll down in the “Advanced settings” list and make sure the option “Show recently used files in Quick Access” is checked.
- Click “Apply” and then “OK” to save the changes.
After following these steps, the Jump Lists should be enabled and visible when you right-click on the File Explorer icon in the taskbar.
Adding Recent Folders to Jump Lists
One of the most useful aspects of Jump Lists is their ability to display recently accessed folders. To add a folder to your File Explorer Jump List, simply navigate to that folder in File Explorer. Windows 11 automatically keeps track of the folders you visit and adds them to the Jump List.
To access recent folders from the Jump List:
- Right-click on the File Explorer icon in the taskbar.
- The Jump List will appear, displaying a list of recently used folders.
- Click on a folder in the Jump List to open it directly in File Explorer.
Keep in mind that the Jump List will only display a limited number of recent folders. As you access new folders, older ones will be removed from the list to make room for the newer entries.
Pinning Folders to Jump Lists
In addition to recent folders, you can also pin your favorite or frequently used folders to the File Explorer Jump List for even faster access. Pinned folders remain in the Jump List regardless of how recently you’ve accessed them, making them ideal for projects or locations you visit regularly.
To pin a folder to the File Explorer Jump List:
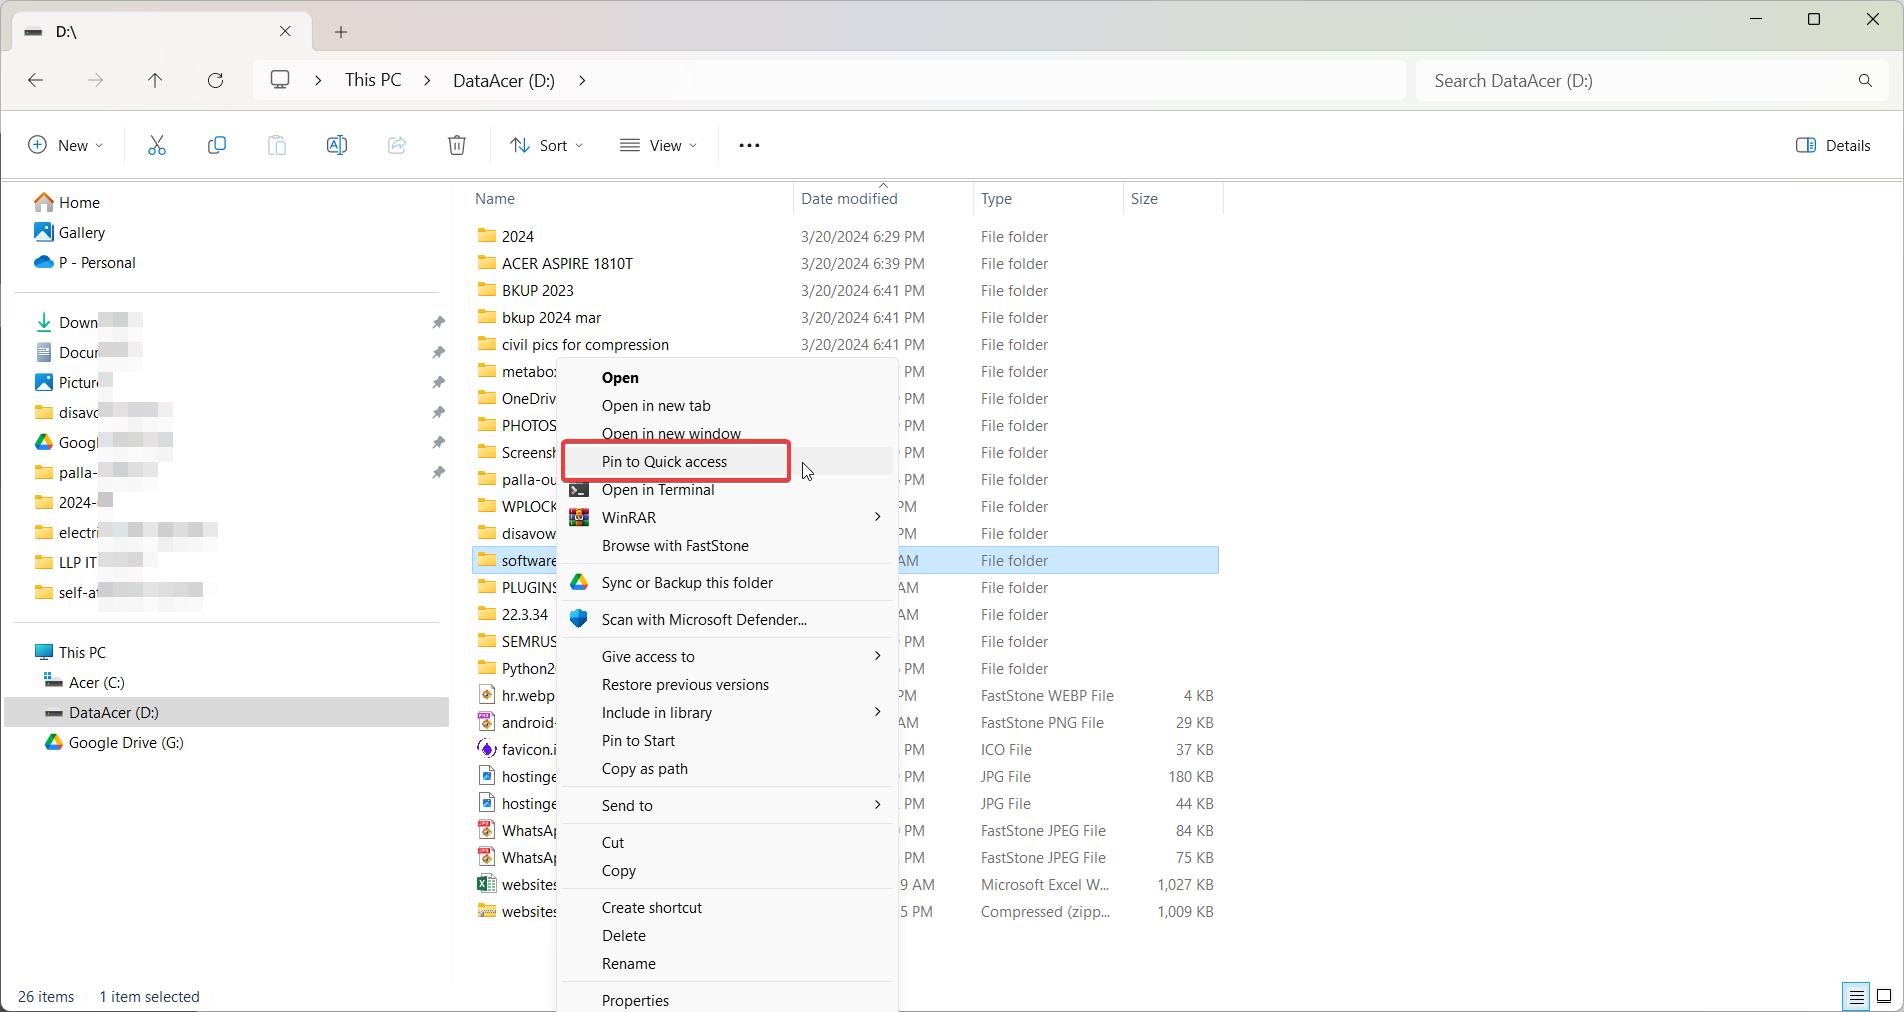
- Open File Explorer and navigate to the folder you want to pin.
- Right-click on the folder.
- From the context menu, select “Pin to Quick access.”
- The folder will now appear under the “Pinned” section of the File Explorer Jump List.
To unpin a folder from the Jump List, simply right-click on the pinned folder in the Jump List and select “Unpin from Quick access.”
Customizing Jump Lists
In Windows 11, you can customize the jump lists for File Explorer to pin frequently used items or remove unwanted items. Here’s how you can customize the jump lists:
- Open File Explorer by clicking on the File Explorer icon in the taskbar or by pressing the Windows key + E.
- Right-click on the File Explorer icon in the taskbar to open the jump list.
- To pin an item to the jump list:
- Open the folder containing the item you want to pin.
- Right-click on the item (file or folder) and select “Pin to Quick Access.”
- The item will now appear in the File Explorer jump list.
- To unpin an item from the jump list:
- Right-click on the File Explorer icon in the taskbar to open the jump list.
- Right-click on the item you want to remove from the jump list.
- Select “Unpin from Quick Access.”
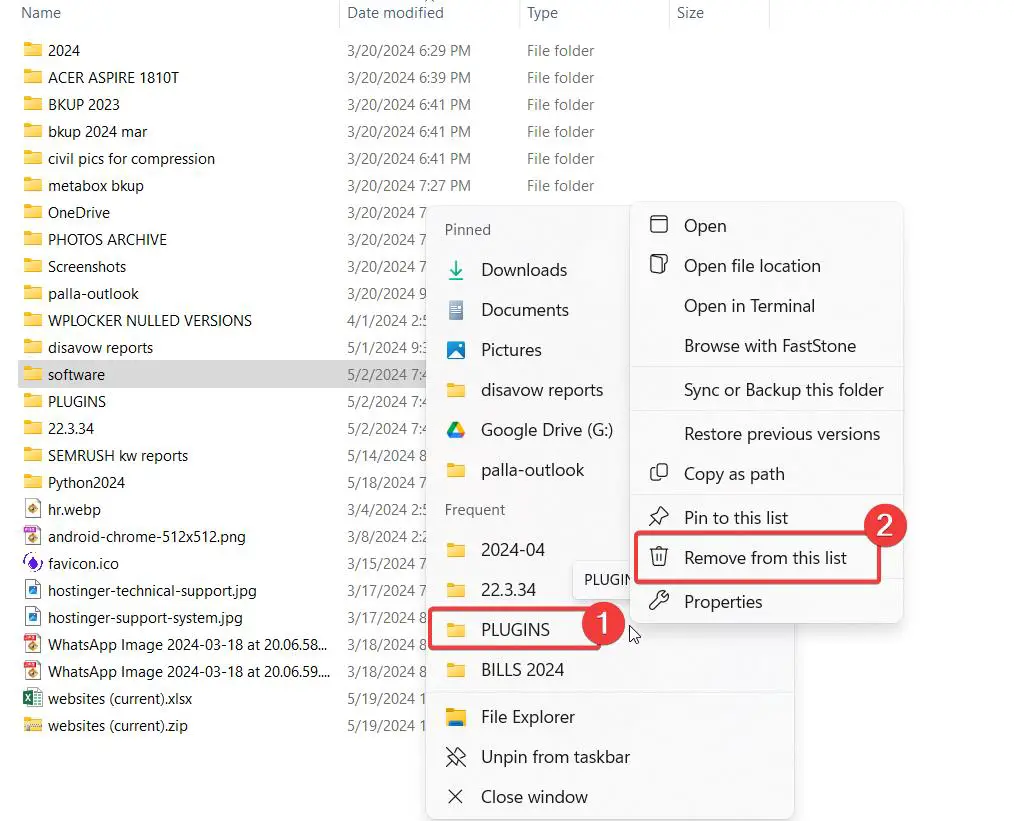
- To remove an item from the “Recent” section of the jump list:
- Right-click on the File Explorer icon in the taskbar to open the jump list.
- Right-click on the item you want to remove from the “Recent” section.
- Select “Remove from this list.”
- To clear the entire “Recent” section of the jump list:
- Right-click on the File Explorer icon in the taskbar to open the jump list.
- Click on “Clear recently opened items.”
By pinning items to the File Explorer jump list, you can quickly access your frequently used files and folders. Unpinning items and removing them from the “Recent” section allows you to declutter the jump list and maintain your privacy by removing the history of recently accessed items.
Note that the jump list customization is specific to each application, so you’ll need to customize the jump lists separately for other applications pinned to your taskbar.
Conclusion
Jump Lists in Windows 11 File Explorer provide a convenient and efficient way to access your recently used and favorite folders. By enabling Jump Lists, adding recent folders, pinning frequently used locations, and customizing the settings to suit your needs, you can streamline your workflow and spend less time navigating through the file system.
With this comprehensive guide, you now have the knowledge and tools to make the most out of the Jump Lists feature in Windows 11 File Explorer. Start organizing your folders and files today, and enjoy the productivity benefits of this powerful tool.


