Last Updated:
No Signal HDMI is an error message that usually shows up when the projector is not receiving signal from the source device.
This could be because something is wrong with the projector. Hardware malfunction could be one reason.
Different devices integrate with the source.
The source device is not securely connected.
The cable connecting the two, or the video format using an HDMI is broken.
It can be difficult to figure out the exact cause. Connected computer or video source is not updated.
But there are some steps you can take to try and resolve the issue.
Projector says no signal if there is something wrong between input and output.
First, check that the source device and projector are both turned on and properly.
Make sure the cables you’re using are capable of carrying the type of video.
If the cables are old, or have been damaged, they may not be able to handle the correctly.
Why Does My Projector HDMI Cable Keep Saying No Signal?
It means that your projector is not receiving an image from the connected video source.
If it is not on the HDMI source, you will get a ‘no signal’ message.
Use the remote to navigate to the HDMI source and ensure that the projector is set to receive.
If necessary, turn the projector and the computer off and then on again.
Additionally, you may need to replace the HDMI cable with a shorter one.
If you can see only the logo projected and the icons are missing, the computer is in Extended Desktop mode.

Here are the steps to change to Duplicate: To change back to single mode, follow these directions.
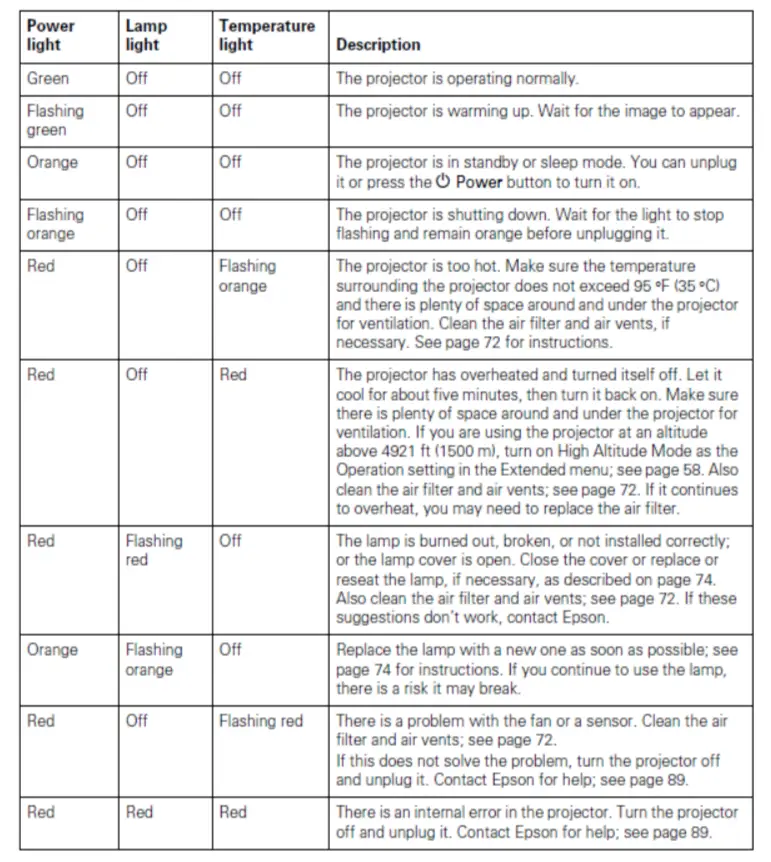
- Ensure that the Power light is green.
- If the light is orange, the computer may be in sleep mode.
- Press the Power button to turn it on.
- If the A/V mute slide is open, then press a key on the computer.
- Select a different source by pressing the Source Search button.
- Make sure that the cables are connected correctly.
- If they are, try different cables.
- Adjust the Brightness setting on the Image menu or select High for the Brightness Control setting in the Settings menu.
- Hold down the Enter button for seven seconds to enter setup.
- If the three lights are red, then reseat or replace the bulb.
- Check the pins on the VGA cable.
- If a pin is bent, straighten it, or replace it. Inspect the pins on each end of the VGA cable.
Identifying the Source of the Issue – See the Message
If you are confronted with the “No Signal” notification, the following steps may help you resolve the issue:
- Press the Source button on the projector in succession to toggle through the available sources. Give it a few moments for a picture to show.
- Switch on the linked computer or video source and press the play button to launch your demonstration, if required.
- Examine the connection from the projector to your video sources.
- If you are projecting from a laptop computer, make certain it is configured to project on an external monitor.
- If needed, turn off the projector and the linked computer or video source and then switch it back on again.
- If the other solutions don’t solve the problem, reset all the settings via the Reset menu.
Epson Projector Blue Screen No Signal – HDMI Port
Ensure the computer has power. Check the cords are linked up properly. If they are, try using substitute cables.
- On a laptop computer, you may need to press the Function (Fn) key and the F8 key at the same time.
- Adjust these settings for the Projector: Right click on the desktop and select “Properties”, and then go to the “Settings” tab.
- Select number two, and if the box labeled “Extend my Windows desktop onto this monitor” is unchecked, make sure it is checked and accept the changes.
- If the image on the screen appears distorted, you can adjust the resolution by altering the slide.
- Usually, “1024 by 768 pixels” works well. Additionally, click on the “Advanced” button, select the graphics driver tab, opt for the “Graphics Properties” and lastly, pick “Clone” operating mode.
Epson Projector No Signal Computer – Projector Screen
Carefully examine the pins on both ends of the VGA cable. If any of them are bent, try to straighten them out.
If that doesn’t work, you should switch the cable.
- In case the red color appears black, you will need to replace the VGA cable.
- When the output is purple, it is likely that the input is set to component instead of RGB.
- So press the Menu button and select the Advanced tab to change it to RGB.
- Lastly, if the image is pink, multicolored, or striped, go to the Menu button and adjust the Sync and Tracking settings.
- As well as the other settings in the Image menu.
Finally, remember to reset all settings to the factory default.
Epson Projector No Signal USB – Laptop
It has a simple setup process that involves connecting the projector to your laptop via USB.
And the projector automatically detects and displays the laptop’s signal.
The image quality is excellent.
- And there are multiple adjustment options available to customize your viewing experience.
- When using as input, then check the connection between the projector and the computer.
- Make sure the cable is plugged in securely on both ends.
- If the issue persists, try Check your HDMI and USB connections.
- Make sure the HDMI end of the adapter to the HDMI on your second display.
Additionally, you may need to replace the cable with a shorter one.
Connect to the Projector Not Showing Computer Screen Windows 11
If your projector is not displaying your computer’s screen on Windows 11, then check the connection between the projector and the source .
Make sure the cables are plugged in securely on both ends.
If the issue persists, try updating the video driver .
You can do this by going to the Device Manager, clicking the Display adapters, right-clicking the adapter, and selecting Update Driver.
Additionally, you may need to replace the HDMI cable with a shorter one.
HDMI input port is broken. Try to display on an external monitor. Set up to display to the correct resolution.
Projector and the connected computer are having correct settings. Message on your projector could indicate the problem. Using the source button, let the projector settings using the options take care of display automatically.
Turn on the connected computer. It could be off. There be a video or image. Press it play button to begin your presentation. Reset all of the projector settings as a last resort.
Caution!: Never or disconnect cables while your projector or devices are powered on. Cables can carry a low DC voltage and could cause a short or electric shock.
Epson Projector No Signal VGA – Troubleshoot
There are a few potential causes to a computer to an Epson projector via VGA cable. Some possible solutions include:
- Making sure that the VGA cable is securely to both the and the projector
- Ensuring that the is set to the correct input source (e.g. VGA)
- Checking that the projector is set to the correct input source (e.g. VGA)
- Making sure that the video card is functioning properly
- Restarting the and projector
- Trying a different VGA cable
If none of these solutions work, it is possible that the VGA port on the projector or the video card is faulty and may need to be repaired or replaced.
Conclusion
To solve this issue. inspect the HDMI cable and make sure that it is securely to the projector and the video source.
If the cable is not damaged, try selecting the correct input source. You will get a ‘no signal’ message, if devices and cables are not connected properly. Use the remote to navigate to the power supply and ensure that the projector is set to receive the signal.
If this does not solve the issue. try the video source directly to the projector. If necessary, turn the projector. Turn on video source off and then on again. Additionally, you may need to replace the HDMI cable with a shorter one.