Display resolution plays a major role in clarity of your screen in Windows 10.
Recommended option is provided by default many-a-times.
Laptop screen size are different based on brand and model. Sometimes, you need to change the screen resolution to fit your needs.
Windows 10 1909 version provides an easy way to change the size of text, apps and other items.
You can increase or decrease the size, based on your requirement. It is a trial and error process, to see which resolution is perfect for your screen.
 Sometimes 15″, 17″, 19″, 21″ screen sizes tend to default to 1920×1080 resolution. But if text on windows and apps is smaller, then you need to go for smaller size resolution.
On the other side, if the windows look big, then you need to take higher screen resolution.
In this post we are going to see, how to change screen resolution in Windows 10 in 2020.
Method #1 – Windows Settings
1. Press Win + I keys to open Settings.
 2. Click on System. New screen opens.
3. On the left-hand side, select Display.
4. On the right-hand side, you can see “Scale and layout” option.
5. Under “Display Resolution“, a drop-down box appears.
 6. Click it and select the desired resolution.
You can also reach the above setting or screen by the following method.
1. Right-click on desktop and select “Display settings“.
 Bonus Tip:
If your screen resolution looks alright, but the text and apps are smaller, then you can make use of the “Change the size of text, apps and other items” option.
You can select 100%, 125%, 150%, 175%. I chose 150% to see bigger text on my windows screen. Display orientation can also be changed. You can select “Landscape” or “Portrait“.
The below video will explain the above process of how to change screen resolution in Windows 10 using settings.
Method #2 : Control Panel
This is the old fashioned way of changing screen resolution in Windows. Following are the steps.
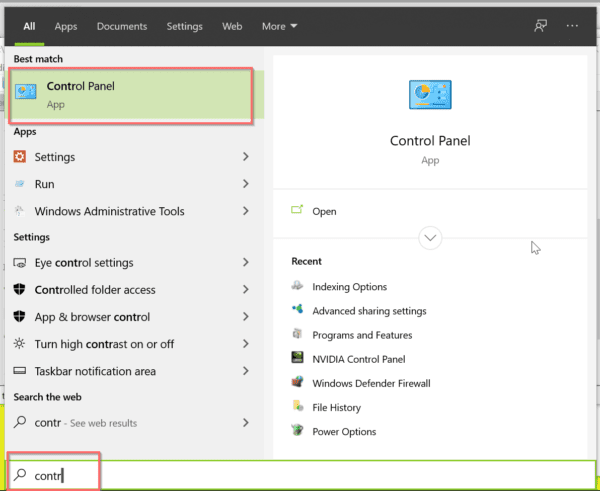
1. Press the Win key and type few letters of “Control Panel“.

2. In the Start Menu list, click the “Control Panel“.
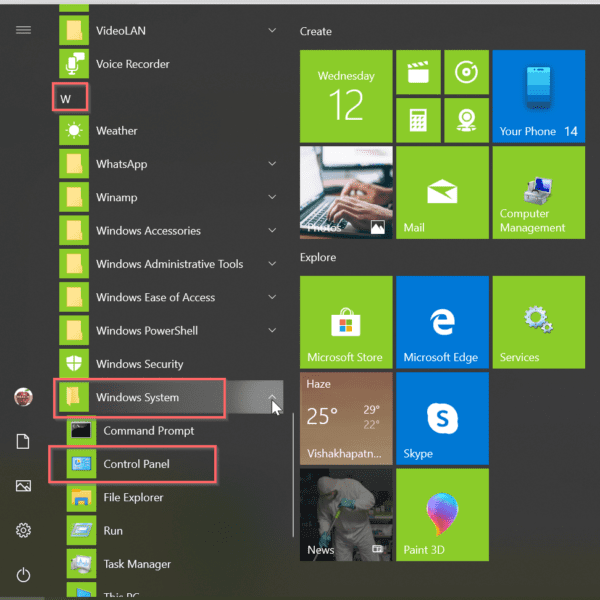
Tip: Otherwise, you click Win key to open Start Menu and Windows System > Control Panel.

3. Appearance > Display > Screen Resolution.
4. Your display device (like monitor model etc) will be listed.
5. Below that select the desired screen resolution.
6. Then click on “Apply“.
If you are using graphics card like NVIDIA, it will be little different.
 1. Open the Control Panel.
2. View by “Small icons“.
3. Click on “NVIDIA Control Panel“.
4. In the pop-up window, select “Change resolution” under Display.
 5. If you have multiple monitors, select the right monitor.
6. Then under “Apply the following settings“, select the screen resolution.
If you increase the resolution, more information is displayed in smaller size. Decreasing the resolution will display less information, but in a larger size.
You can also change the “Refresh rate” and “Color depth“.
The following video will show how to change your screen resolution using your graphics card control panel in Windows 10.
Conclusion
In the previous version of Windows, you need to use Control Panel. But in Windows 10, the interface is much easy to understand. You just have to make a few clicks and your screen resolution will change immediately.
Few seconds time is given, to see whether you like the changed screen resolution. Otherwise, you can revert back to the default resolution.
If you like this post, please share it in your social circles.


