Last Updated:
Windows 10 and 11 users may encounter issues when trying to change their app recommendation settings, which can be frustrating when attempting to install apps from sources other than the Microsoft Store.
This problem is often caused by restrictions put in place by Microsoft to enhance security and performance, particularly on devices running Windows 10 or 11 in S mode.
Users may see error messages or be unable to locate the necessary settings to modify app recommendations.
Fortunately, there are several solutions available to resolve this issue, depending on the specific version of Windows and the user’s level of technical expertise.
In this guide, we will explore three different methods to tackle the problem of changing app recommendation settings in Windows 10 and 11, catering to users with varying levels of technical knowledge. By following these steps, users can regain control over their app installation preferences and enjoy a more personalized Windows experience.
Solution 1: Switch out of Windows 10/11 S Mode
As the original poster Kyle heckman discovered, one of the main causes of being unable to change app recommendation settings is that the Windows device is running in S mode.
Windows 10 and 11 in S mode is a more locked down, secure version of Windows that only allows apps to be installed from the Microsoft Store in order to improve security and performance. It does not allow changing many settings related to installing apps from other sources.
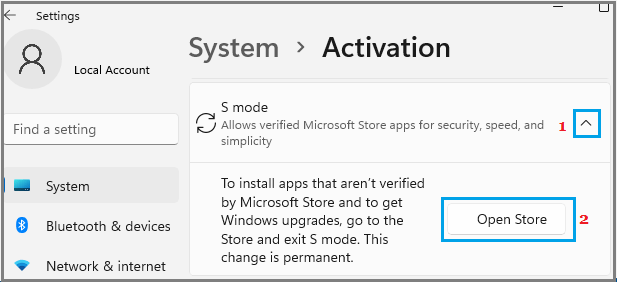
To resolve this, you need to permanently switch out of S mode:
- Go to Settings > Update & Security > Activation
- Under “Switch to Windows 10/11 Home or Pro“, click the “Go to the Store” link
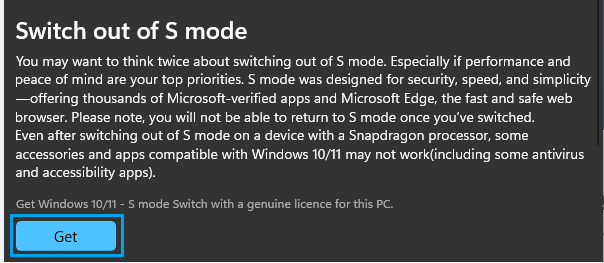
- On the “Switch out of S mode” page in the Microsoft Store, click “Get” to switch out of S mode for free
- After switching, you will have the options to change app recommendation settings under Settings > Apps as expected.
Note that switching out of S mode is a one-way process. Once you switch, you cannot put the device back into S mode. However, there are no costs or licensing issues with switching out of S mode.
Solution 2: Modify “Choose where to get apps” setting via Registry Editor (not recommended for most users)
For advanced users on Windows 10/11 Home who do not have access to the Local Group Policy Editor, it is possible to enable the “Choose where to get apps” setting to change app recommendation settings by modifying the Windows Registry.
Warning: Incorrectly editing the registry can cause serious problems that may require you to reinstall Windows. Make sure to backup the registry before making changes and only proceed if you know what you are doing.
- Right-click the Start button and select “Run”
- Type “regedit” and click OK to open the Registry Editor
- Navigate to the following registry key:
HKEY_LOCAL_MACHINE\SOFTWARE\Policies\Microsoft\Windows\Explorer - Right-click in the right pane and select New > DWORD (32-bit) Value
- Name the value “AicEnabled” and press Enter
- Double-click the new “AicEnabled” value and change the Value data to 1
- Click OK and close the Registry Editor
- Restart your computer for the changes to take effect
After the restart, you should see the “Choose where to get apps” option under Settings > Apps > Apps & features to modify your app recommendation settings.
Again, directly editing the registry can be risky, so most users should try other solutions first if possible. If you are not confident making registry changes, seek assistance from a professional.
Solution 3: Use Local Group Policy Editor (Windows 10/11 Pro, Enterprise, and Education only)
For Windows 10 and 11 Pro, Enterprise, and Education editions, you can change the app recommendation settings through the Local Group Policy Editor. Home editions do not include the Local Group Policy Editor.
- Press the Windows key + R to open the Run dialog
- Type “gpedit.msc” and press Enter to open the Local Group Policy Editor
- Navigate to the following policy:
Computer Configuration > Administrative Templates > Windows Components > Store > Turn off Automatic Download and Install of updates - Double-click “Turn off Automatic Download and Install of updates” and set it to “Enabled”
- Click OK and close the Local Group Policy Editor
- Restart your computer for the changes to take effect
Once the policy is enabled, the Microsoft Store will no longer automatically update apps. This allows you to change the “Choose where to get apps” setting under Settings > Apps to modify your app recommendation settings.
By enabling this policy, you are opting to take manual control over Store app updates rather than using Microsoft’s recommended automatic app updates. Make sure to periodically check for and install app updates yourself to maintain security and get the latest features.
In summary, the three ways to resolve issues changing app recommendation settings are:
1) Switching out of Windows 10/11 S mode
2) Modifying the “Choose where to get apps” setting via the Registry Editor
3) Enabling the “Turn off Automatic Download and Install of updates” policy via the Local Group Policy Editor
I recommend trying the S mode solution first if applicable to your situation, as it is the most straightforward. Registry and Group Policy edits should only be used by advanced users. When in doubt, consult a Windows expert for further assistance.