Last Updated:
If you’re seeing error code 0x800f0950 on Windows 11, you’re not alone.
This error typically appears when trying to install .NET Framework 3.5, add a language pack, or run a game or app that depends on older .NET components.
In my experience troubleshooting Windows errors, this is one of the most common installation failures users in the US, Europe, and India report after upgrading to Windows 11.
Whether you’re hitting this on a fresh Windows 11 install, Windows 10, or even Windows Server 2019, at least one of these fixes will resolve your issue.
One of the errors in Windows is code 0x800f0950. It usually occurs when you try to install a new language pack or the .NET Framework. However, it also comes with some bugs and errors that can affect your user experience.
.NET 4.8 and 3.5 are required to play many games on Windows 11 and 10. Missing framework or outdated versions of .NET can cause this error. 0x800f0950 language pack not properly installed is another reason.
It may be caused by various factors, such as an outdated Windows version, a disabled Windows Update service, corrupted system files, or network issues.
The good news: error 0x800f0950 is fixable. In this guide, I’ll walk you through 7 proven methods—from running the Microsoft .NET Repair Tool to clearing Windows Update components—so you can get your system working again in minutes.
What Is Error Code 0x800f0950?
Error 0x800f0950 is a Windows installation failure code that surfaces when the OS cannot complete the installation of a requested Windows feature or component.
You’ll typically see one of these messages:
“The following feature couldn’t be installed: .NET Framework 3.5 (includes .NET 2.0 and 3.0). The changes couldn’t be completed. Please reboot your computer and try again. Error code: 0x800F0950“
Or, during a language pack installation:
“Sorry, we’re having trouble getting this feature installed. 0x800f0950.”
Or in PowerShell:
“Add-WindowsCapability failed. Error code = 0x800f0950“
The error affects Windows 10, Windows 11, and Windows Server 2019.
What Causes Error 0x800f0950 in Windows 11?
.NET Framework 3.5 Not Installed Correctly
Many games and older apps require .NET 3.5, which is not enabled by default on Windows 11. If a previous installation was interrupted—by a power cut, forced shutdown, or network drop—leftover install files can block new attempts.
Language Pack Corruption
When you try to install a language pack through Windows Update or Settings and the download is incomplete, the 0x800f0950 error can appear instead of a standard failure message. This is the 0x800f0950 language pack variant of the error.
Corrupted Windows Update Components
The Windows Update service relies on several background components. If the SoftwareDistribution folder or catroot2 cache is corrupted, any feature installation—including .NET 3.5—will fail with this error.
Group Policy Restrictions
On managed PCs (corporate environments, school PCs), a Group Policy setting may be blocking Windows from fetching .NET 3.5 from Microsoft Update servers. This is a common cause in enterprise environments that’s often missed.
Fix 1—Use the Microsoft .NET Framework Repair Tool
This is the first thing I recommend trying. Microsoft’s official repair tool automatically scans for and fixes broken .NET components.
Steps:
- Download the Microsoft .NET Framework Repair Tool from microsoft.com/en-us/download/details.aspx?id=30135
- Right-click
NetFxRepairTool.exeand select Run as administrator - Accept the license terms and click Next
- Follow on-screen prompts and click Finish
- Restart your PC and attempt the .NET 3.5 installation again
This tool handles most cases involving incomplete or corrupted prior installations.
Fix 2—Install .NET 3.5 via DISM Command (Recommended)
The DISM command bypasses the standard installer and pulls the feature directly from Windows Update. This is the most reliable fix for the .NET Framework 3.5 error code 0x800f0950 on Windows 11.
Steps:
- Press
Win + Sand search Command Prompt - Right-click and choose Run as administrator
- Type the following command and press Enter:
DISM /Online /Enable-Feature /FeatureName:NetFx3 /All /LimitAccess /Source:"%SystemRoot%\sources\sxs"- If you get a “source not found” error, use this alternative command instead:
DISM /Online /Enable-Feature /FeatureName:NetFx3 /All- Wait for the operation to complete (it may take several minutes)
- Restart your PC
Pro tip: Ensure you’re connected to a stable internet connection when running the second command, as it downloads components from Microsoft’s servers.
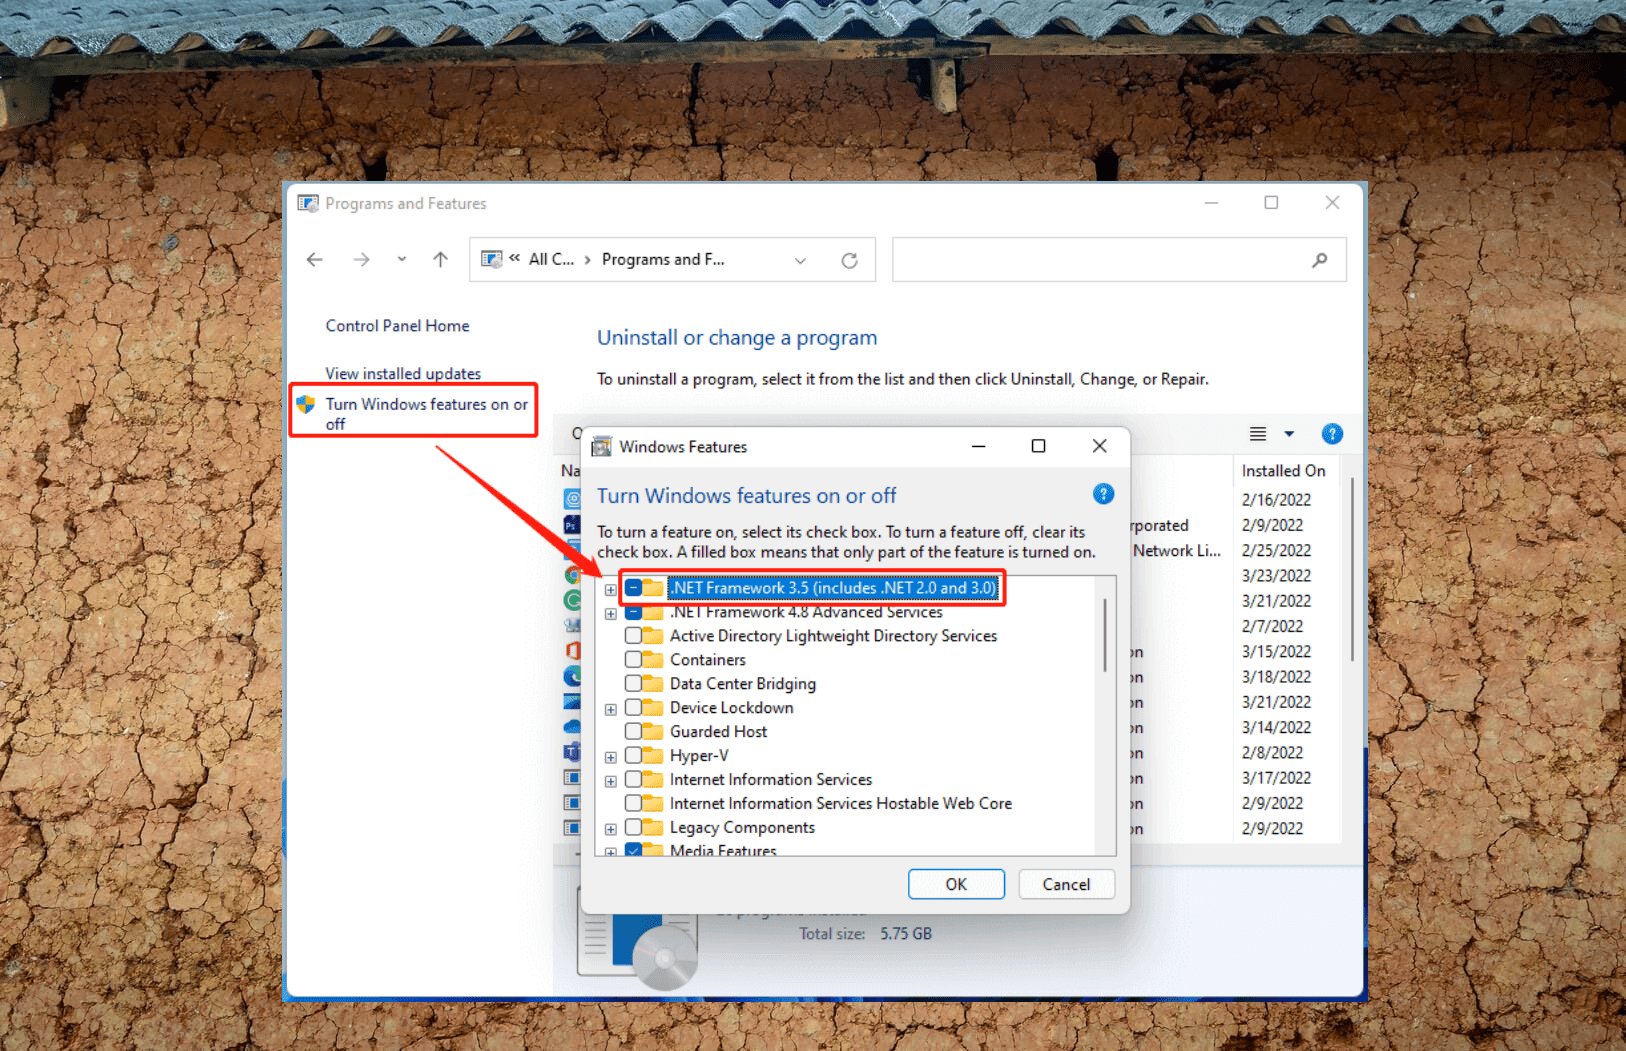
Fix 3 – Enable .NET 3.5 via Windows Features Dialog
If DISM fails, try activating .NET 3.5 through the GUI.
Steps:
- Press
Win + R, typeoptionalfeatures, and press Enter - In the Windows Features dialog, locate .NET Framework 3.5 (includes .NET 2.0 and 3.0)
- Check the box and click OK
- Let Windows download and install the feature
- Restart your PC
This method works well when the DISM command returns a “no operation was performed” message.
Fix 4 – Update Windows to Fix 0x800f0950
An outdated Windows build is a surprisingly common cause of this error. Windows 11 requires .NET Framework 4.8 to be present before 3.5 installs correctly.
Steps:
- Press
Win + Ito open Settings - Go to Windows Update
- Click Check for updates
- Install all pending updates, including optional and quality updates
- Restart and try the .NET installation again
Fix 5—Run SFC and DISM /RestoreHealth
Corrupted system files are a common root cause. Running both tools clears the underlying damage.
Steps:
- Open Command Prompt as administrator
- Run the System File Checker first:
sfc /scannow- After it completes, run DISM to repair the Windows image:
DISM /Online /Cleanup-Image /RestoreHealth- Restart your PC and retry the .NET installation
Both commands typically take 5–15 minutes. Do not close the command prompt while they run.
Fix 6 – Reset Windows Update Components
If the Windows Update service is corrupted, no feature installation will succeed. Resetting its components clears the blockage.
Steps:
- Open Command Prompt as administrator
- Run these commands one by one:
net stop wuauserv
net stop cryptSvc
net stop bits
net stop msiserver
ren C:\Windows\SoftwareDistribution SoftwareDistribution.old
ren C:\Windows\System32\catroot2 catroot2.old
net start wuauserv
net start cryptSvc
net start bits
net start msiserver- Restart your PC
- Go to Windows Update and check for updates again, then retry installing .NET 3.5
Fix 7 – Fix 0x800f0950 Language Pack Error
The error code 0x800f0950 language pack variant occurs when Windows can’t download or apply a language pack. Here’s how to resolve it.
Reinstall Language Pack via Windows Update
- Press
Win + I→ Time & Language → Language & region - Click Add a language and re-add your desired language
- Check the boxes for language pack, speech, handwriting, etc.
- Click Install and wait for it to complete
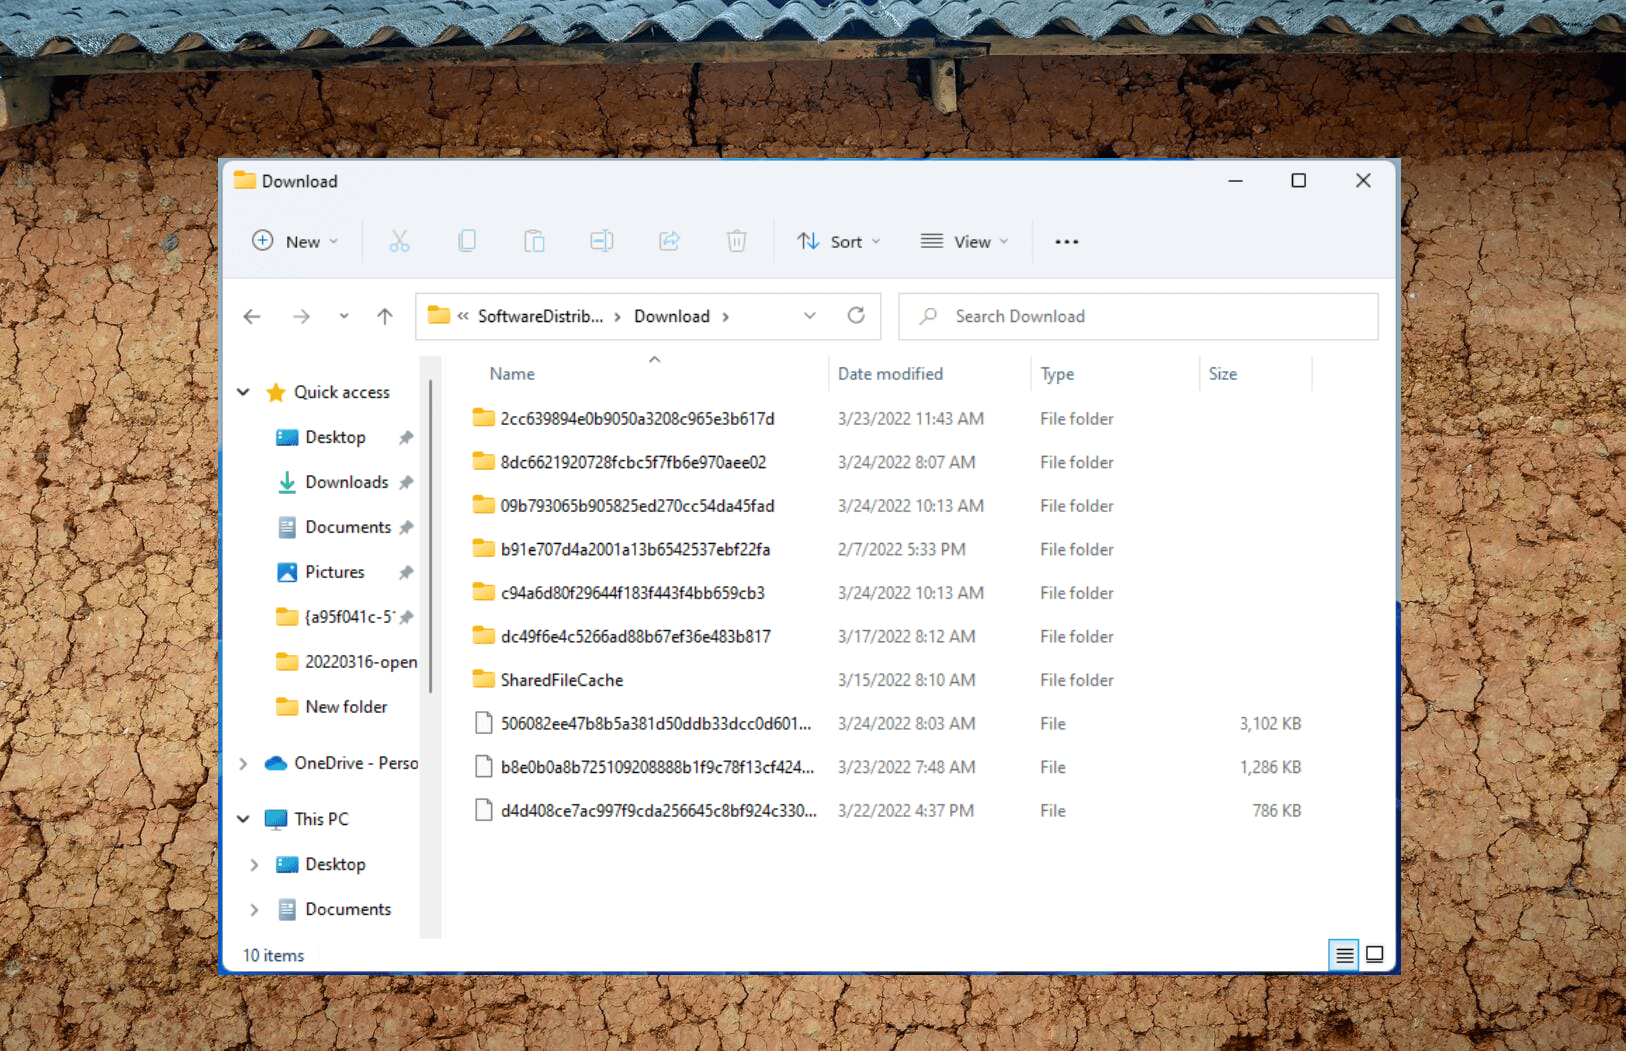
Delete SoftwareDistribution Folder
If the above fails, corrupted cached update files are likely the cause.
- Open Command Prompt as administrator
- Run:
net stop wuauserv - Navigate to
C:\Windows\SoftwareDistributionand delete all contents - Run:
net start wuauserv - Return to Settings → Windows Update and try reinstalling the language pack
Fix Add-WindowsCapability Failed Error Code 0x800f0950
If you’re using PowerShell to add Windows capabilities and see “Add-WindowsCapability failed.” Error code = 0x800f0950″; the fix is slightly different.
Steps:
- Open PowerShell as administrator
- Run the following command, replacing
CapabilityNamewith your specific capability:
powershell
Add-WindowsCapability -Online -Name "Language.Basic~~~en-US~0.0.1.0"- If it fails, try specifying a source path:
powershell
Add-WindowsCapability -Online -Name "Language.Basic~~~en-US~0.0.1.0" -Source "\\server\share\LanguageISO"- If you’re on a managed/corporate PC, check Group Policy: run
gpedit.msc→ Computer Configuration → Administrative Templates → System → look for “Specify settings for optional component installation and component repair” and set the source to a valid Windows media or Windows Update.
Error 0x800f0950 on Windows Server 2019
The error 0x800f0950 Windows Server 2019 variant appears when installing .NET Framework 3.5 as a Windows Server feature using Server Manager or DISM.
Fix via DISM on Server 2019:
- Mount your Windows Server 2019 ISO or insert installation media
- Open Command Prompt as administrator and run:
DISM /Online /Enable-Feature /FeatureName:NetFx3 /All /LimitAccess /Source:D:\sources\sxsReplace D: with your actual DVD/ISO drive letter.
- If you don’t have installation media, run:
Install-WindowsFeature Net-Framework-Core -Source \\network\share\sxsFix via Server Manager:
- Open Server Manager → Add Roles and Features
- At the Confirmation step, click “Specify an alternate source path.”
- Enter the path to
\sources\sxson your installation media - Proceed with installation
Main Reasons for 0x800f0950 .NET framework error
In many cases, when you try to manually install .NET 3.5 or automatically install during games, error 0x800f0950 crops up.
Some of the error messages look like this
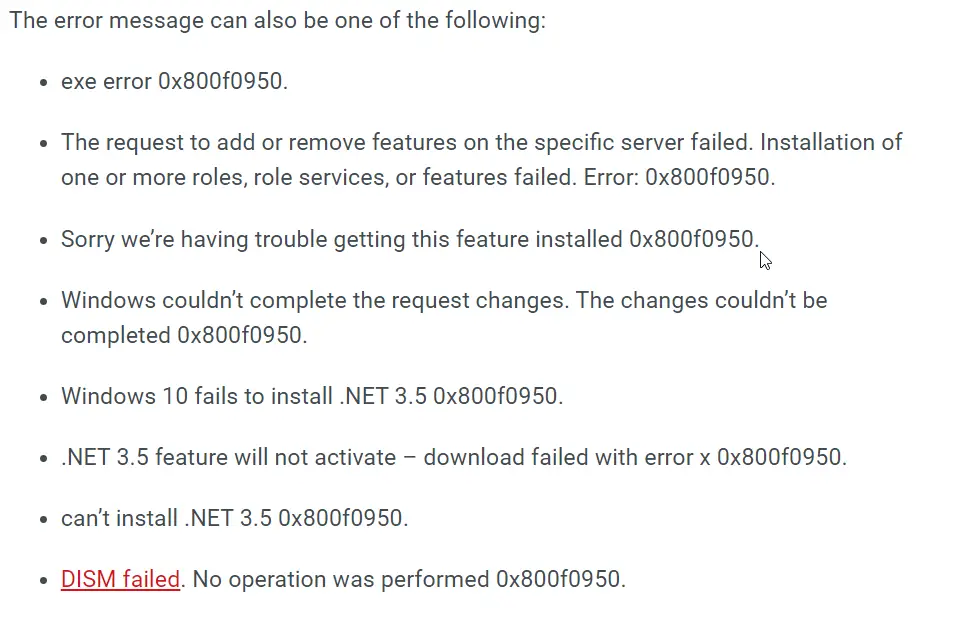
Source: minitool.com
When you upgrade to Windows 11, you need the latest .NET framework, like 4.8. The error message may show that you need 3.5, but you need the latest version.
You can either manually download the latest .NET or use Windows Update to install it. Before you install 4.8 or 3.5, make sure Windows 10 or 11 is updated to the latest build version.
Causes of 0x800f0950 Error in Windows 11 or 10
.NET 3.5 does not exist—for some reason, this version might have been deleted or is not installed on your OS. For many programs this is a dependency. Using the Windows features section, you can trigger the install, and it will bypass any other problems.
.NET 4.8 is not installed—this error mainly occurs in Windows 11 when .NET 4.8 is not there. When you see the error screen, you may see that 3.5 does not exist. But the actual reason is that the latest version of the framework is required.
Old .NET framework installation—When you try to update the .NET or install it, the software may hang in the middle. The uninstallation may also not complete properly. Using the .NET repair tool, you can fix such things.
Microsoft servers may be overloaded temporarily. The download or installation of the required feature failed. You can delete all the files and folders in the SoftwareDistribution folder found in the Windows directory. Then reinstall the language pack using the Windows 11 update.
Common errors and fixes to the 0x800f0950 Windows 11 are mentioned in this article. It will help install the required features.
Use Microsoft .NET Framework Repair Tool
If you are getting error code 0x800f0950 when trying to install .NET Framework v3.5 on your Windows 11 PC, you may need to use a special tool from Microsoft that can fix common issues with this feature.
The tool will scan your system for any corrupted or missing components related to .NET Framework v3.5 and repair them automatically.
To use the Microsoft .NET Framework Repair Tool, follow these steps:
- Visit the Microsoft .NET Framework Repair Tool website and download the tool to your system.
- Launch the tool and follow the on-screen instructions to fix .NET Framework installation issues.
- Reboot your PC and try to install .NET Framework v3.5 again.
Install .NET 3.5 using the CMD line tool.
Insert the installation media of Windows 11.
Open the command prompt or PowerShell in administrator mode using repair tools.
Enter the following command.
Dism /online /enable-feature /featurename:NetFX3 /All /Source:D:\sources\sxs /LimitAccess
Select the drive letter for the source DVD or installation media drive.
.NET 3.5 Offline Installer tool
You can also make use of the following code to install .NET 3.5
@echo off
Title: .NET Framework 3.5 Offline Installer
for %%I in (D E F G H I J K L M N O P Q R S T U V W X Y Z) do if exist “%%I:\sources\install.wim” set setupdrv=%%I
if defined setupdrv (
echo Found drive %setupdrv%
echo Installing .NET Framework 3.5…
Dism /online /enable-feature /featurename:NetFX3 /All /Source:%setupdrv%:\sources\sxs /LimitAccess
echo.
echo .NET Framework 3.5 should be installed
echo.
) else (
echo No installation media found!
echo Insert DVD or USB flash drive and run this file once again.
echo.
)
pause
Copy this code in a notepad and save it as net35install.cmd.
Insert the Windows 11 installation DVD or media.
Run the above CMD file as administrator.
It should find the source drive and install .NET 3.5 automatically.
Source: https://answers.microsoft.com/en-us/windows/forum/all/net-framework-35-installation-error-0x800f0950/ee020d53-d550-49cd-b449-95f15c3a3569
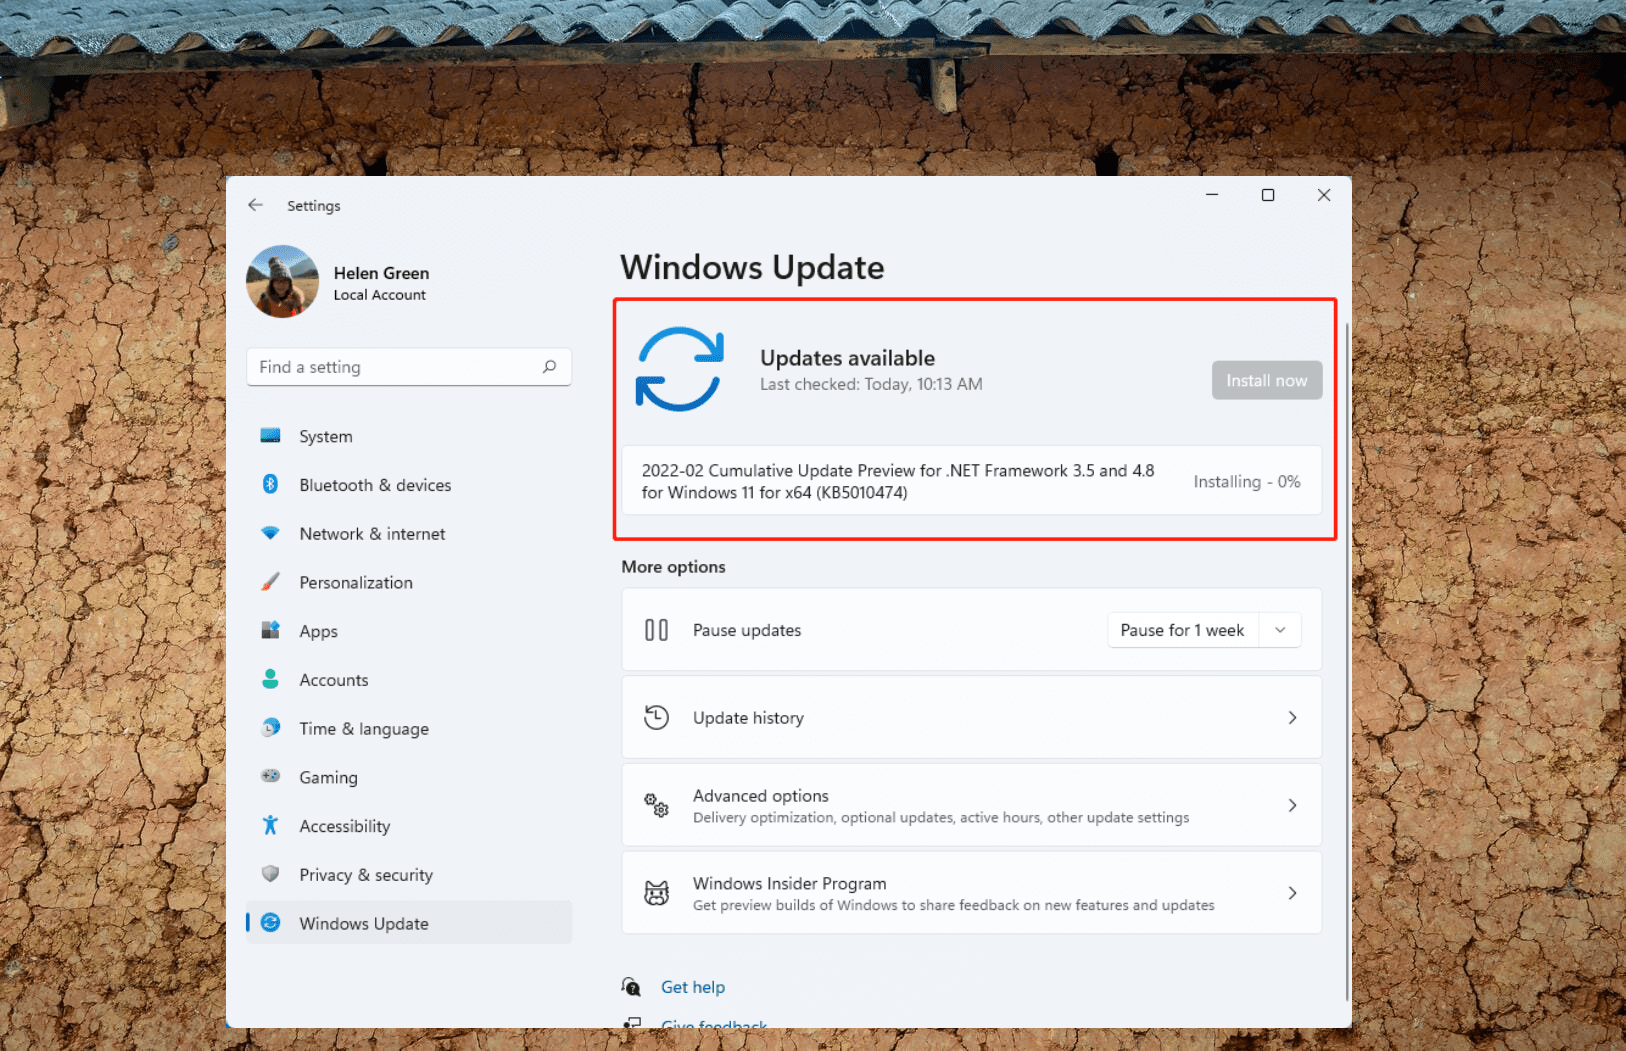
Update Your Windows Version
One of the possible reasons why you get error code 0x800f0950 on Windows 11 is that your system is not up to date.
Microsoft releases regular updates for Windows 11 that can fix various bugs and errors, including this one.
Therefore, it is recommended that you check for and install any pending updates on your PC before trying to install a new language pack or .NET Framework feature.
To update your Windows version, follow these steps:
- Open Settings using the Win + I hotkey.
- Click on Windows Update from the left pane.
- Click on Check for updates.
- Windows will search for pending updates and install them if available.
- Restart your PC and try to install the feature again.
Enable Windows Update Service
Another possible cause of error code 0x800f0950 on Windows 11 is that the Windows Update service is disabled on your PC.
This service is responsible for downloading and installing new features and updates for your system. If it is not running properly, you may encounter problems when trying to install a new language pack or .NET Framework feature.
To enable the Windows Update service, follow these steps:
- Open the Run dialog box by pressing the Win + R keys.
- Type services.msc and press Enter.
- Locate Windows Update from the list of services, right-click on it, and choose Properties.
- Change the startup type to “Automatic” from the drop-down menu.
- Click on Start under Service Status if it is not running already.
- Click on Apply > OK to save the changes.
- Restart your PC and try to install the feature again.
Run DISM and SFC commands.
Sometimes, error code 0x800f0950 on Windows 11 can be caused by corrupted or damaged system files that prevent certain features from being installed properly.
To fix this issue, you can use two built-in commands that can scan and repair system files: DISM (Deployment Image Servicing and Management) and SFC (System File Checker).
To run DISM and SFC commands, follow these steps:
- Open Command Prompt as an administrator by typing “cmd” in Start Menu search box, right-clicking Command Prompt, and choosing “Run as administrator.”
- Type
dism /online /cleanup-image /scanhealth
and press Enter to check for any corruption in your system image - Type
dism /online /cleanup-image /restorehealth
and press Enter to repair any corruption found - Type
sfc /scannowcommand in Command Prompt window and press Enter key - This command will scan your system for corrupted or missing files and try to repair them automatically.
It may take some time depending on your system speed and size of files.
Wait until it finishes and then proceed with the next command.
Will resetting Windows fix 0x800f0950?
A PC reset (keeping your files) can fix persistent cases of 0x800f0950 that don’t respond to any other method. It restores system files without destroying your data. Use Settinonly if necessarycovery → Reset this PC as a last resort.
Can outdated Windows cause error 0x800f0950?
Yes. If .NET Framework 4.8 is not installed—which is delivered via Windows Update—attempts to install .NET 3.5 will fail with this error. Always run Windows Update before attempting .NET feature installation.
What does “Add-WindowsCapability failed.” What does “Error code = 0x800f0950” mean?
This PowerShell error means Windows could not download or apply a capability (such as a language pack or optional feature). The fix involves running PowerShell as an administrator, checking Group Policy settings, or providing an alternate source path.
What is error code 0x800f0950?
Error code 0x800f0950 is a Windows installation failure that occurs when the system cannot install .NET Framework 3.5 or a language pack. It is typically caused by corrupted Windows Update components, missing .NET 4.8, or incomplete previous installations.
How do I resolve 0x800f0950 on Windows 11?
The most reliable fixes are running the Microsoft .NET Framework Repair Tool, using the DISM /Online /Enable-Feature command, enabling .NET 3.5 via Windows Features, and running SFC /scannow followed by DISM /RestoreHealth. Most users fix it within the first two methods.
Conclusion
Error code 0x800f0950 is frustrating, but it’s almost always fixable without reinstalling Windows. Start with the Microsoft .NET Framework Repair Tool and the DISM /Enable-Feature command—these two methods resolve the majority of cases. If you’re facing the 0x800f0950 variant related to the language pack, clearing the SoftwareDistribution folder and reinstalling via Settings typically does the trick. For Windows Server 2019, always point DISM to the \sources\sxs folder on your installation media.
If none of the above works, run SFC /scannow and DISM /RestoreHealth to fix underlying system file corruption—that’s usually the hidden culprit.
Did one of these fixes work for you? Please share a comment below to let us know which method resolved the issue. If you’re still stuck, describe your exact error message and we will help you troubleshoot further.