Last Updated:
You’re not alone if you want to enable Windows 11 auto login. Many home users, office workers, kiosk administrators, and small business owners prefer automatic sign-in to save time during startup.
With recent updates in Windows 11 23H2 and 24H2, Microsoft has added additional security protections that can make automatic login slightly more complicated than it was in Windows 10.
One of those changes is to the login process—Windows 11 has ramped up security, meaning you need to manually enter your password each time you start your PC.
For some users, this extra security provides peace of mind. But others find it an inconvenience, especially if you’re the only one who uses your computer. The excellent news is you can still set up automatic login in Windows 11; you just need to follow a few extra steps.
In this guide, I’ll show you exactly how to enable auto login in Windows 11 using Netplwiz, Registry Editor, and Microsoft’s official Autologon utility. I’ll also explain why Windows Hello, Credential Guard, and recent Windows updates sometimes prevent automatic sign-in from working correctly.
What Is Windows 11 Auto Login?
Windows 11 automatic login allows your PC to bypass the password screen and sign directly into your user account when the computer starts.
Benefits include:
- Faster startup
- Convenient home PC access
- Ideal for kiosk systems
- Useful for media centers
- Better workflow for dedicated workstations
However, anyone with physical access to your computer can access your files and settings.
Before You Enable Automatic Login
Security Risks You Should Know
Microsoft officially warns that administrators or advanced users can potentially access passwords used for automatic login, which are stored locally.
I recommend using auto-login only if:
- The PC stays in your home
- Physical access is restricted
- No sensitive business data is stored
Home vs Office PCs
| Device Type | Recommended? |
|---|---|
| Personal Home PC | Yes |
| Media Center PC | Yes |
| Office Shared Computer | No |
| Domain-Joined Enterprise PC | Use caution. |
| Public Kiosk | Yes (with restrictions) |
Method 1 – Enable Windows 11 Auto Login Using Netplwiz
This remains the easiest method.
Step 1
Press:
Windows + R
Type:
netplwiz
Press Enter.
Step 2
Select your account.
Step 3
Uncheck:
Users must enter a username and password to use this computer
If the checkbox is missing:
Go to:
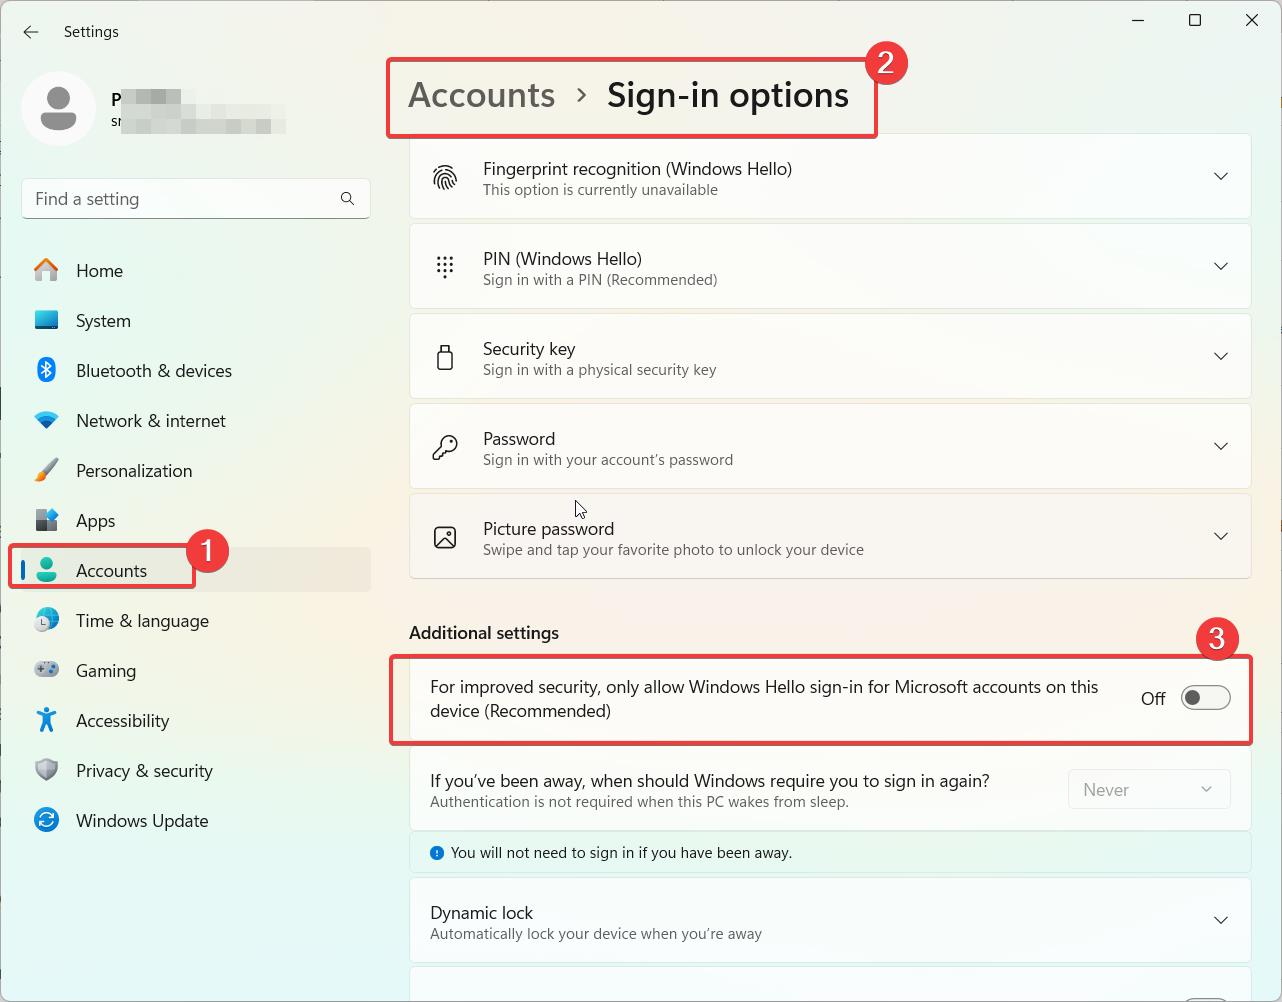
Settings → Accounts → Sign-in Options
Disable:
Only allow Windows Hello sign-in for Microsoft accounts on this device
Step 4
Click Apply.
Step 5
Enter your password.
Step 6
Restart your PC.
Windows should now sign in automatically.
Method 2 – Windows 11 Auto Login Registry Method
Change DevicePasswordLessBuildVersion
Open Registry Editor:
regedit
Navigate to:
HKEY_LOCAL_MACHINE\SOFTWARE\Microsoft\Windows NT\CurrentVersion\PasswordLess\Device
Find:
DevicePasswordLessBuildVersion
Change:
2 → 0
This restores the Netplwiz checkbox if Windows Hello removed it.
Configure AutoAdminLogon
Navigate to:
HKEY_LOCAL_MACHINE\SOFTWARE\Microsoft\Windows NT\CurrentVersion\Winlogon
Create or edit:
| Registry Value | Data |
|---|---|
| AutoAdminLogon | 1 |
| DefaultUserName | Your Username |
| DefaultPassword | Your Password |
| DefaultDomainName | Computer Name |
Restart Windows.
Automatic sign-in should be enabled.
Method 3 – Use Microsoft Sysinternals Autologon
Microsoft offers a free tool called Autologon.
Advantages:
- Easier than manual registry editing
- Automatically encrypts credentials
- Quick setup
Steps:
- Download Autologon.
- Run as administrator.
- Enter username and password.
- Click Enable.
- Restart the PC.
Microsoft officially maintains this utility.
Windows 11 Auto Login After Update Not Working
Windows Hello Conflicts
Many Windows 11 updates re-enable Windows Hello requirements.
Solution:
- Open Sign-in Options
- Disable Windows Hello, requirement.
- Reconfigure Netplwiz
Credential Guard Issues
Windows 11 24H2 systems with Credential Guard enabled may automatically reset the AutoAdminLogon values.
Domain-Joined PCs
Some domain environments overwrite autologon settings through Group Policy.
Verify:
- Domain credentials
- Group Policy Objects
- Credential Guard status
Best Auto Login Method for Home and Business Users
| Method | Difficulty | Security | Best For |
|---|---|---|---|
| Netplix | Easy | Medium | Home Users |
| Registry | Advanced | Medium | Power Users |
| Sysinternals Autologon | Easy | High | Most Users |
| Group Policy | Advanced | High | IT Admins |
My Recommendation
For most users, Microsoft’s Sysinternals Autologon tool offers the best balance of convenience and security. The Netplwiz method remains the fastest option for personal computers.
How to Enable Auto Login in Windows 11
The easiest way to configure automatic login is directly through Windows 11’s sign-in settings:
- Press the Win + I keys and open the Settings app in Windows 11.
- Select Accounts > Sign-in options.
- Under Additional Settings, there is a specific setting available.
- For improved security, only allow Windows Hello sign-in for Microsoft accounts on this device (recommended).
- Turn off this option.
- Press Windows + R to open the Run dialog box. Type “netplwiz” and hit Enter.
- Alternatively, you can search for “netplwiz” in the Windows search bar and select the app.
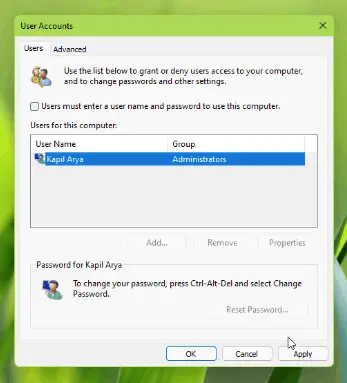
- In the User Accounts window that appears, go to the Users tab. Uncheck the box next to “Users must enter a username and password to use this computer.”
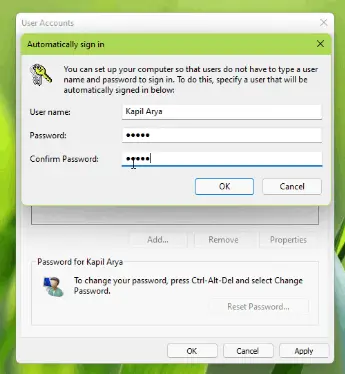
- Click Apply, then enter your account password to confirm the changes.
- Restart your PC for changes to take effect.
Now your designated account will log in automatically whenever you start your Windows 11 PC!
You can customize the experience by enabling added password requirements under sign-in options like requiring a password on wake or after screen timeout.
Using Windows Registry to Enable Auto Login
More advanced users can also enable automatic login by modifying the Windows registry:
- Type regedit in the taskbar search to open the Registry Editor.
- Navigate to HKEY_LOCAL_MACHINE\SOFTWARE\Microsoft\Windows NT\CurrentVersion\Winlogon.
- Add a new string value named AutoAdminLogon and set it to 1.
- Add another new String value named DefaultUserName and set it to your username.
- Add a final String value named DefaultPassword and set it to your password.
- Restart your PC for changes to apply.
This will automatically sign in the designated user account when booting up. Be cautious when editing the registry and back up changes.
Using Third-Party Tools to Enable Auto Login
If you would rather not mess with the registry, third-party tools like AutoLogon can enable automatic login:
- Download and install the AutoLogon utility.
- Launch the app and check the box for Enable AutoLogon.
- Enter your username and password.
- Click Set to save your credentials.
- Restart your PC to allow auto login.
This simplifies the process without having to directly edit sensitive registry files. But use trusted third-party apps at your own risk.
Overview of Automatic Login in Windows 11
The automatic login feature allows a designated user account to log in automatically without entering a password. This saves you time and gives you quick access to your files, programs, and desktop as soon as you power on your PC.
Here are some key things to know about auto login in Windows 11:
- Single-user convenience—Best for personal devices used primarily by one person.
- Accessibility benefit – Helps those with mobility issues by removing the need to type passwords.
- Security risk: allows open access to your PC if physical security is compromised.
- Customization—You can require a password on wake from sleep or screen timeout for added security.
Overall, automatic login offers considerable convenience for frequent single users. But enable it at your own risk and customize the settings to meet your security needs.
Pros and Cons of Automatic Login
Before we begin, let’s consider the advantages and disadvantages of automatic login in Windows:
Pros
- Saves time – avoids typing password when you’re the only user
- Convenience – ideal for home computers used by one person
- Accessibility – eliminates typing for those with dexterity issues
Cons
- Less secure – anyone can access your PC if stolen
- Not suitable for shared devices
- Can prevent automatic Windows updates
- Skips Microsoft account verification
The main trade-off is convenience vs. security. Automatic login makes your life easier if you live alone. But if someone loses your PC or accesses it, your data becomes more vulnerable.
Many businesses and family computers will opt to keep password logins. But automatic login can make sense for private home machines.
Is automatic login in Windows 11 secure?
While extremely convenient, enabling automatic login does come with security concerns:
- No login password allows anyone access if your PC is left unattended
- Multiple accounts remain accessible unless password protected
- Files and programs open to access without authentication
To keep your device and data secure with auto login enabled:
- Use it only on personal, single-user devices
- Physically secure your PC at home or the office
- Require a password on wake or screen timeout
- Leverage disk encryption like BitLocker
- Enable Windows Hello facial or fingerprint login
These tips will help minimize risks while still benefitting from the time-saving auto login feature.
How do I enable auto login in Windows 11?
Open Netplwiz, select your account, uncheck the password requirement option, and restart the computer.
Could you please explain why the Netplwiz checkbox is missing?
Windows Hello often hides it. Disable Windows Hello sign-in requirements first.
Does Windows 11 24H2 affect auto logon?
Some users report Credential Guard and security features interfering with autologon settings.
Can I use auto login with a Microsoft account?
Yes. Both Microsoft accounts and local accounts support automatic sign-in.
Conclusion
Automatic login allows quick access to your Windows 11 desktop while skipping the login screen. Configure it through Settings, the registry, or third-party software. Just be aware of the security trade-offs.
Windows 11 auto login remains one of the easiest ways to speed up startup and eliminate repetitive password entry on personal computers. Whether you use the Netplwiz method, Registry Editor, or Microsoft’s Autologon utility, the setup process takes only a few minutes.
For most users, I recommend starting with Netplwiz and moving to Sysinternals Autologon if Windows Hello or newer Windows 11 updates create problems. Remember to weigh convenience against security before enabling automatic sign-in.
If this guide helped you configure Windows 11 automatic login, leave a comment below and share it with friends or coworkers who struggle with repeated Windows sign-ins.