First, check the connection to make sure that the cable is securely plugged into both devices.
And then inspect any ports for any visible damage.
If everything looks good, then try swapping out the cable for a new one and see if that solves the issue.
If not, then it’s time to check your network settings.
Make sure that both devices are set up correctly according to the manufacturer’s instructions.
And, if necessary you may need to reset your router or modem.
Finally, test the connection again.
If all else fails contact your internet provider or IT service to help resolve any further issues.
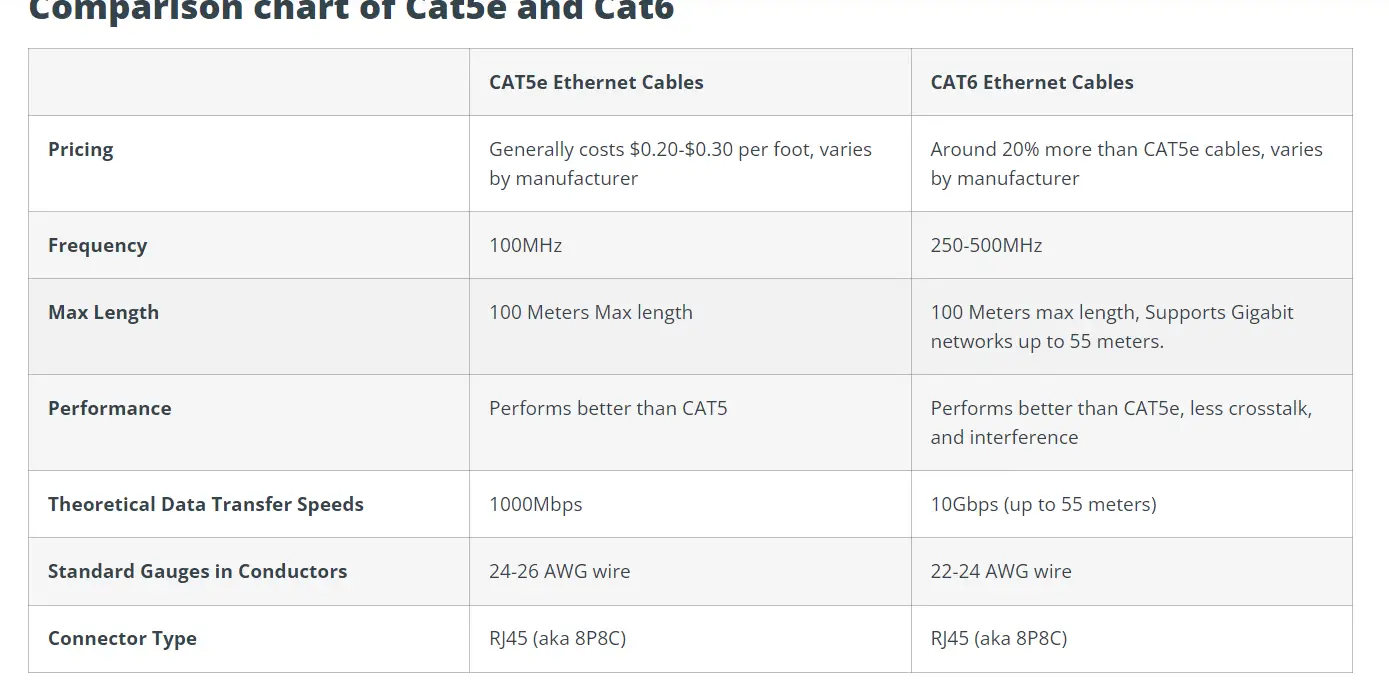
What Is a Cat 5e Cable?
A Cat 5e cable is a type of cable used for Ethernet networks.
It is an enhanced version of the previous Cat 5 cables, and is designed to provide improved performance and reliability in high-speed network applications.
This type of cable typically has four twisted pairs of copper wire, which are used to transmit data signals between networked devices.
In addition, Cat 5e cables are also designed with shielding to reduce electromagnetic interference (EMI) from nearby electrical devices.
This shielding helps maintain the integrity of the signal being transmitted over the cable.
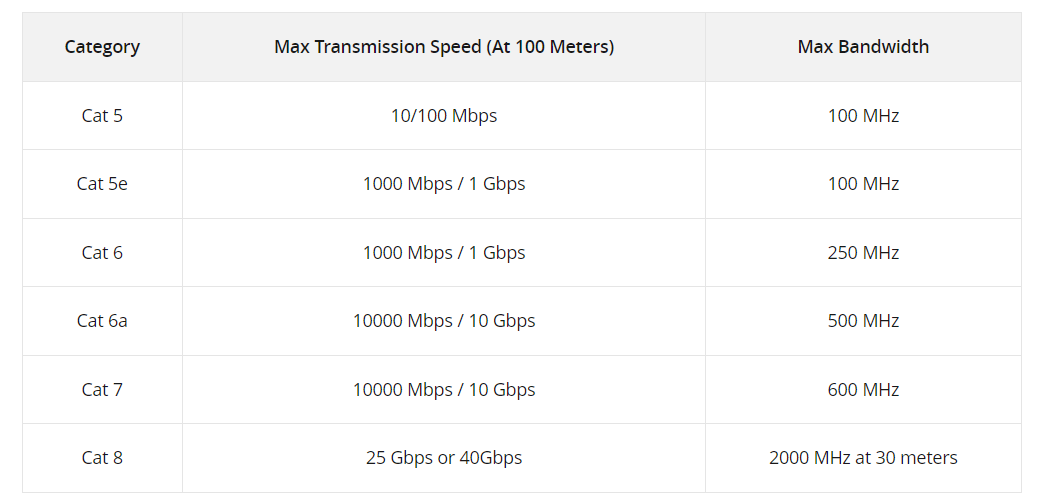
The Cat 5e cable is the most common form of Ethernet cabling and can support speeds up to 100 Mbps. Making it ideal for most home or office applications.
Common Cat 5e Cable Problems
Common problems with Cat 5e cables include
- incorrect terminations – Incorrect terminations can lead to poor connections and slow speeds.
- damaged cables – While damaged cables can lead to poor connections and slow speeds.
- incompatible speeds – Incompatible speeds can cause slower speeds or dropped connections.
- incorrect wiring – Incorrect wiring can lead to dropped connections or poor speeds.
Ethernet cable not detected
- If it appears to be properly connected, then you should try swapping out the cable with a different one.
- You may also need to reset your router or modem.
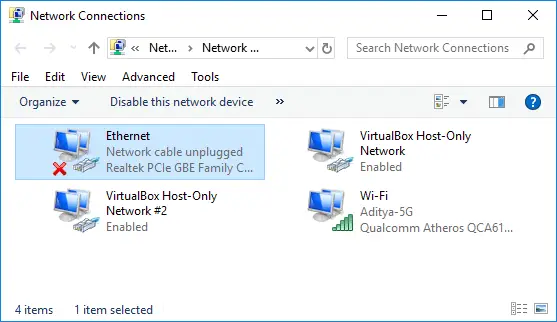
- Additionally, if your computer has an Ethernet port, you should also check that it’s enabled in the device’s settings.
Finally, if none of these steps resolve the issue, it could mean that there is a problem with either the port or the cable itself and they will need to be replaced.
Ethernet suddenly not working
If your Ethernet connection suddenly stops working, you can try the following steps to fix it:
1. Check the Ethernet cable connections
2. Restart the modem/router
3. Restart your PC
4. Check if the Ethernet adapter is enabled
5. Try using a different Ethernet cable
6. Run the Network Adapter Troubleshooter
7. Temporarily turn off your firewall
8. Reinstall the Ethernet drivers
9. Use another port on the router
10. Run the Network Reset Setting in Windows.
Ethernet cable not working windows 10
If you’re experiencing issues with an Ethernet cable on a Windows 10 computer, there are a few troubleshooting steps you can try to fix the problem:
- Check the cable connections: Make sure that the cable is securely plugged into both the computer and the network jack. Also, ensure that the cable is not damaged, such as frayed wires or cuts in the insulation.
- Restart the computer and the router: Sometimes, simply restarting both the computer and the router can resolve connectivity issues.
- Check the status of the network adapter: Open the Device Manager and check if the network adapter is enabled and working properly. If it’s disabled or if it has a yellow exclamation mark, there may be an issue with the adapter.
- Update the network adapter drivers: Go to the manufacturer’s website to check for any updates to the network adapter drivers and install them.
- Run the Windows troubleshooter: Windows has a built-in troubleshooter that can automatically detect and fix common networking issues. Go to
Settings > Update & Security > Troubleshoot > Internet Connectionsand run the troubleshooter. - Configure the network settings: Go to
Settings > Network & Internet > Ethernetand make sure that the adapter is set to automatically obtain IP and DNS settings. - Disable and re-enable the adapter: From the Device Manager, right-click on the network adapter and select Disable. Wait for a few seconds and then select Enable.
- Check for Windows updates: Make sure your Windows 10 is up-to-date and any updates that could be related to network connectivity are installed.
If none of the above steps work, you may have a more serious problem with the computer’s network adapter or with the cable itself, it would be wise to consult an expert or professional.
Ethernet not working windows 11
To access the Ethernet settings on Windows 11, open the Start menu, click Settings, then click Network & Internet. Under the Advanced Network Settings tab, you will find the Ethernet settings. You can view, configure, and troubleshoot your Ethernet connection from there.
If your Ethernet connection is not working on Windows 11, you can try the following steps to fix it:
1. Check the Ethernet cable connections
2. Restart the modem/router
3. Restart your Windows 11 PC
4. Check if the Ethernet adapter is enabled
5. Try using a different Ethernet cable
6. Run the Network Adapter Troubleshooter
7. Temporarily turn off your firewall
8. Reinstall the Ethernet drivers
9. Use another port on the router
10. Run the Network Reset Setting in Windows 11.
HP docking station ethernet not working windows 11
If your HP docking station’s Ethernet connection is not working on Windows 11, you can try the following steps to fix it:
1. Check the Ethernet cable connections
2. Restart the HP docking station
3. Restart your Windows 11 PC
4. Check if the Ethernet adapter is enabled
5. Try using a different Ethernet cable
6. Run the Network Adapter Troubleshooter
7. Temporarily turn off your firewall
8. Reinstall the Ethernet drivers
9. Use another port on the HP docking station
10. Run the Network Reset Setting in Windows 11.
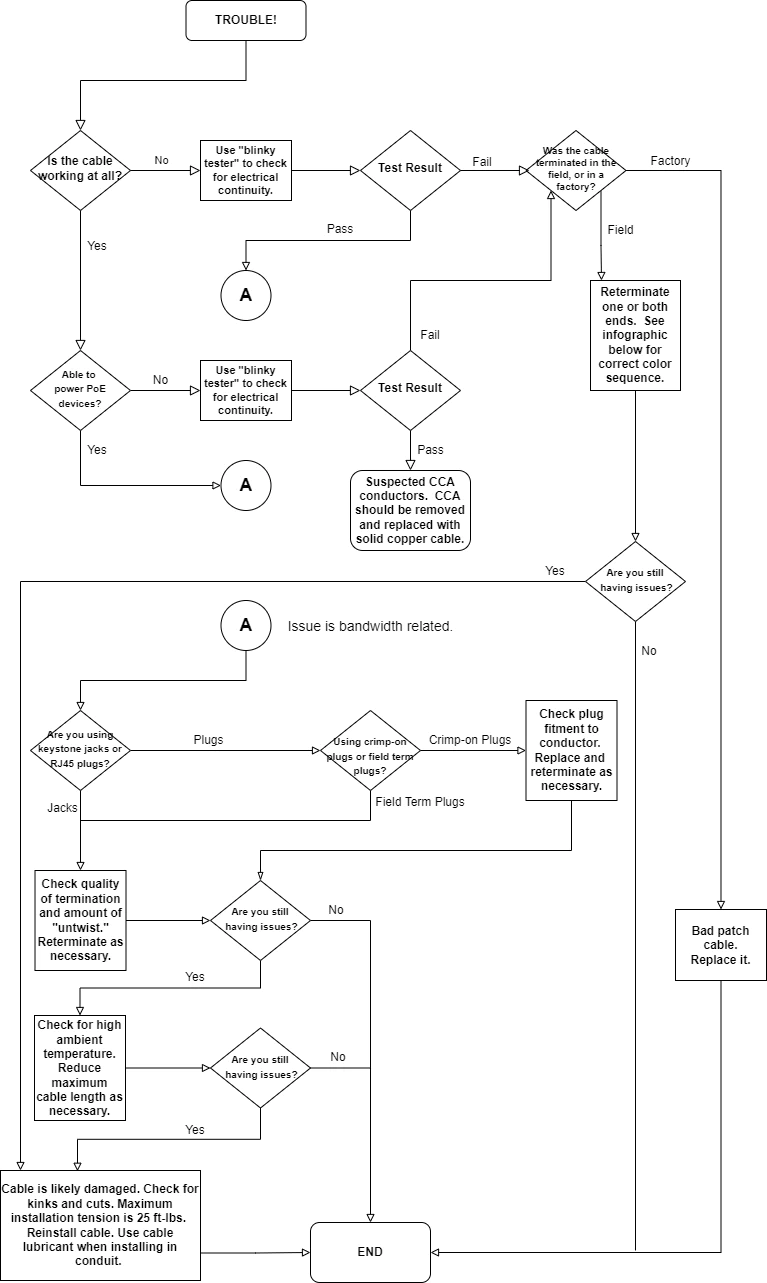
Step-by-Step Guide to Troubleshooting Your Cat 5e Cable
I’d be happy to provide you with a step-by-step guide to troubleshooting your Cat 5e cable. Here are the general steps you should take:
- Verify that the cable is properly connected to both devices. Make sure that the cable is securely plugged into both the device and the network jack.
- Check for physical damage to the cable. Inspect the cable for any visible damage, such as frayed wires or cuts in the insulation. If the cable is damaged, it will need to be replaced.
- Check the cable length. Cat 5e cables have a maximum length of 328 feet (100 meters). If the cable is longer than this, it may not be able to transmit data properly.
- Test the cable with a cable tester. A cable tester can be used to check for continuity, shorts, and wire mapping. This can help you to determine if there is a problem with the cable or with the way it is wired.
- Try swapping out the cable. If you have another cable of the same type available, try swapping it out to see if the problem persists. This can help you to determine if the issue is with the cable or with the device it is connected to.
- Check the device settings. Make sure that the device is configured properly and that it is set to the correct speed and duplex for the network.
- Check for network issues. If you’re still experiencing issues, check to see if there are any problems with the network. This may include issues with the network switch or router.
Note: If you are not familiar or comfortable with troubleshooting electrical devices, it would be wise to consult an expert or professional.
DIY Solutions for Troubleshooting Your Cat 5e Cable
Before attempting to troubleshoot the cable, you should make sure that all of the components are properly connected.
And that there is no visible damage to the cable itself.
If everything appears to be in order, then you can begin testing the connection by using an Ethernet tester tool or multimeter with continuity function.
This will help ensure that all of the wires in the cable are properly connected and functioning correctly.
Additionally, if you suspect any issues with interference, then you may need to use a shielded Cat 5e cable or move your devices away from any potential sources of electromagnetic radiation.
Professional Solutions for Troubleshooting Your Cat 5e Cable
First, it is important to make sure all connections are secure, which can be done by visually inspecting each connection point on the Cat 5e cable.
Making sure the correct cable type is being used is also essential.
As using a lower-grade cable could lead to degraded performance or even complete failure.
Additionally, making sure the right length of cable is being used to ensure proper signal strength .
And that any kinks or bends in the cable are kept at a minimum.
Finally, if experiencing any issues with your Cat 5e cable, having a professional come out and test it for you will guarantee a reliable and trouble free connection.