With Windows 10, update and upgrade are important. Security problems can creep in instantaneously. Speed is another factor to be taken care of. Lack of features in the previous version is also another reason for upgrade.
Keeping these things in mind, you have to make sure your Windows 10 system is always the best. In Windows 7 these updates would automatically download. Based upon the preference given, they would notify you to install or done without fail.
- Want to Install 1809 October 2018 update immediately without waiting?
- How to Block the Windows 10 Redstone 5 (October 2018 Update) Version 1809, from Installing ?
- Service Trick to Block 1809 Upgrade
- Local Group Policy Editor to Stop Windows 10 1809 Upgrade
- Branch Readiness Level Tip to Block Redstone 5 Upgrade
- The Registry Tip to Block October 2018 Upgrade
- Wushowhide Trick to Hide 1809 Upgrade
Want to Install 1809 October 2018 update immediately without waiting?
There is much curiosity whenever a new Windows 10 update is released. But with 1 billion devices in near reach, you will not be able to upgrade to 1809 version ASAP. It may take weeks to months to roll to the new update.
There are certain pros and cons in upgrading to the new version. As with the earlier OS upgrades, there were lot of issues like keyboard, mic not working, BSOD errors, audio problems and many others. Sometimes the updates seem to hang in the middle with not able to enter the system again.
But Microsoft leader Satya Nadella made sure that the new upgrades are without much faults. Also if you observe in many tech forums, there are not many issues related to 1809.
So if you decide to upgrade to Redmond 5 Build, to experience the new features it brings without much waiting, you can do the following.
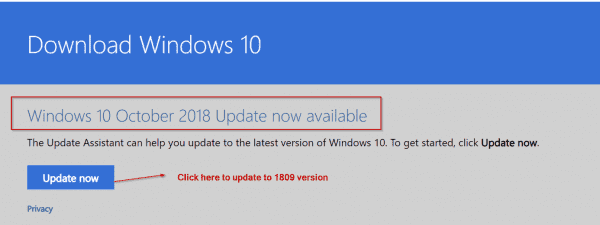
Visit the following page of Microsoft – https://www.microsoft.com/en-us/software-download/windows10.
As on today, the page has been updated to download the October 2018 update. If you are already on 1803 version and Windows 10 Pro, it will ask you to install the Windows10Upgrade9252.exe Update assistant. It is about 5.8 MB size.
Once you give permission to install it, a pop-up will show whether you want to update or not. Click the “Update now” button if you want to proceed. Then the rest of the process is same, as like before updates.
In the next article, I’ll let you know what are the new features in 1809 version.
But the option to stop Windows updates from downloading and installing automatically was direct. In Windows 10, the clever “developers” have forced the updates on you, with the block option, not noticeable very easily.
There are two things, as reason, for you to block Windows 10 upgrade.
- The amount of time taken to do the update. It may take an hour, two or more than that based upon your system configuration and internet speed.
- What if the updates, hang after 45% or 55% ? You have to recover for whatever error code the Windows 10 throws up or reinstall from start again!
So in any case, if you think you should freeze your Windows 10 updates from installing in future, there are several solutions.
How to Block the Windows 10 Redstone 5 (October 2018 Update) Version 1809, from Installing ?
From Oct 1st onwards, Microsoft starts to push the default upgrade of 1809 to your computers. If you are on 1703 or 1709 version, there are different ways to differ this upgrade. But if you have already made a switch to the 1803 (Redstone 4 or April Creators Update), you can disable the upgrade permanently or temporarily based upon your needs.
Service Trick to Block 1809 Upgrade
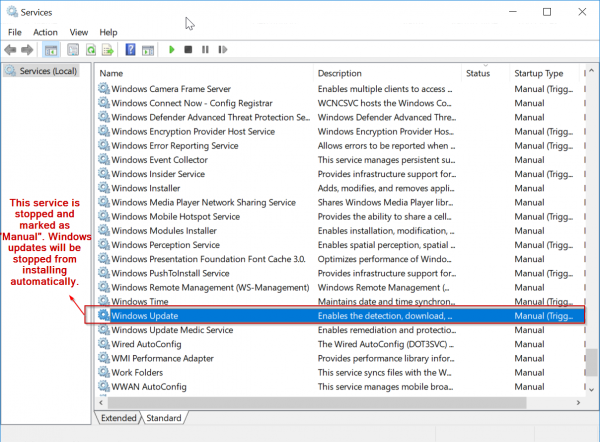
The way to stop Windows 10 installing any new updates holds good for upgrade also. As we all know that there is a service called “Windows Update”. The function of this process is to do the following –
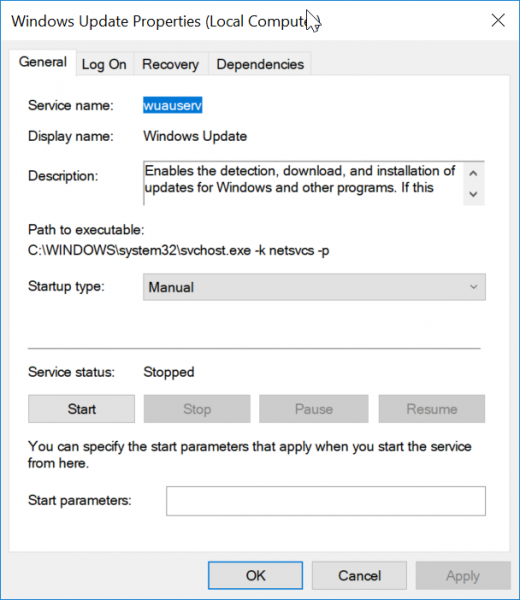
Enables the detection, download, and installation of updates for Windows and other programs. If this service is disabled, users of this computer will not be able to use Windows Update or its automatic updating feature, and programs will not be able to use the Windows Update Agent (WUA) API.
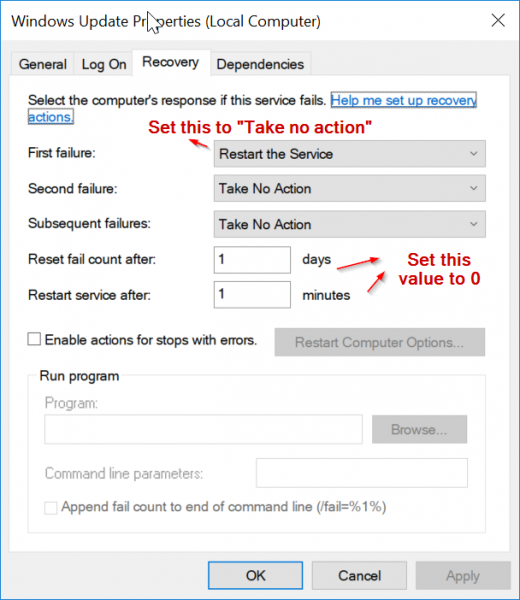
So if you make the “Startup type” of the service as either “Manual” or “Disabled”, this program doesn’t kick in whenever there are new updates. Before that you have to “Stop” the service.
But the downside is that it will not install any other updates also including Office and Windows security updates.
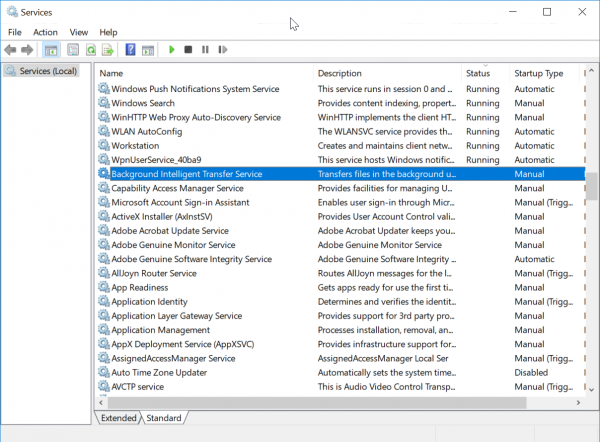
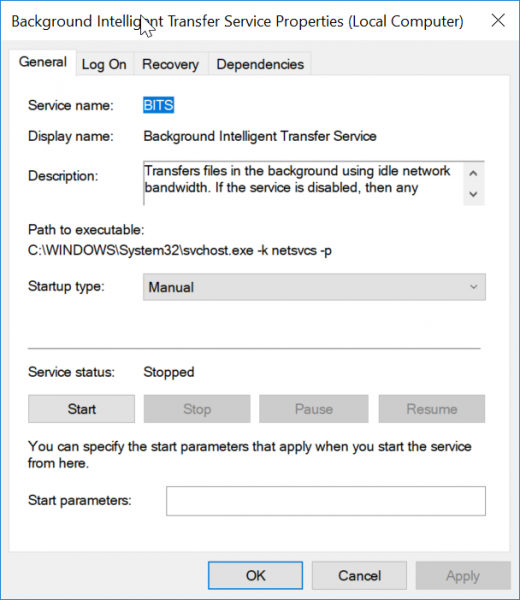
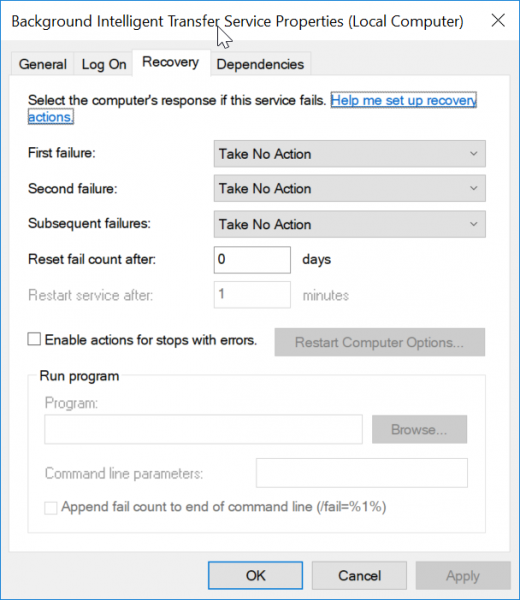
If you want to be doubly sure that this trick works perfectly, you can also make one another service “Startup type” in a similar fashion. Background Intelligent Transfer service (BITS) is also related to installing new updates and making an upgrade to the new version.
Transfers files in the background using idle network bandwidth. If the service is disabled, then any applications that depend on BITS, such as Windows Update or MSN Explorer, will be unable to automatically download programs and other information.
You may not be able to set this as “Manual”. Even if you make it as “Automatic (Delayed Start)”, it starts when Windows 10 boots up. The best option to fulfill your needs is to make it “Disabled”.
The above tip is a crude method of stopping the 1809 upgrade.
But there is a better and smarter way of deferring your upgrade. Read along to know other tricks.
Local Group Policy Editor to Stop Windows 10 1809 Upgrade
This is another trick which will work permanently, unless removed manually. It not only stops the upgrade, but other updates also. So this must be used cautiously. Though it blocks the updates automatically, if you have the “Windows Update” service running, then the upgrade can be done manually.
- Type gpedit.msc in the Run box, by pressing Win + R at the same time.
- Navigate to the following path.
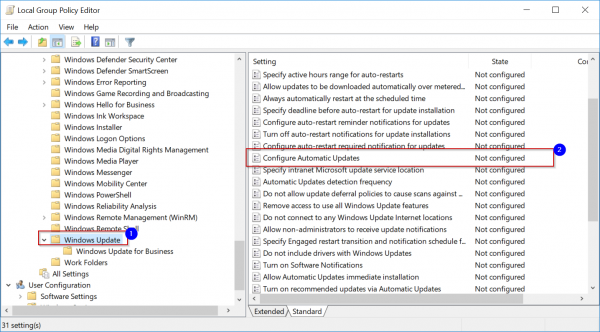
- Computer Configuration\Administrative Templates\Windows Components\Windows Update
- I think this works for both Home and Pro users. But you need to have Administrator privileges, to do this trick.
- Once you reach the above item, click on the right side – Configure Automatic Updates policy.
- Click the Disabled option to prevent this policy from running again.
- Then click Apply and OK buttons.
Sometimes the above option may not work or necessary privileges are there to perform this operation. In that case, you can try this other trick.
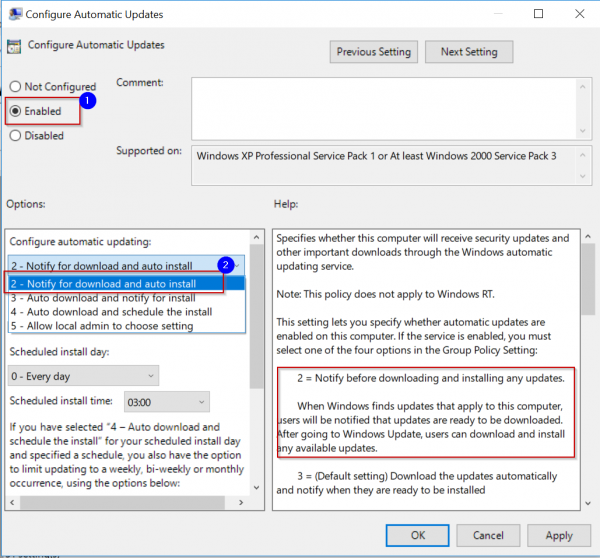
- Using the Local Group Policy editor path as above, double-click the option.
- Make the Policy as “Enabled“.
- There are number of options available now.
- 2 – Notify for download and auto install.
- 3 – Auto download and notify for install.
- 4 – Auto download and schedule the install.
- 5 – Allow local admin to choose setting.
4. Select the “2” option.
5. This will notify of the “1809” upgrade and any other security updates before downloading.
6. Also you can decide when to install them.
Once you see this notification, you can install the 1809 update manually by going to Settings > Update & Security > Windows Update. You can revert the changes at any time, by changing the above policy option from “Enabled” to “Not Configured“.
Branch Readiness Level Tip to Block Redstone 5 Upgrade
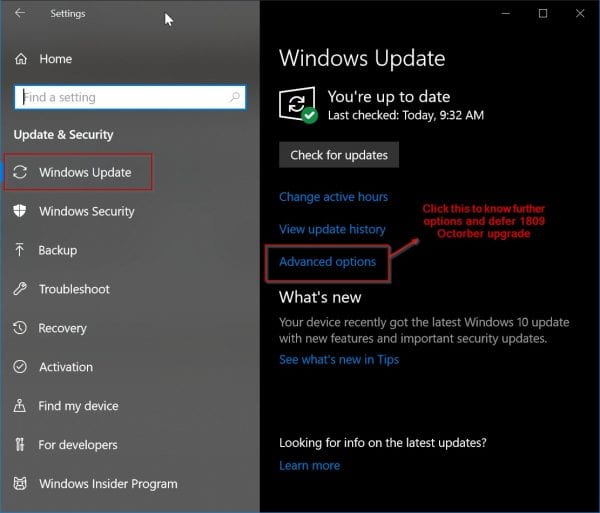
In this method, you can make use of the “Update & Security” option in Windows Settings. On the left-hand side you have “Windows Update”. Click it. Then on the right hand side, click on “Advanced options”.
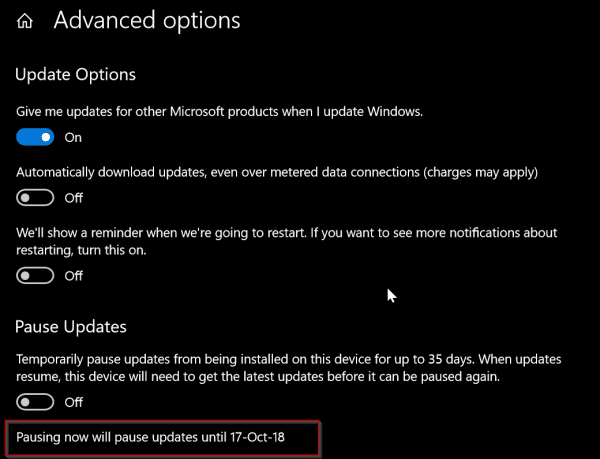
Another window opens. Here you have the option to “Pause Updates” if you are on 1803 or April Creators update version. Switch this option to “On”. With this feature on Windows 10 Pro, you can
Temporarily pause updates from being installed on this device for up to 35 days. When updates resume, this device will need to get the latest updates before it can be paused again.
As we know 1809 October update is ready to be pushed from 1st Oct onwards for regular users. So you can utilize this little tweak on Sept 29th or 30th, so you have 35 days to see if the new version is stable or not.
Then it automatically installs the latest updates, before you can pause again. So this is like a half-knife from stopping the Redstone 5 build version.
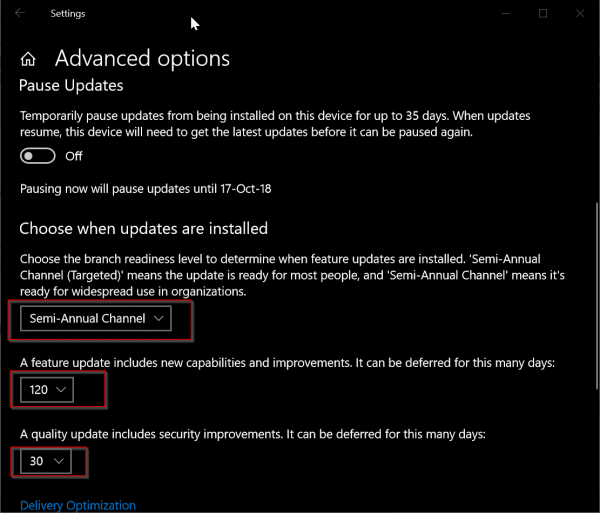
Just below the above option, there is another setting that says –
- Choose when updates are installed.
Here you can set the branch readiness level to –
- Semi-Annual Channel
Don’t choose the other option that says “Semi-Annual Channel (Targeted)” which is on , by default.
Then just below it, there are two settings –
- A feature update includes new capabilities and improvements. It can be deferred for this many days:
- A quality update includes security improvements. It can be deferred for this many days.
Since 1809 is a feature update, you can set it something like 120 days, which will defer the October upgrade till 4 more months. I think you can leave the default setting of quality update as it is, which is generally “0” days.
There is also a small note below this setting which embraces the “cruelty” of Microsoft. It tries to install Windows 10 new updates, without taking user acceptance into purview. This was lot easier in Windows 7 or Vista.
Note: Windows Update might update itself automatically first when checking for other updates.
And then it says –
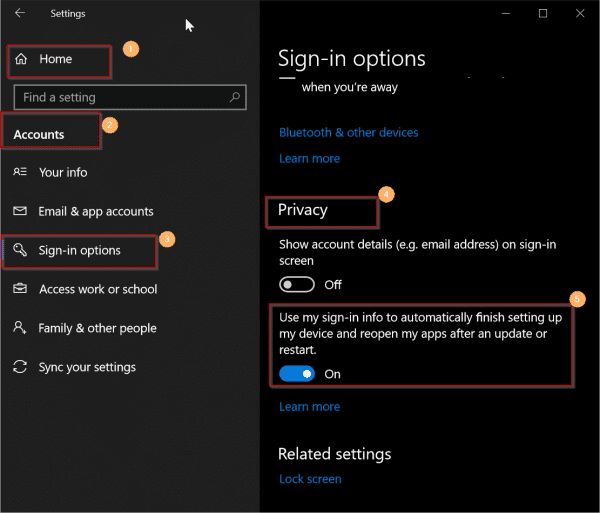
Configure automatic device setup after an update under the Privacy section in “Sign-in” options.
So in case Windows 10 has done the upgrade, make sure that option is set to “On”, so it can use the sign-in information automatically. Otherwise, your system might hang up in the middle.
The Registry Tip to Block October 2018 Upgrade
If you are a Windows 10 Home user, then the above trick may not be available on your list.
But don’t dishearten!
With the help of Registry Editor you can block the Octorber 2018 upgrade.
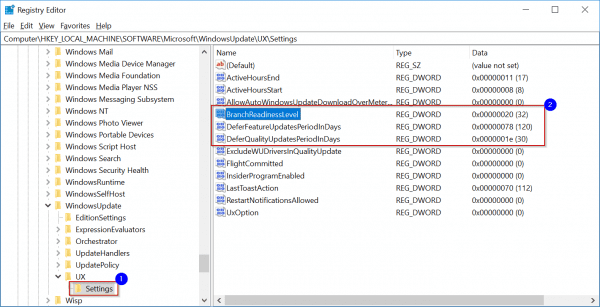
- Press Win+R and type “regedit”.
- Open the following item in it.
- HKEY_LOCAL_MACHINE\SOFTWARE\Microsoft\WindowsUpdate\UX\Settings
- Under this you have to create the following keys.
- BranchReadinessLevel
- DeferFeatureUpdatesPeriodInDays
- DeferQualityUpdatesPeriodInDays
- For all the above keys, you have to choose the “Base” as “Decimal“.
- For “BranchReadinessLevel”, you can set a value 10 or 20. To enter the value data, you need to double click the value name. A data value of 10 means “Semi-Annual Channel (Targeted)” and 20 means “Semi-Annual Channel“.
- For “DeferFeatureUpdatesPeriodInDays” you can set any value from 0 to 365 days. (It means you can defer the upgrade until 1 year).
- For “DeferQualityUpdatesPeriodInDays” you can set in the same range. (But this is not preferred, as it will also defer any security updates other than 1809 upgrade related).
As a Pro user, you have the luxury of these keys being created automatically, once you set the options in Windows Update & Security settings.
To create any new value, you can right-click an empty area and select New > DWORD (32-bit) value. You can choose the Decimal option while selecting the base.
During the navigation of the path, if you don’t find any item like “UX”, simply click the parent folder and do New > key and create the missing key.
Wushowhide Trick to Hide 1809 Upgrade
An alternative tweak which would temporarily prevent a driver update from reinstalling in Windows 10 can also be used to defer the 1809 update. As we know with latest features and fixes, Win 10 also provides the latest updates to your drivers. These are automatically installed.
But in some cases, the driver update can temporarily cause issues. In such a case, you can prevent the problematic driver from reinstalling again when the next Windows Updates are installed.
This trick can be used to solve our problem.
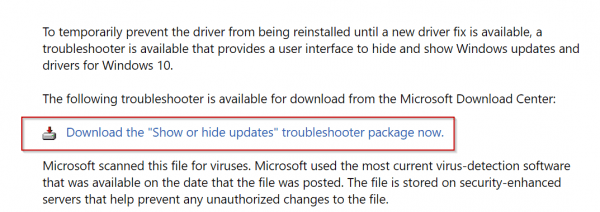
Step 1 : Download Microsoft’s Wushowhide tool by going to KB 3073930 page.
Step 2: For this you can click on the link that says “Download the ‘Show or hide updates’ troubleshooter package now“.
Step 3: Move it to a convenient location.
Step 4: Double-click on Wushowhide.diagcab to run it.
Step 5: It will run for long time. When it comes out of the process, click on the link with the label “Hide Updates”.
Step 6: This will show all the “hidden updates” , Microsoft pushes to your computer.
Step 7. If the “Feature update to Windows 10, Version 1809” (something like that) is visible and checked, just uncheck it.
Step 8: If this troubleshooting tool successfully worked, your upgrade/update/patch will be hidden.
Step 9 : You will see a “Troubleshooting has completed” dialog. Then beside the “1809” update you can see that it is marked as “Problems found”. It means you have successfully completed your hack to prevent the 1809 upgrade.
Step 10. Click close and you are finished.




![Windows 10 System Settings – 13 Features Explained with Details [1909]](https://www.windowstechit.com/wp-content/images357/2018/03/launch_control__panel_windows_10_settings-768x606.png)

Many thanks sir, my utmost appreciation for the hard work of your team, i am
indeed a regular visitor to your website, i thought to,
(out of courtsey) provide some suggestion and feedback of my own , would be thankful if you could reply or acknowledge my suggestions to make this site more
content focused .
Regards.
Ramesh Talwar
Fascinating read about preventing Windows 10 updates,
although there’s a very simple way.
Start, Run MSCONFIG
Click on Services then scroll down to Windows Update
Uncheck box
Done
@Vic: That’s similar to stopping or blocking the Windows Update service, which can be done from services.msc.