VPN (Virtual Private Network) is a keyword which most of the office workers from home are more familiar with than home users. VPN allows a computer using Internet (public connection) to get connected to a private network through a secure “tunnel” between the home machine and the business network.
VPN connection establishes security between the end user and the server. You are completely anonymized while browsing, banking transactions, playing games etc. It protects your online identity. Torrents are one place where you download lot of music, videos and movies.
But are you really protected from download malware, ransomware etc from these sites?
Unless your IP is masked from those sites, they may take unwanted advantage of your computer or server.
So many VPNs like ExpressVPN, NordVPN, Hotspot Shield, PrivateVPN etc exist in the market. Based on cost and protection, you need to decide which product to use. In the most simple case, Windows 10 allows you to connect to a VPN server using in-built features. By making your Windows 10 computer into a VPN server, your clients can connect to it with extra protection. The VPN server provides all the required hardware to enable hosting and delivery of VPN services.
A virtual private network (VPN) extends a private network. So the people in the public network can send and receive data as if they are using the private network itself. It makes it quick and secure enough.
Compared to other technologies VPN offers several advantages like cost savings and scalability.

VPN has many other advantages like enhanced security, remote control, can share files, online anonymity, unblock websites and bypass filters, change IP address, better performance and reduce costs.
VPN can lower costs by eliminating the necessity for expensive long-distance leased lines. One needs only short dedicated connection to the service provider in the case of VPN.
- Why to Setup VPN Server in Windows 10
- How to Setup VPN Server in Windows 10
- How to Setup Router for your VPN Server Connection
- Connect to your VPN server in Windows 10
- There are two basic requirements to setup VPN in Windows 7.
- Following are the steps for configuring Incoming VPN Connection in Windows 7
- Following are the steps for configuring Outgoing VPN Connection in Windows 7
Why to Setup VPN Server in Windows 10
You can make your Windows 10 PC into a VPN server for several reasons. These include playing LAN games, privately browsing the net using public Wi-Fi, connecting to home network while driving, hide your ip etc.
Though it is very much easy to set up VPN in Windows 10, you have to do certain things.
– You need to allow forwarding ports from your router
– One has to expose their computer and a port to PPTP protocol for VPN directly to the internet. To do this, you need to use strong credentials and use a port which is not default.
– Instead of manually configuring the VPN server, one can use services like ExpressVPN to install them automatically.
How to Setup VPN Server in Windows 10
1. Open Control Panel. (Press the Win key and type “control” and click on the required item from the search items).
2. View by small icons.
3. Network and Sharing Center > Change adapter settings
4. Press the Alt key.
5. Click File > New Incoming Connection from the available menu items

6. Now select the user account that can connect remotely to this computer.
7. For security purpose, you can create a new user.

8. Click the “Next” button
9. Check the option “Through the Internet“.
10. On the next screen, select the networking software that should be enabled for incoming connections.

11, After selection, click the “Allow access” button.
12. Then note down the computer name. This information is required by remote people to connect to your VPN server.

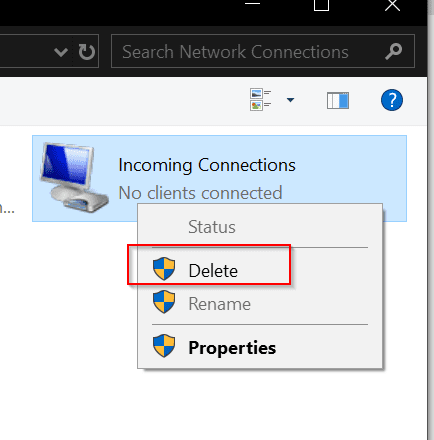
Now your VPN server is up and running. It will take incoming connection requests. You can disable the VPN server by right-clicking the “Incoming Connections” item and press the “Delete” label.
How to Setup Router for your VPN Server Connection
Since you will be using Internet to connect to your VPN server (computer), you are most likely be using Router. It is mandatory to set port forwarding to let router send traffic to the right PC.
Based upon your router make up, you can log on to your set up page.
Model No. TL-WR841N/TL-WR841ND).
1. On the left hand side, you can see “Virtual Servers” under “Forwarding”
2. Click on “Add New” on the right-hand side.

3. You have to fill-in the following details
a. Service Port – This is the port on the router facing the internet. Generally provide a number above 5000 (range is between 1 and 65353).
b. Internal Port
c. IP Address – Find the IP address of your computer using Google.
d. Protocol
e. Status
f. Common Service Port.
4. Save the settings.
Then check using any online tool to check port forwarding.
Connect to your VPN server in Windows 10
1. Press the Win + I key to open Windows Settings.
2. Click on “Network & Internet“.
3. On the left-hand side, click on “VPN“.
4. Make sure the following two options are ON.
a. Allow VPN over metered networks.
b. Allow VPN while roaming.
5. This is to make sure VPN works all the time. You can turn them OFF, if you don’t like over metered networks and while roaming.

6. Click on “Add a VPN connection“.
7. You need to fill in the following fields.
a. VPN Provider – Windows (built-in)
b. Connection Name – any name to remember your connection
c. Server name or address – this can be the public IP address or domain name.
d. VPN type – Automatic (default). Otherwise you can choose – Point to Point Tunneling Protocol (PPTP), L2TP/IPsec with certificate, L2TP/IPsec with pre-shared key, Secure Socket Tunneling Protocol (SSTP), IKEv2. This depends on your VPN vendor requirements.
e. Type of sign-in info – Username and password (default). Otherwise, you can select Smart card, One-time password, Certificate.
f. User name (optional) – You can give your name to remember.

There are two basic requirements to setup VPN in Windows 7.
The first requirement is setting up a remote system to call into the business network which is called outgoing. The second requirement is on the network side.
In this scenario, a computer allows secure connections from other remote systems or connected computers. This is called incoming. Windows 7 comes with a preloaded VPN client called Agile which makes setting up of both incoming and outgoing, very easy for VPN to work.
According social.technet.microsoft.com, the following are the detailed steps on how you can establish incoming and outcoming connections in Windows 7.
Following are the steps for configuring Incoming VPN Connection in Windows 7
- First go to Control Panel and open Network and Sharing Center.
- Click on Change adapter settings.
- Press Alt+F and select New Incoming connection
- Put a check on who you’d like to give access to this computer or you can configure a new account by clicking on Add someone,after that click on Next.
- Put a check mark on Through the Internet. Click on Next.
- Select the protocols you want to enable for this connection. Click on Allow access.
- Make a note of the Computer name as this will be used by the client to connect to this computer and after that Click on Close.
Following are the steps for configuring Outgoing VPN Connection in Windows 7
-
- First go to Control Panel and open Network and Sharing Center.
- Click on Set up a new connection or network.
- Select Connect to a workplace then click on Next.
- Select Use my internet connection (VPN).
- Type the IP address or computer name where you wish to connect and your connection name under the Destination name field.
- Enter a User name and password that has been granted access to the host computer.
- For getting connected through created VPN connection, you can either right-click on the Network icon in the system tray and select Network and Sharing Center or go to Control Panel and open Network and Sharing Center, and click on Connect to a network.
- Now connect VPN Connection windows will appears.
If you are not clear with the above instructions on setting up a VPN in Windows 7, there is also an YouTube video which details in more-depth with a clear example.
How to Setup VPN in Windows 7 between Home and Remote System
This is just a simple tutorial on getting VPN started in Windows 7 and 10. You may encounter many troubles or questions when you try to setup VPN with the default settings in Windows 7. For all such problems you can search Google. On the contrary, there is also this below link which can be useful when creating Incoming Connections.
Source: http://technet.microsoft.com/en-us/library/cc755008%28WS.10%29.aspx
Enjoy!


My brother recommended I may like this web site. He was once entirely right.
This put up truly made my day. You can not believe just how a lot
time I had spent for this info! Thanks!