One of the most frustrating issues users report after upgrading to Windows 11 is the search bar failing to work properly.
You click in the search bar and start typing, but no results appear at all. Or the results are totally unrelated to what you’re searching for. A non-functional search is a major productivity killer in Windows 11.
Corrupted system files after an OS update, problematic search index, and background app conflicts rank among the most common culprits.
The Windows search bar is one of the handiest tools for quickly finding files, apps, settings and more on your PC.
But many users encounter problems with the search bar not working properly after upgrading to Windows 11. If your search box results are blank or you can’t find anything, try these proven solutions to get search working again in Windows 11.
Introduction of Solutions
Rebuilding the search index from scratch, running SFC and DISM scans, changing index locations, resetting search configurations, and performing OS reinstalls can often get search working again.
While frustrating, a non-working search bar in Windows 11 is a solvable problem. With the right troubleshooting approach and a few tweaks, you can get the search bar responding accurately to your queries once more.
Follow the expert-recommended steps to stop pulling your hair out and restore seamless search capabilities after upgrade issues. Quickly implement the top solutions covered here and eliminate Windows 11 search not working headaches for good.
Fix #1. Rebuild the Index
Often, a corrupted search index is the culprit behind non-working search. Rebuilding the index from scratch resolves this. Open an admin PowerShell and run:
Get-Service | Where-Object {$_.Name -like "WSearch"} | Restart-ServiceGive it some time to fully reindex your system. Search should now be working. Another way to do this is follow these steps.
Here are the steps to rebuild the search index in Windows 11:

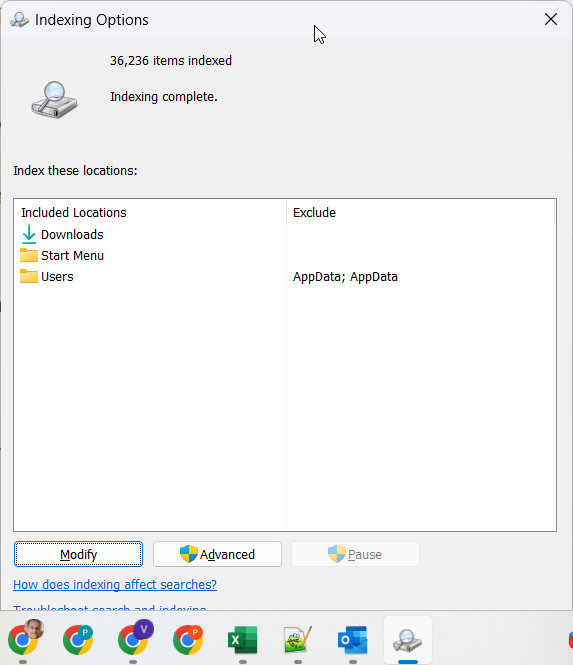
- Open the Start menu and search for “Indexing Options” to open the Indexing Options control panel.
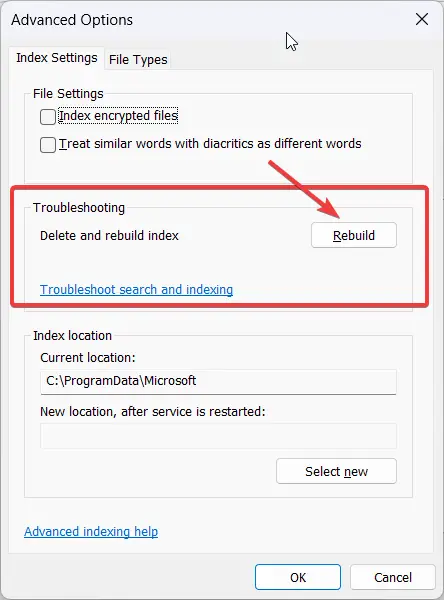
- Click on “Advanced” and scroll down to the “Indexing Settings” section.
- Click “Rebuild” next to the drive where you want to rebuild the index (usually this will be your C: drive).
- A prompt will appear warning that rebuilding the index may take several hours. Click “OK” to begin.
- The index will now rebuild in the background. You can continue using your PC during this time.
- To monitor progress, open Task Manager and go to the “Processes” tab. Look for the “Windows Search Indexer” process.
- Once the indexing process finishes, search should be working normally again in Windows 11. You can verify by searching for a random file on your system.

Rebuilding the search index forces Windows to completely re-crawl and index all files, emails, apps, settings and content on your PC from scratch. This resolves many search issues caused by a corrupted index.
Fix #2. Run SFC and DISM
Here are the steps to run the DISM tool in Windows 11 to help fix search bar issues:
- Open the Start menu and search for “Windows Terminal“. Open the Windows Terminal app.
- In the terminal window, type “cmd” and press Enter to open a Command Prompt window.
- Type the following command and press Enter:
DISM /Online /Cleanup-Image /RestoreHealth- DISM will now run and scan Windows for any corruption or problems with system files. This can fix underlying issues causing search problems.
- Once DISM has finished, close the Command Prompt and restart your computer.
- After rebooting, check if the search bar is working properly in Windows 11 now.
- You can also run SFC (System File Checker) after DISM by typing the following in Command Prompt:
sfc /scannow- This will scan and replace any corrupted system files from a cache.
Running DISM and SFC scans can solve many common causes behind a malfunctioning search bar in Windows 11 like file corruption. Be sure to run them as admin.
Fix #3. Change Index Locations
Try moving the search index to a different drive with enough free space, like an SSD. This optimizes search performance.
Here are the steps to change the search index locations in Windows 11:
- Open the Start menu and search for ‘Indexing Options‘ to open the Indexing Options control panel.
- Click on the ‘Modify‘ button.
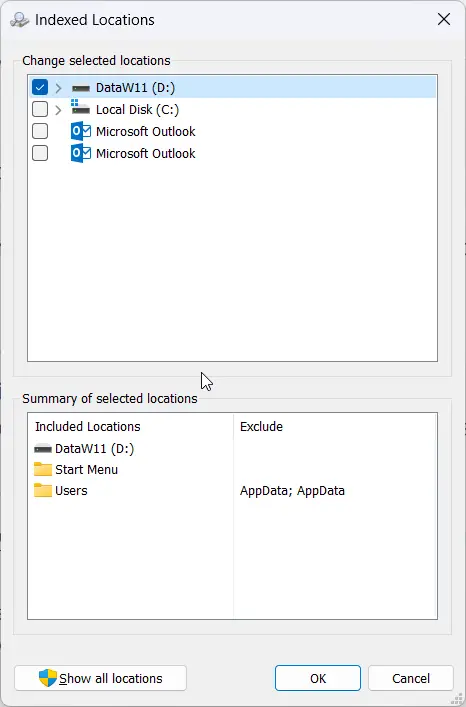
- In the Index Locations tab, you will see a list of currently indexed locations.
- To add a new location, click ‘Show all locations‘ and then click the ‘Add’ button.
- Select the new drive or folder you want to set as an index location. Typically an SSD drive is best for performance.
- Check the box that says ‘Index this location‘. Choose ‘OK’ to add it.
- To remove an existing indexed location, select it from the list and click the ‘Remove’ button.
- Click ‘OK’ to apply the changes.
- Windows will rebuild the search index using the new locations.
- Once complete, test search to ensure it is working properly now in the updated locations.

Optimizing index locations can significantly improve search speed and performance in Windows 11 if the original system drive location was sluggish. Monitor disk usage after changing locations.
Fix #4. Reset Search Settings
As a last resort, resetting the search configuration often resolves stubborn search problems. Go to Windows Settings > Search and turn off search history and Cortana to fully reset settings.
Fix #5. In-place Upgrade to Fix Windows 11 Search Bar Not Working
If nothing else works, perform an in-place upgrade to reinstall Windows 11 while retaining your data and apps. This wipes all system settings back to default.
Following these top troubleshooting solutions should get your recalcitrant Windows 11 search bar back up and running smoothly again.


