When users switch to games or multiple monitors, they need the right resolution, text, image and other settings. Blurry apps are another problem.
Plug-n-play are feasible with different devices connected to Windows 11. But when you change to a bigger screen, you need advanced scaling settings optimized.
Previous to the current OS, there was special option to change the refresh rate and resolution automatically.
But that has changed in Windows 11.
Advanced Scaling Settings
The advanced scaling settings is not there. But when you switch to a different monitor, a notification comes asking permission to automatically to set the right scaling settings.
If you have an external monitor, you can change the display setting, scaling and font size for that device.
Then in the advanced scaling settings, you can choose that profile. For now, the current option is limited. It only shows the current settings that are set.
What is DPI scaling level in Windows
DPI scaling, also known as Display Scaling, is a feature in Windows that allows users to adjust the size of objects on their computer screens.
This feature is especially useful for users who have high-resolution displays or those who have visual impairments. DPI scaling essentially tells Windows how to “stretch” images, text, and other objects so they appear bigger or smaller on the screen.
By default, Windows automatically sets DPI scaling based on the resolution of the screen, but users can customize this setting by going to the “Display settings” menu.
DPI scaling can also be set on a per-application basis, which means that users can have different scaling options for different programs.
Overall, DPI scaling makes it easier for Windows users to read text, view images, and work with other objects on their screens, regardless of their monitor size or resolution.
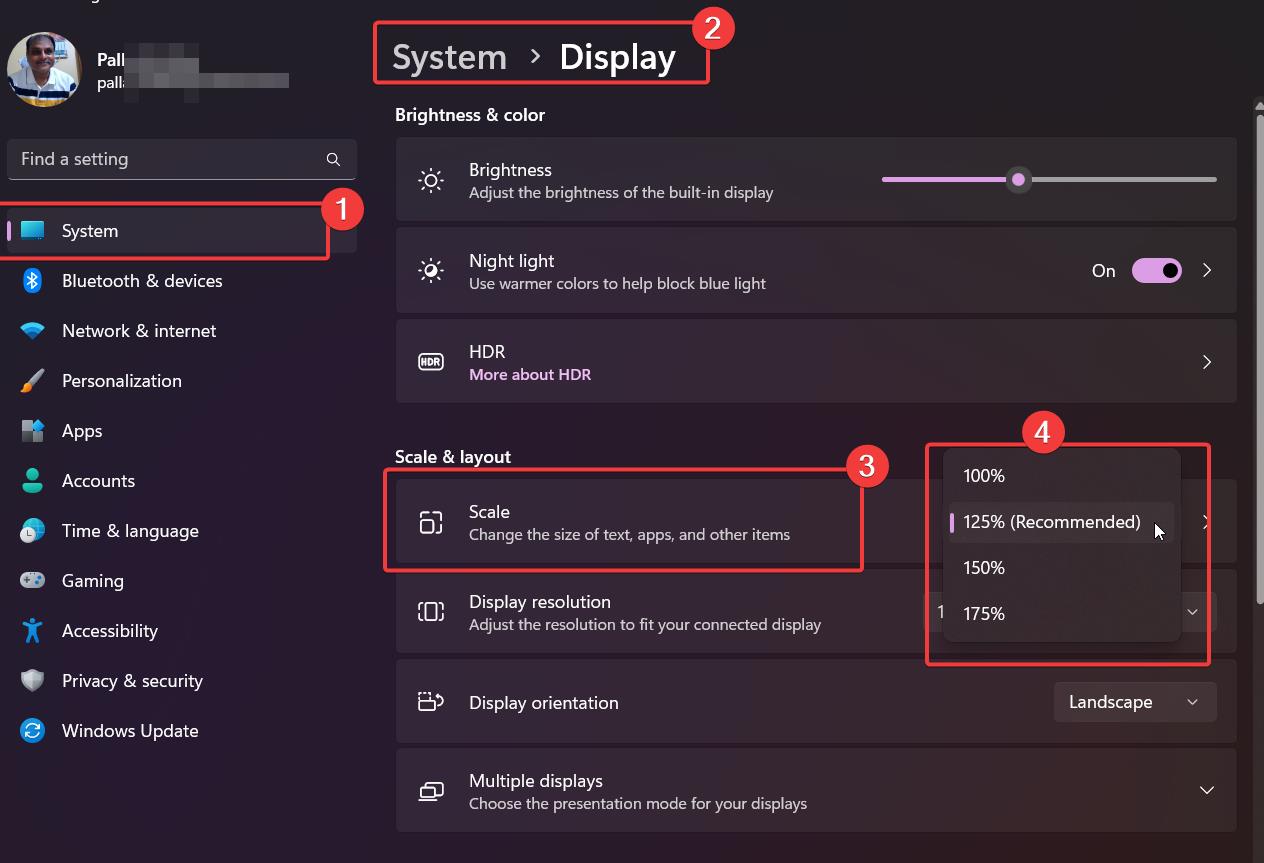
How to change Display Scale in Windows 11
- Launch “Settings” with the “Win + I” shortcut.
- Select System > Display.
- Select a scaling option of your choice from the “Scale” dropdown menu.
- The scaling will change instantly.
This is the preferred and common method to change DPI scale in Windows 11. The size of text, apps and other items are changed. The scale % depends on your graphics card and monitor resolution. Some may have even 200% also.
Set Custom Display DPI Scale in Windows 11
- Open the Windows 11 Settings app.
- Select the System > Display on the left hand side.
- Under Scale & Layout click the arrow beside Scale.
- Type a scaling value between 100 and 500 in the “Custom Scaling” field.
- Click the “Save” icon next to the field.
- With that, you set a custom display scaling in Windows 11.

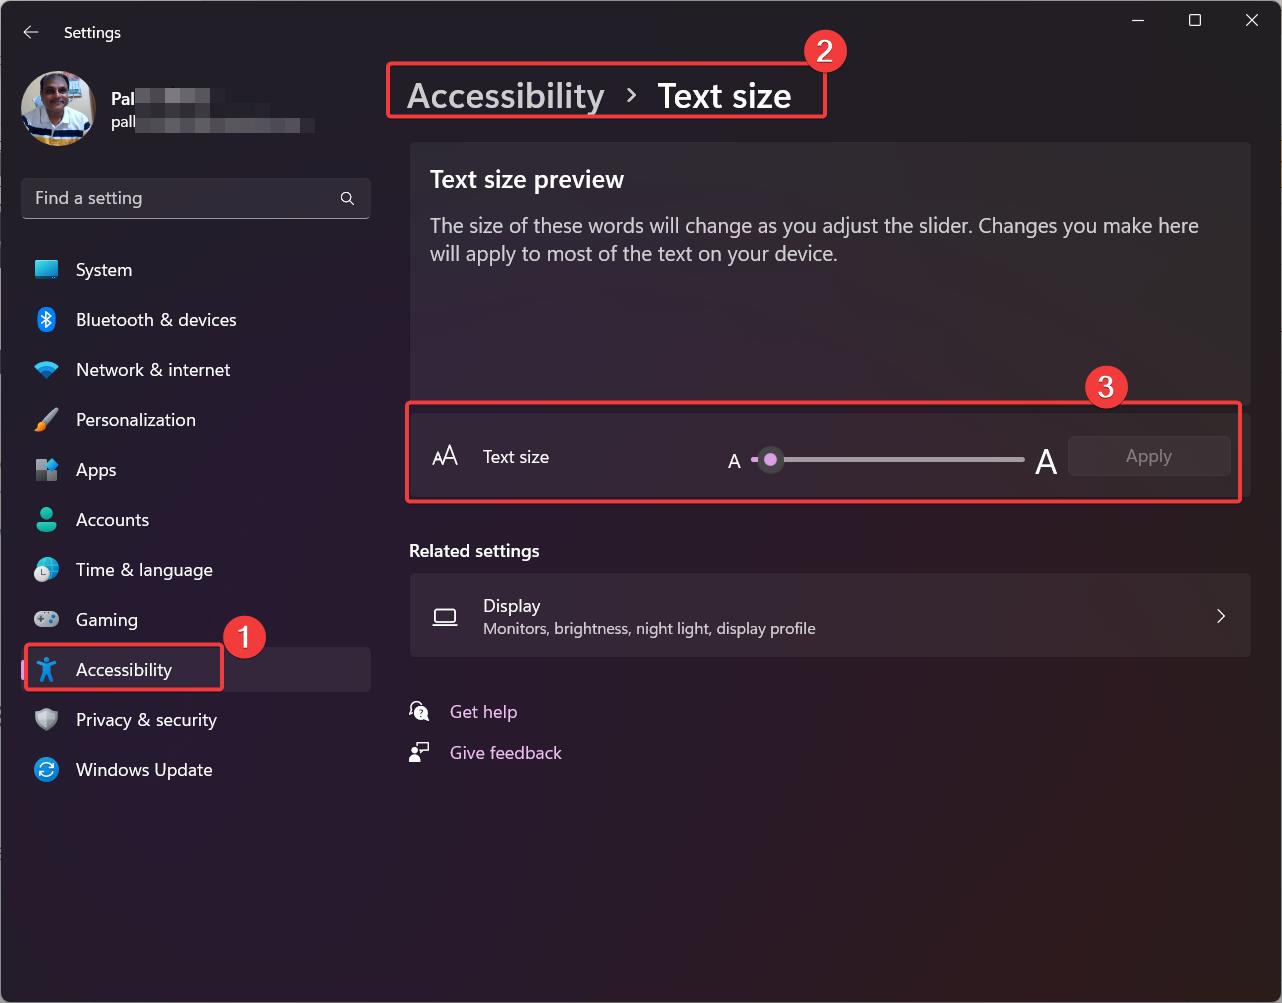
Increase or Decrease Text Size in Windows 11
- In the Settings app, navigate to the following.
- Select Accessibility > Text Size.
- Use the Text Size slider to increase or decrease the text size.
- Click the “Apply” button to save changes.
Reset Scaling Setting in Windows 11
- Open the Windows 11 Settings app.
- Go to the System > Display page.
- Select the “Recommended” option from the Scaling dropdown menu.
- With that, you reset the display scaling in Windows 11.
Use Registry to Change Display Scaling DPI in Windows 11
Open the registry editor by typing regedit in the search box.
Go to HKEY_CURRENT_USER\Control Panel\Desktop
- Find the “
LogPixels” value and edit it. - Switch the Base option from Hexadecimal to Decimal.
- Change the its value data to one of the following numbers:
- 96 = default 100%
- 120 = medium 125%
- 144 = larger 150%
- 192 = extra-large 200%
- 240 = custom 250%
- 288 = custom 300%
- 384 = custom 400%
- 480 = custom 500%
Next, find the Win8DpiScaling value and open it. Set its value data to 1 if you use LogPixels value other than 96.
Restart Windows 11 for the changes to take effect.
Fix Blurry apps automatically in Windows 11/10
The biggest problem with wrong scaling is the blurry apps on your main display. Since you have changed to another monitor, Windows 11 thinks that that is the current scaling.
It tries to set a similar scale for the old or new display. Then you see blurry apps as they are not properly scaled. But there is life-saver!
Windows 11 will automatically notify you about blurry apps when you unplug from the display and connect to the new one. You can make changes to the apps using the notification setting.
Each app can also be customized to have a different scaling DPI.
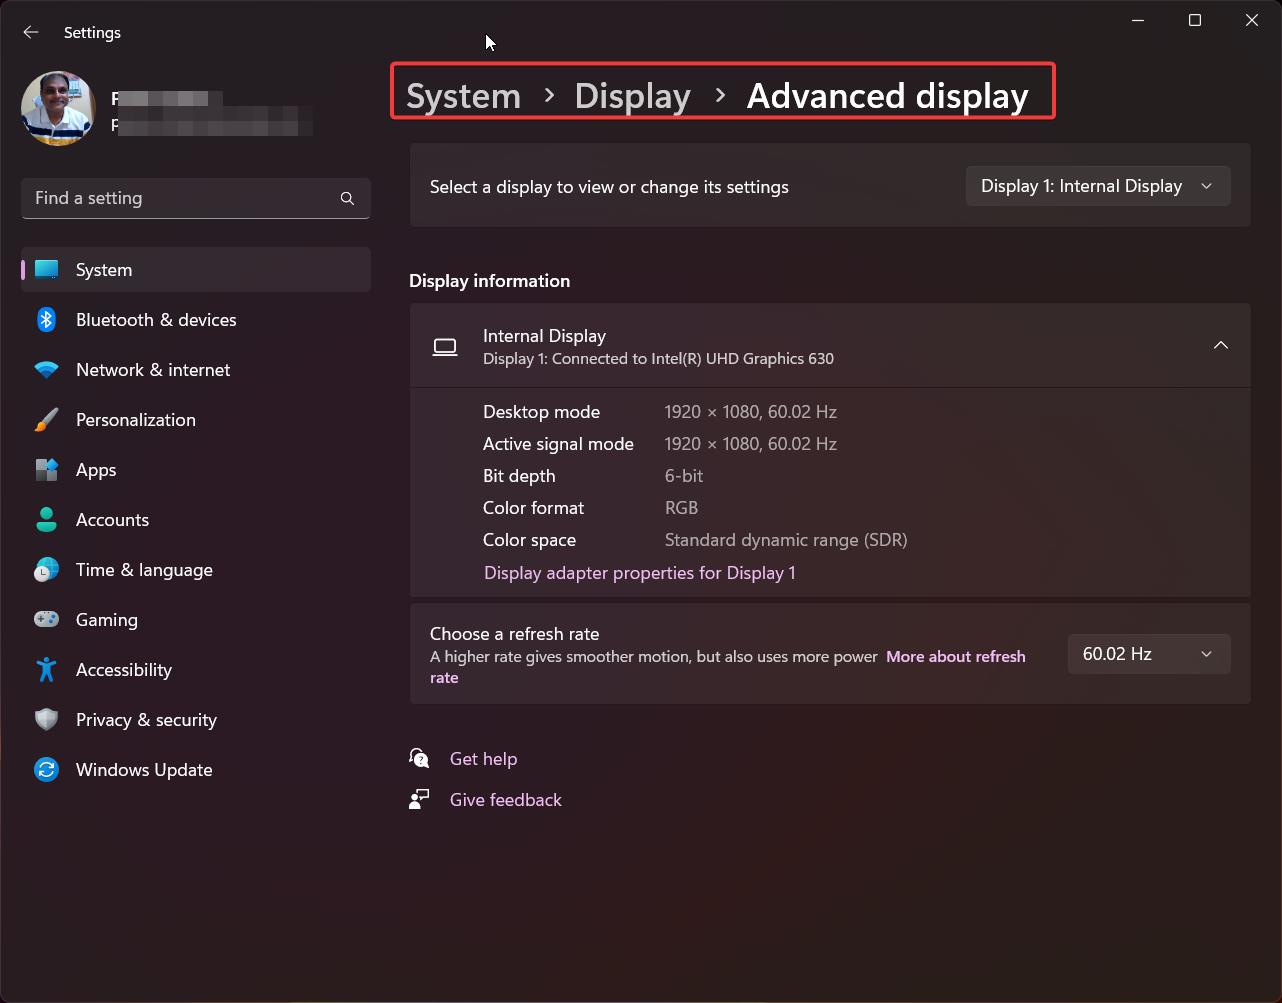
Advanced Display Settings in Windows 11/10
Though the advanced display settings option was introduced in Windows 10 v1803, it was removed in Windows 11.
The current advanced display settings page will only tell about the screens connected to the computer. It also tells about the refresh rate, resolution, bit rate, depth, color format etc.
Other than that it is not of much use.
Graphics Settings in Windows 11/10
If you are using Windows 11, you need to go to System > Display. Under the related settings, you can see Graphics. Click the blurry app in the list, and select the Options button.
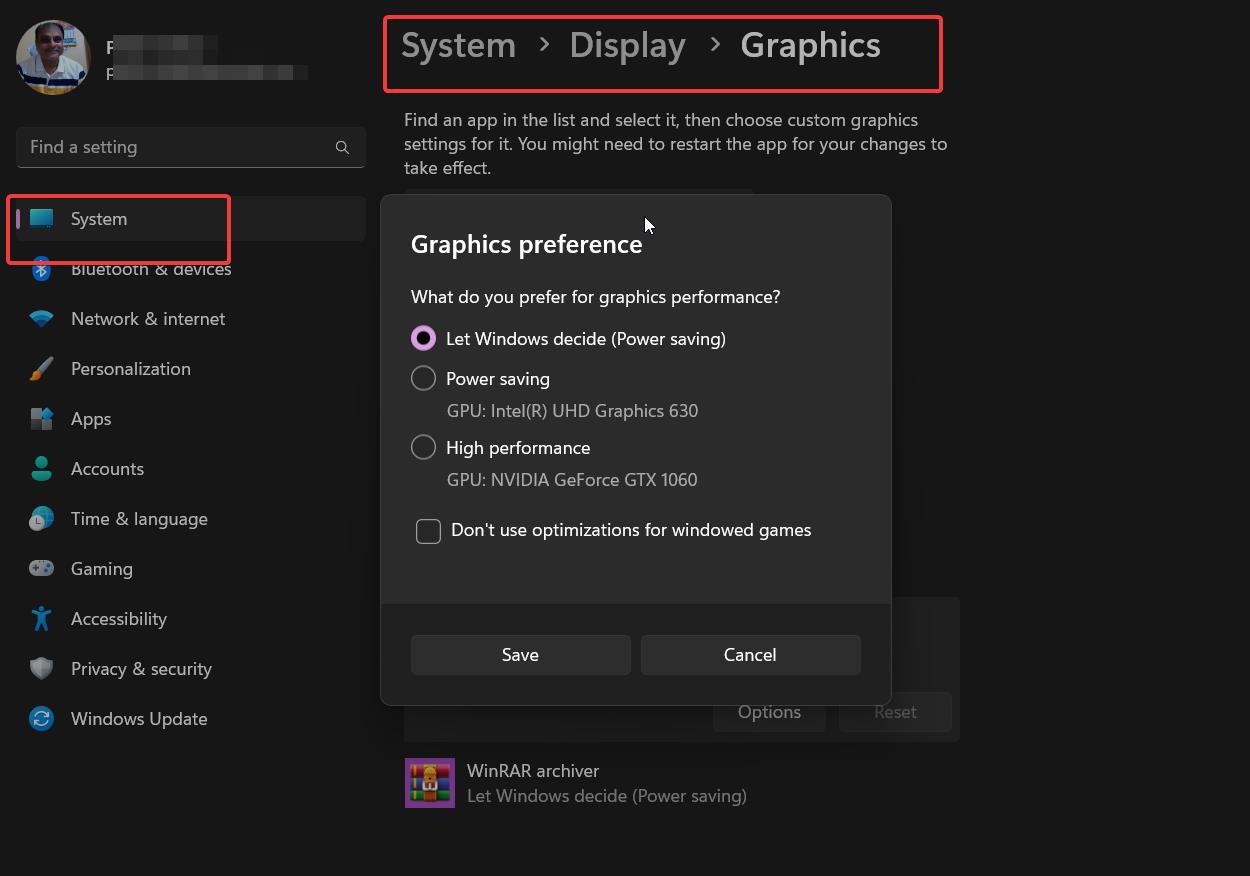
Following that, choose the Graphics performance based on the current setting.
Why Advanced Scaling Settings Windows 11 missing is bothering some users?
Windows 11 is the latest version of Microsoft’s operating system, and it comes with many new features and customization options.
The advanced scaling settings in Windows 11 are a crucial aspect of the user interface as they determine how images and text are displayed on the screen.
However, some users have reported that the advanced scaling settings in Windows 11 are missing, making it difficult to adjust the scaling of the screen to their liking.
This issue has caused frustration among users who have been looking for a way to customize their display settings further.
While Microsoft has yet to address this issue, there are some workarounds that users can use to get the advanced scaling settings back.
Overall, the missing advanced scaling settings in Windows 11 problem is a significant inconvenience for users who require a high level of customization in their user interface.
Fractional scaling never great such as 125%,150%,175% etc. Nothing beats integer scaling such as 100%, 200% or 300%. Those are just using pixels as they are made and not trying to break them up into fractional nits. No doubt Windows has actually done well as they could with DPI fractional scaling. Apple basically created their MacBook’s to use 200% scale on their Retina screens to avoid the pitfalls of fractional scaling. But they too offer fractional settings that do look pretty good as well. I think on FHD notebooks many just live with the side effects or choose to use 100% scale and deal with text being slightly smaller than they would like. Some even like the advantage this gives in a bigger desktop working space. I know some who solve this by simply reducing resolution to make everything bigger.
I am using 125% and it works great on my desktop and laptop.