Follow the easy instructions discussed in this blog to know how we can import the Bulk Outlook PST files into Office 365 Exchange Online.
Now a day’s Microsoft Office 365 is going to popular, just because it provides the Exchange Online environment and it is work on Cloud Platform.
So the People and the small or large Business Organizations are migrating from another Email Clients (like Lotus Notes, Thunderbird, and Outlook) to o365 Mailbox.

In this post, we are going to explain that how to import the Outlook PST data into Exchange Online. So if you want to convert your PST file data like email, contacts, calendars, appointments, and attachments etc into the Office 365 Mailbox.
Two Possible ways for doing the PST to Office 365 Migration:
For the conversion of PST to o365, Microsoft provides a process which is called the Network Upload Method and it is a free and the manual way of moving PST to Exchange Online. But due to saving the time and data most of the person or organizations also search another process of importing PST file data into Cloud Platform.
So here we are explaining that another process which is the third-party software.
These third parties are GUI based application. So the non-technical or the large organization mostly prefer that application to complete the Migration steps. Now follow the instruction to know about both processes in details.
Method 1: Export PST file into Office 365 Mailbox manually
With this process, you can easily convert the PST to Exchange Online environment but first, you need to give the sharing permission of the PST file or folder.
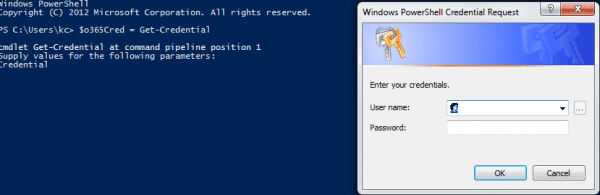
After that, you need to add the Mailbox Import Export feature into Organization Management list. For adding this feature, open the Windows PowerShell and put these given commands.
$o365Cred = Get-Credential

$Session = New-PSSession -ConfigurationName Microsoft.Exchange -ConnectionUri https://ps.outlook.com/powershell/ -Credential $o365Cred -Authentication Basic –AllowRedirection
Then hit the Enter Key and configure the Office 365 Mailbox with the PowerShell by going the Office 365 Admin account.
Then create the Import PS Session by putting these commands
Import-PSSession $Session

Now assign the Mailbox Import Export role to enter these Commands:
New-ManagementRoleAssignment -Role "Mailbox Import Export" -SecurityGroup "Organization Management" -Name "Import Export Org Management"

New-ManagementRoleAssignment –Role "Mailbox Import Export" –User "username"
![]()
In the username place, you need to give the valid or proper name.

Create the Import Job and Upload the PST
After assigning the Mailbox import export permission, you need to upload the PST file into Office 365. So open the o365 Mailbox and log in with the Administrator, just because only the admin can do the manual process.
Once you logged in then click Admin center and go the Data Migration by clicking Setup>> after that Upload PST file and select the PST file.
At the end hit on New Import Job for creating the Import job and put the name,>> Next>> Next.
Know the SAS URL and install Azure tool
When the above process has done, a window will open on the screen. Now here you will see few options so first click the Show Network SAS URL to know the SAS address >> Copy that URL. After that hit Download Azure AzCopy option and install the Azure application.
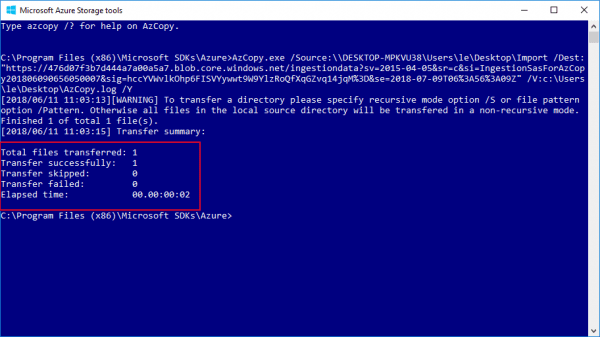
Once it successfully installed just launch the software and put that given command:
“AzCopy.exe /Source:\\PST file location path/Dest:”SAS URL” /V: location to save log file \AzCopy.log /Y”
Create CSV or Mapping file
When the PST stored in the Azure AzCopy tool, then you need to move that PST from the Azure to Office 365. For this you have to create the CSV or mapping file like this:
| Workload | FilePath | Name | Mailbox | IsArchive | TargetRootFolder |
| Exchange | Provide a shared file path | Pankaj.pst | pankaj@mails.onmicrosoft.com | FALSE |
Upload CSV and validate it
After creating the CSV file you need to go back to the import window, >> check on prepare mapping file option and upload that CSV for validating the PST. When it validates successfully, it will allow saving that PST in the Office 365 Mailbox.
For uploading CSV file just click Select Mapping file option and browse the PST where you stored before >> hit Validate for validating PST. Once it validates>> Save it into o365 Mailbox.
Method 2: Move from PST to Office 365 using the third-party tool
In the manual process, you can see that it is a time-consuming and little bit difficult as it involves Windows PowerShell commands. That’s why we are suggesting one more easy method, which is the, third-party software. With this process, you can easily convert the PST file data to o365.
There are many applications available, so it’s very important to choose the best software. Here I am also recommending you the MailsDaddy PST to Office 365 Migration Tool. This is the best application for importing the PST file data like emails, contacts, calendars, appointments, and attachments etc into the o365 Exchange Online environment.
How the PST to Office 365 Migration Tool work?
Follow all the instructions for uploading PST file into Cloud Mailbox.
Step1: First, download the software from the following the link and install it on your PC.
https://www.mailsdaddy.com/pst-to-office-365-migration-tool/
Step 2: Once it installed just launch the application.
Step 3: Now click Add File button to upload the PST>> Scan >> Ok
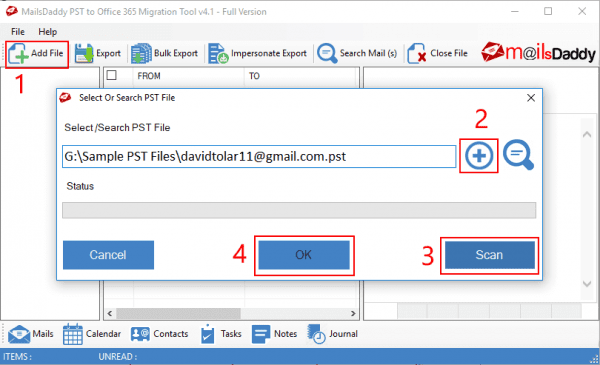
Step 4: After uploading the PST, it will show the preview of PST file data.

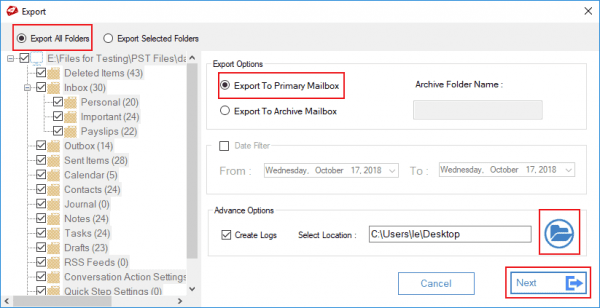
Step 5: Then you can select the data and give the location to save the log file >> click Export. That’s it.
Why the third-party tool is better than the Manual method?
Most of the people use the third-party application because with the third-parties tools you can export your all PST data into Office 365.
You don’t need any PowerShell and Azure Commands.
But the MailsDaddy PST to Office 365 Migration Tool has many other features, and these all features make it different and easy.
1 Search by name, email & subject: With this application, you can search the required PST data item by the Name, Email, and Subject.
2 Searches by Data Range Filter: In this features, you can easily select the PST item from particular data to data and export it.
3 Export Multiple PST into o365 with Bulk and Impersonate option: With these options, you can import your Multiple PST file data into Multiple Office 365 mailbox by creating the CSV file.
Note: In the Impersonate option you need to give the applicationimpersonate permission or full access to the admin account.
Conclusion:
In this article, I have explained that how to import the Bulk Outlook PST to Office 365 Exchange Online Mailbox. Here I also discussed two possible methods one is manual and another is a third-party tool. You can use any one of them. If you still have any doubt then you can leave a message in the comment box.