In today’s collaborative work environment, sharing Excel files with multiple users has become a necessity for efficient team collaboration and data management.
If you’re using Office 365, you have the ability to share Excel workbooks with multiple users seamlessly.
In this article, we will guide you through the process of how to share Excel file for multiple users and provide tips on making your Excel file shareable for seamless collaboration.
Excel allows multiple users to access and edit a workbook simultaneously, which can significantly improve productivity when working on group projects or team-based tasks.
Share Excel Workbook Office 365
However, ensuring that the shared Excel file remains synchronized and accessible for all users can be challenging without the right tools and settings.
Whether you’re wondering how to share an Excel file with multiple users or how to share an Excel sheet with multiple users, we’ll cover all the essential steps you need to take.
With Office 365, sharing an Excel file becomes incredibly straightforward. You can easily make the Excel doc shared by uploading the file to OneDrive or SharePoint, where it can be accessed and edited by designated users.
Using the Excel shared file multiple users feature, you can track changes made by each individual and ensure real-time collaboration. This process is simple, as it allows multiple users in Excel to work on the same document without worrying about version control issues.
In this guide, we will walk you through the steps to share an Excel workbook in Office 365, explaining how to make an Excel file shared and enable multiple users in Excel to access and edit the file at the same time.
You’ll learn how to manage permissions, control who can edit the file, and allow team members to contribute seamlessly. Whether you need a shareable Excel spreadsheet with your colleagues or want to collaborate on complex datasets, this method ensures a smooth workflow and reduces the risk of errors.
By the end of this article, you will have a clear understanding of how to share an Excel workbook with multiple users in Office 365, as well as the benefits and limitations of sharing Excel files in real-time.
Whether you’re managing a team project, tracking inventory, or collecting feedback, sharing an Excel workbook is a vital skill that ensures smooth collaboration and up-to-date data for everyone involved.
Collaborating with team members on Excel reports, data analysis, budgets, trackers, and other spreadsheets is made easy with Office 365’s flexible file sharing abilities. You can grant access to multiple users with customized permissions to enable productive teamwork.
This step-by-step guide covers how to share an Excel workbook stored on SharePoint or OneDrive with multiple employees, external partners, clients, or stakeholders. We’ll outline setup in both desktop and web versions of Excel on Windows and Mac.
Follow these tips to securely share Excel files for seamless collaboration across multiple users with Office 365.
Step 1: Upload the Excel File to SharePoint/OneDrive
To enable access for multiple users, you first need to store the Excel file in a shareable cloud location:
- Open the Excel file and select File > Save As
- Choose SharePoint or OneDrive and pick a document library to save it in
- This uploads the spreadsheet to the cloud rather than local storage
Storing on SharePoint or OneDrive is essential for external sharing and access.

Step 2—Get Sharing Links for the Excel File
The easiest way to share an Excel file is by generating a shareable link:
- On SharePoint/OneDrive, navigate to the uploaded spreadsheet
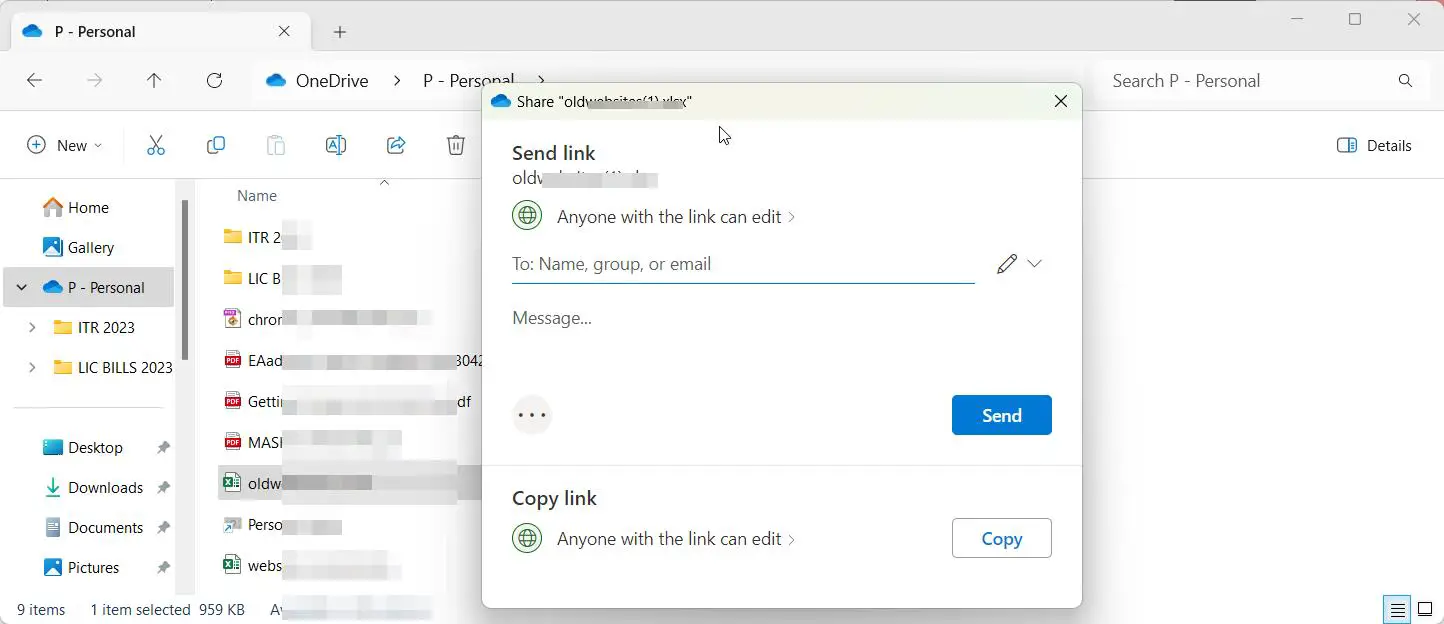
- Click the “Share” button and select “Get a link.”
- Choose either “Anyone with the link” for public access or “Specific people” to enter individual emails
- Copy the generated private or public share link
This link allows instant access to the Excel file for recipients.

Step 3—Adjust Link Settings and Permissions
Tailor the sharing link’s settings for desired permissions:
- In SharePoint/OneDrive, click the 3-dots next to the file. Share
- Click “Advanced settings” to adjust link options
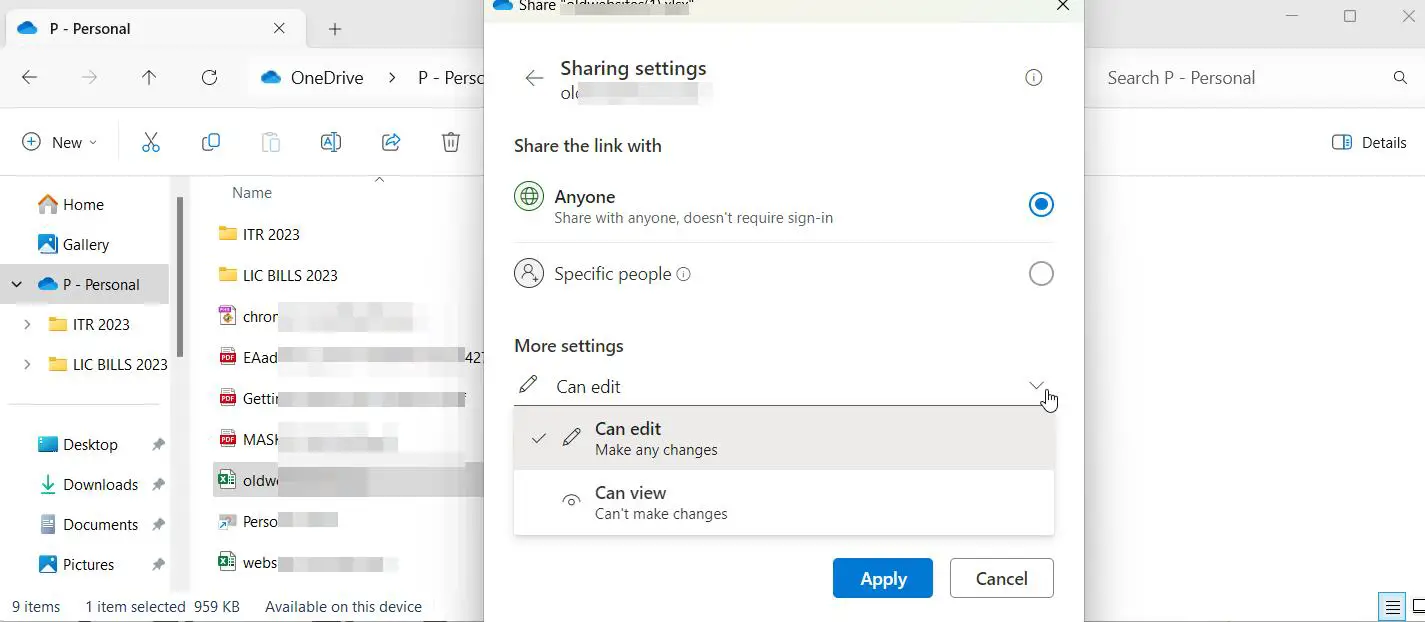
- Enable or disable options like edit/view, expirations, and password protection
- For added security, disable “Allow editing” and require sign-in
Configuring appropriate settings prevents unwanted actions like external edits.

Step 4—Share the Excel Link with Recipients
Now send the link to internal and external recipients that need access:
- Paste the link into email, IM or other channels to share with colleagues
- For external users, ensure the link permissions are appropriately scoped
- Make sure to notify users to enable external sharing access if blocked by default
Sharing the link instantly grants view or edit access depending on permissions.
Step 5—Directly Add Users with Office 365 Accounts
To give access without needing the link, you can directly add users:
- Again click Share > Invite people on the Excel file
- Enter email addresses or names of people in your organization
- Specify permission level for each user (Edit/View)
- Users will see shared file appear automatically in their Office 365
This approach associates file access directly with their account.
Step 6—Disable External Sharing If Required
If broader external collaboration isn’t needed, disable external sharing:
- Access SharePoint/OneDrive admin center > Policies > Sharing
- Under external sharing, select “Don’t allow sharing outside your organization.”
- Remove any broadly shared links to disable public access
- This limits guests and restricts external exposure of files
Disabling external sharing ensures assets stay within your organization.
Advanced Tips for Excel File Collaboration
- Require users to sign-in for link access to maintain accountability
- Limit guest access timeframes by enabling link expiration
- For confidential data, disable downloads and printing via Information Rights Management
- Preview pane allows quick in-browser Excel viewing without full edit rights
- Sort documents into Teams channels or SharePoint document sets for related collaboration
Troubleshooting Excel File Sharing
If users are having trouble accessing shared Excel files:
- Verify external sharing is enabled for users’ Office 365 accounts
- Check that users have permissions for the specific SharePoint site
- Make sure users click the direct share link rather than navigating directly
- If already added with direct access, have user refresh the library
Connecting with your IT help desk can also troubleshoot and resolve external sharing issues.
How to Share Excel file for multiple users Office 365
Sharing an Excel file for multiple users in Office 365 is a seamless process that allows for efficient collaboration and real-time updates. Follow these simple steps to share an Excel file with multiple users:
Step 1: Upload the Excel File to OneDrive or SharePoint
The first step in sharing an Excel file for multiple users is uploading it to OneDrive or SharePoint. These cloud storage services are integrated with Office 365, making them the ideal platforms for file sharing. To do this:
- Open your OneDrive or SharePoint app.
- Click on the Upload button or drag your file into the app.
- Select the Excel file you want to share and upload it.
Step 2: Open the Excel File Online
Once your Excel file is uploaded, open it directly in Excel for the web. This ensures that all users can access the file in a shared environment where real-time edits are possible. To open the file:
- Navigate to the OneDrive or SharePoint location where your Excel file is saved.
- Click on the file to open it in the browser. This will automatically open the file in Excel Online.
Step 3: Click the “Share” Button
Next, to share the file with others, look for the Share button located in the top-right corner of the screen. This opens the sharing settings and allows you to manage who can access your file. The steps are:
- In Excel Online, click on the Share button.
- A pop-up window will appear asking you to set up sharing options.
Step 4: Set Permissions for Multiple Users
At this stage, you can choose how you want to share the file. You have several options for granting access:
- Anyone with the link: This option allows anyone who receives the link to access the file, even if they don’t have an Office 365 account. You can choose whether they can view or edit the file.
- Specific people: Choose this option if you want to limit access to specific users. Enter their email addresses, and they will receive an invitation to view or edit the file.
- Only people in your organization: This option restricts access to users within your company or organization.
Once you’ve selected the permissions, click Send or Copy Link to share the file with the selected individuals.
Step 5: Collaborate in Real-Time
Now that you’ve shared the file, multiple users can begin collaborating. Excel allows multiple users to access the file simultaneously, with changes automatically updated in real-time. Each user’s name is displayed at the top of the workbook, and color-coded cells indicate who is editing which part of the file. This makes it easy to track changes and avoid conflicts.
Step 6: Monitor and Manage Permissions
As you collaborate, it’s important to monitor who has access and what permissions they have. You can always adjust the permissions by clicking on the Share button again and selecting Manage Access. This allows you to modify who can edit or view the file, remove access, or add new collaborators.
By following these simple steps, you can easily make your Excel file shareable, allowing multiple users in Excel to collaborate efficiently on the same document in Office 365. Whether it’s for team projects, financial planning, or data analysis, sharing Excel workbooks Office 365 ensures seamless collaboration and up-to-date information across all team members.
Conclusion
In conclusion, sharing an Excel file with multiple users has never been easier, especially with the powerful tools available in Office 365.
Whether you’re wondering on how to share an Excel file with multiple users, the platform provides a range of options that allow you to collaborate effectively in real time.
The ability to share Excel workbook Office 365 is an essential feature for teams and businesses that rely on seamless collaboration.
By using Excel shared file multiple users, you can ensure that all members have access to the latest version of the file, and they can contribute or edit the content as needed. This functionality eliminates the need for multiple versions of a document and reduces the risk of errors or miscommunication.
If you want to make an Excel doc shared, the process is simple: just upload your file to OneDrive or SharePoint and set the appropriate permissions.
Once you’ve done this, you can easily manage access, control editing rights, and ensure that your team can work together on the same file without any disruptions. This makes it easy to share an Excel sheet with multiple users while keeping everything synchronized.
By following the steps outlined in this article, you can confidently share an Excel file with multiple users in a secure and efficient manner.
Whether it’s a shareable Excel spreadsheet for a collaborative project or an important report that requires input from multiple team members, Excel allows multiple users to work on the same document at the same time. This not only speeds up workflows but also ensures that data is consistent across the board.
In summary, sharing an Excel workbook with multiple users on Office 365 offers a streamlined and effective way to manage team collaborations. You can make the Excel file shared with just a few clicks, making it accessible to everyone involved.
As you continue to leverage Excel’s multiple-user functionality, your ability to manage complex projects will improve, reducing delays and enhancing overall productivity.
Whether you are learning how to share an Excel sheet with multiple users for the first time or looking for more advanced tips, sharing an Excel workbook in Office 365 has become a key tool for modern teamwork.


