Category: Solved

  • 5 Best Solutions to Fix “BOOTMGR is Missing” Error in Windows

    5 Best Solutions to Fix “BOOTMGR is Missing” Error in Windows

    Have you encountered the dreaded “BOOTMGR is Missing. Press Ctrl+Alt+Del to restart” error on your Windows PC? If so, you’re not alone. This frustrating issue can prevent your system from booting properly, leaving you stuck at a black screen with no access to your files or programs. But don’t worry—this guide will help you understand what BOOTMGR (Windows Boot Manager) is, why this error occurs, and the best solutions to fix it.

    What is BOOTMGR?

    BOOTMGR (Boot Manager) is an essential component of Windows that helps your operating system start correctly. It works in conjunction with the Boot Configuration Data (BCD) to locate and launch Windows during startup. If BOOTMGR is missing, damaged, or misconfigured, your PC will fail to boot, leading to the infamous BOOTMGR is missing error message.

    Source: answers.microsoft.com and other forums and picture generated using AI tools.

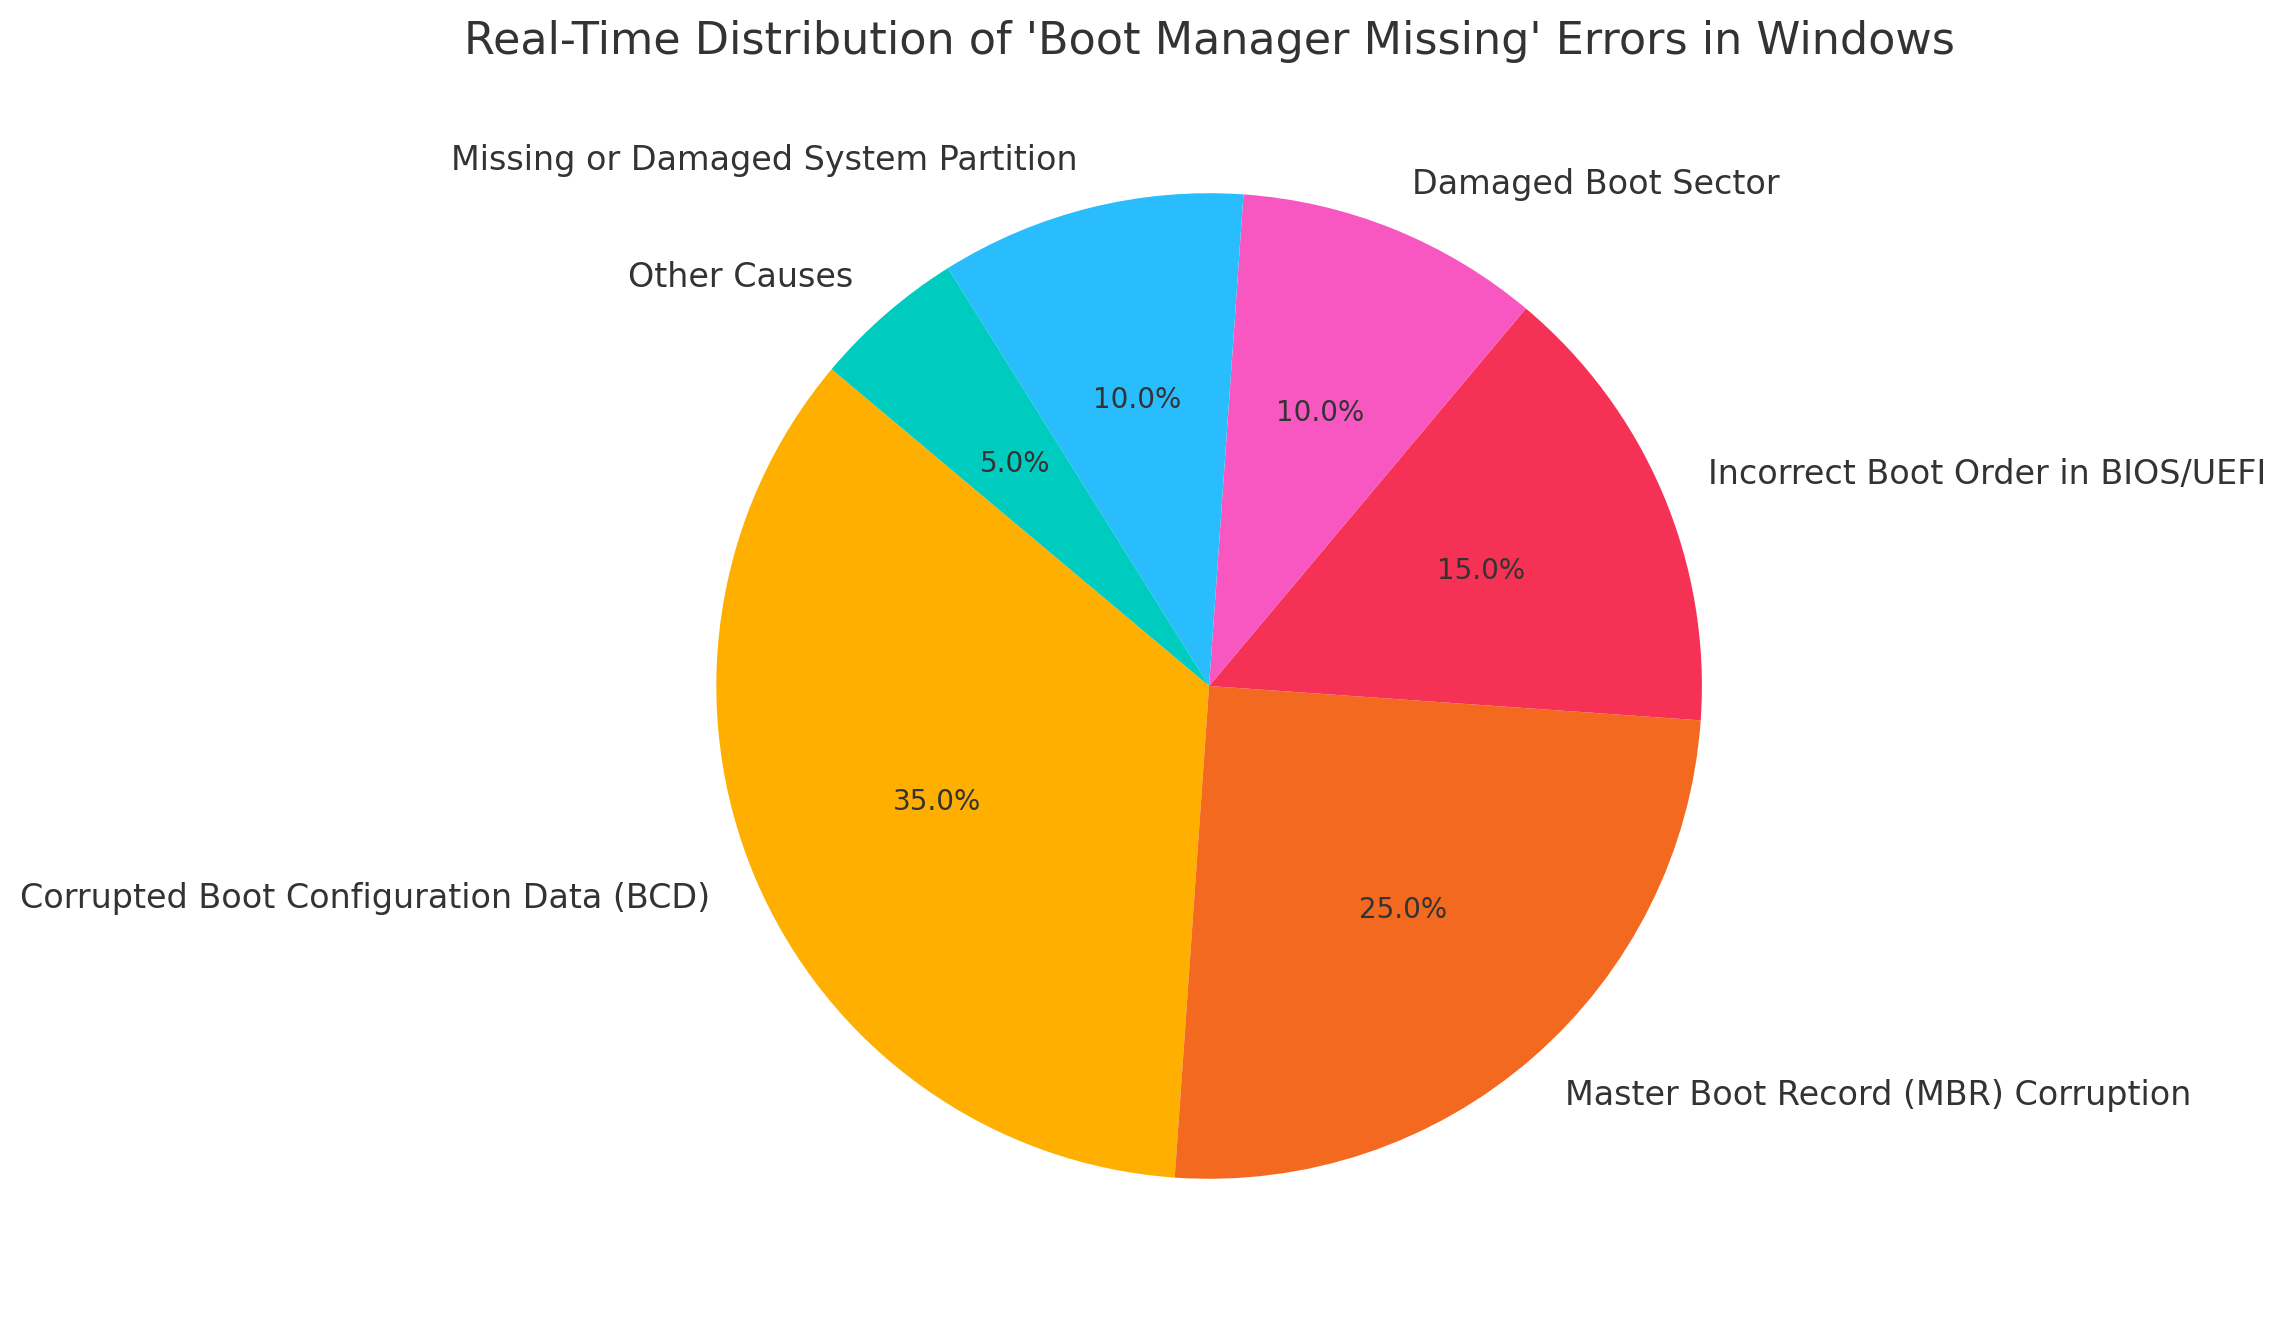
    Common Causes of Boot Manager Missing Error

    1. Corrupt Boot Sector or Master Boot Record (MBR)

    The Master Boot Record (MBR) is a crucial component of the boot process. If the MBR gets corrupted due to malware attacks, unexpected shutdowns, or faulty updates, the system might fail to locate BOOTMGR, resulting in a startup failure.

    2. Incorrect Boot Order in BIOS/UEFI

    BIOS/UEFI settings dictate the sequence in which the computer checks storage devices for bootable files. If an external device (USB, DVD) is set as the first boot option instead of the internal hard drive, Windows may fail to find BOOTMGR.

    3. Damaged Hard Drive or SSD

    A failing hard drive or SSD may contain bad sectors or corrupted data, leading to missing BOOTMGR errors. If your storage drive is physically damaged, the system will struggle to retrieve boot information, causing startup issues.

    4. Corrupt Windows System Files

    System files are essential for Windows to function correctly. Unexpected shutdowns, power failures, or malware infections can corrupt critical system files, including those related to the Windows Boot Manager.

    5. Accidental Deletion of Boot Configuration Data (BCD)

    The Boot Configuration Data (BCD) stores important information required to start Windows. If this data is accidentally deleted, misconfigured, or becomes corrupted, the BOOTMGR error will appear.

    6. Disconnected or Failing Storage Drive

    If the primary hard drive or SSD is not properly connected or is failing, Windows will not be able to access the BOOTMGR file. Loose SATA cables, faulty power connections, or drive failures can all contribute to this issue.

    This guide covers the 5 best solutions to fix the BOOTMGR is missing error in Windows 7, Windows 8, Windows 10, and Windows 11.

    boot manager missing windows 10 11 7

    Solution 1: Run Startup Repair from Windows Recovery Environment (WinRE)

    Why Use Startup Repair?

    Startup Repair is a built-in Windows tool that automatically fixes boot-related issues, including missing BOOTMGR errors.

    Steps to Perform Startup Repair

    1. Insert a Bootable Windows Installation Media (USB/DVD).
    2. Restart your PC and boot from the installation media (Press F2, F12, or DEL to access BIOS and change boot priority if needed).
    3. Select “Repair your computer” from the Windows setup screen.
    4. Navigate to “Troubleshoot” > “Advanced Options” > “Startup Repair”.
    5. Select your Windows installation and follow the on-screen instructions.
    6. After completion, restart your computer and check if the issue is resolved.

    If Startup Repair does not fix the problem, proceed to the next solution.

    Solution 2: Rebuild the Boot Configuration Data (BCD)

    Why Rebuild BCD?

    A corrupted or missing Boot Configuration Data (BCD) can prevent Windows from booting, resulting in the BOOTMGR error.

    Steps to Rebuild BCD Using Command Prompt

    1. Boot into Windows Recovery Environment (WinRE) using a bootable USB/DVD.
    2. Click on “Repair your computer” > “Troubleshoot” > “Advanced Options” > “Command Prompt”.
    3. In the Command Prompt window, type the following commands:
    bootrec /fixmbr
    bootrec /fixboot
    bootrec /scanos
    bootrec /rebuildbcd
    
    1. Press Enter after each command and wait for completion.
    2. Restart your system and check if the BOOTMGR error persists.

    If this does not resolve the issue, try repairing the Master Boot Record (MBR).

    Solution 3: Repair the Master Boot Record (MBR)

    Why Repair MBR?

    The Master Boot Record (MBR) is a crucial part of the boot process. If it becomes corrupted, it can trigger the BOOTMGR error.

    Method 1: Repair MBR Using Command Prompt

    1. Access Command Prompt from WinRE as explained earlier.
    2. Type the following command and press Enter:
    bootrec /fixmbr
    
    1. Restart your PC and see if the issue is fixed.

    Method 2: Rebuild MBR Using AOMEI Partition Assistant

    1. Download AOMEI Partition Assistant on another working PC.
    2. Create a bootable USB drive using AOMEI Partition Assistant.
    3. Boot the problematic PC using the bootable USB.
    4. Select Rebuild MBR from the options.
    5. Apply changes and restart your system.

    This should repair the boot loader and resolve the BOOTMGR missing issue.

    Solution 4: Check and Modify Boot Order in BIOS

    Why Check Boot Order?

    If your boot order is incorrect, your system might try to boot from an external device instead of your main hard drive, leading to the BOOTMGR error.

    Steps to Set Correct Boot Order

    1. Restart your PC and enter BIOS/UEFI (Press F2, F12, ESC, or DEL key during startup).
    2. Navigate to Boot Options.
    3. Ensure that your main hard drive (where Windows is installed) is set as the first boot device.
    4. Save changes and restart your PC.

    If the issue persists, proceed to the final solution.

    Solution 5: Perform a Clean Windows Installation

    When to Perform a Clean Installation?

    If all other methods fail, reinstalling Windows is the last resort. This erases all files and software, so backup important data first.

    Steps to Perform a Clean Windows Installation

    1. Create a Bootable Windows USB/DVD:
      • Download the Windows Media Creation Tool from Microsoft’s website.
      • Create a bootable USB using Rufus or Windows’ built-in tool.
    2. Boot from the Installation Media:
      • Restart your PC and boot into the USB/DVD.
      • Select “Install Now”.
    3. Delete Existing Partitions:
      • Choose Custom Installation and delete the old Windows partition.
    4. Install Windows:
      • Follow the on-screen instructions to complete the installation.

    Once Windows is installed, update all drivers and security patches to prevent future errors.

    Conclusion

    Fixing the BOOTMGR is missing error is crucial for restoring your system’s functionality. The five best solutions covered in this guide include:

    1. Running Startup Repair from WinRE.
    2. Rebuilding Boot Configuration Data (BCD).
    3. Repairing the Master Boot Record (MBR).
    4. Checking and modifying boot order in BIOS.
    5. Performing a clean Windows installation.

    By following these methods, you can effectively resolve the error and get your system running again. If none of these solutions work, consider seeking professional assistance to check for hardware failures or disk corruption.

    The “Boot Manager is Missing” error can be alarming, but these proven solutions from Microsoft forum users show that it can be fixed in multiple ways. Try these methods one by one, starting with the simpler ones, and get your system running again!

    How to Fix “Boot Manager is Missing” Error – 10 Solutions from Microsoft Forum Users

    One of the most frustrating errors Windows users encounter is the dreaded “Boot Manager is Missing” message. This issue usually occurs when the Boot Configuration Data (BCD) is corrupted, the Master Boot Record (MBR) is damaged, or the system drive is not properly recognized. Fortunately, many Microsoft forum users have successfully resolved this issue. Here are 10 solutions shared by real users who fixed the error.

    1. Use Windows Installation Media to Repair Boot Manager

    Microsoft forum user @TechPro2022 resolved the issue by booting from a Windows installation USB/DVD and using the Startup Repair tool. He shared:

    “I inserted my Windows 10 installation USB, selected ‘Repair your computer,’ and then ran Startup Repair. It fixed my boot files instantly.”

    2. Rebuild the Boot Configuration Data (BCD)

    User @FixItMike suggested rebuilding the BCD using Command Prompt. He explained:

    “After booting into Windows recovery mode, I opened Command Prompt and typed the following commands:

    bcdboot c:\windows
    bootrec /fixmbr
    bootrec /fixboot
    bootrec /scanos
    bootrec /rebuildbcd
    

    Restarted my computer, and it worked!”

    3. Check Boot Order in BIOS

    User @SystemGeek shared that the boot sequence in BIOS was incorrect. He fixed it by:

    “Entering the BIOS by pressing F2 at startup, setting my system drive as the first boot device, saving changes, and restarting. Problem solved!”

    4. Use Bootrec.exe to Fix MBR and Boot Sector

    A user named @JohnTheFixer recommended another way to repair the Master Boot Record:

    “I booted into recovery, opened CMD, and ran bootrec /fixmbr and bootrec /fixboot. This restored my boot sector and fixed the issue.”

    5. Disable Secure Boot in BIOS

    User @JaneIT found that Secure Boot was interfering with booting:

    “I disabled Secure Boot in my BIOS settings, and my system booted normally again. Seems like my Windows install wasn’t compatible with Secure Boot.”

    6. Set Active Partition Using Diskpart

    User @BootFixGuy shared that marking the correct partition as active helped:

    “I booted into recovery, ran diskpart, selected my system drive, and set it as active using:

    diskpart
    select disk 0
    select partition 1
    active
    

    Rebooted, and it worked!”

    7. Perform System Restore

    A forum user, @RecoveryKing, recommended using System Restore:

    “I used System Restore to go back to a point before the issue started. This brought my system back to life without affecting my files.”

    8. Remove External Drives

    User @USBFix warned that external drives can sometimes cause boot issues:

    “I had a USB drive plugged in, and for some reason, my PC was trying to boot from it. Unplugged it, restarted, and Windows loaded fine.”

    9. Run CHKDSK to Repair Disk Errors

    User @HDDHelper shared:

    “I ran chkdsk c: /f /r to scan and fix bad sectors on my drive. After the repair completed, my system booted without issues.”

    10. Reinstall Windows as a Last Resort

    Finally, @ReinstallRandy stated:

    “Nothing worked for me, so I backed up my data, formatted the drive, and did a clean Windows install. It was a hassle, but at least my PC runs smoothly now.”

  • 5 Powerful Solutions to 0x800f0922 Update Error

    5 Powerful Solutions to 0x800f0922 Update Error

    Error 0x800f0922 is a common issue that users encounter during Windows updates on both Windows 10 and Windows 11.

    This error typically arises when either the update could not be downloaded or installed correctly, preventing the system from receiving important updates.

    Recognizing the primary causes and associated problems of this error is crucial for efficient troubleshooting and resolution.

    One of the leading causes of the 0x800f0922 error is insufficient space on the System Reserved partition.

    This can hinder the update process, as the updates require adequate space on this partition to proceed. Moreover, connectivity issues can also contribute to the occurrence of this error.

    For instance, if the system cannot connect to the update server, it may result in the 0x800f0922 error, eventually leading to an incomplete or failed update installation.

    Understanding Error 0x800f0922

    Aside from storage or connectivity issues, certain software configurations within the operating system might block updates and trigger error 0x800f0922.

    Examples of such configurations include incorrect DHCP settings or problems with specific update packages like KB4343909 and KB4462919. Being informed about these potential pitfalls can significantly streamline the troubleshooting process.

    Furthermore, difficulties with the .NET Framework can also prompt the 0x800f0922 error. The .NET Framework is integral to many applications, and any issues during its update can result in failures which manifest as this error code.

    Other factors such as antivirus or firewall settings blocking the update process, or even corrupted Windows Update components, can contribute to the problem.

    By developing a thorough understanding of these causes, users and IT professionals can better approach the resolution of the 0x800f0922 Windows update error.

    Equipped with this knowledge, effective solutions and preventative measures can be implemented to ensure a smoother update experience and sustain a reliable system environment.

    Five Common Causes of Error 0x800f0922

    Error 0x800f0922 in Windows update scenarios, often presents substantial challenges for users updating their Windows 10 or Windows 11 systems.

    Understanding the primary causes of this error is crucial for effectively addressing it. Here, we will explore five major causes contributing to the occurrence of the 0x800f0922 error.

    1. Network Connectivity Issues: A stable internet connection is paramount for a successful update process. Connectivity issues, such as limited or no connectivity, can lead to the 0x800f0922 error.

    This problem arises because Windows Update servers cannot be accessed or the data packets are interrupted during the download process.

    To mitigate this, ensure a reliable internet connection and check network settings to troubleshoot any discrepancies.

    2. Insufficient Disk Space on the System Reserved Partition: Windows updates require adequate disk space to unpack and install files.

    The System Reserved partition, a critical region for holding Boot Configuration Data (BCD), must have enough space for the update.

    If this partition is full, the update cannot proceed, resulting in the 0x800f0922 error. Freeing up space or expanding the System Reserved partition can resolve this issue.

    3. Disabled .NET Framework: Many Windows updates depend on the .NET Framework being enabled. If this framework is disabled or not installed, it can impede the update process, causing the 0x800f0922 error.

    Ensuring the .NET Framework is properly enabled in the Windows features can help circumvent such hindrances.

    4. Corrupted or Incomplete Update Files: Sometimes, the update package itself may be corrupted or remain incomplete due to factors like sudden interruptions or hardware issues during download.

    This disruption can trigger the 0x800f0922 error. Deleting the faulty update files and re-downloading a fresh copy from the Windows Update servers can often rectify the problem.

    5. Problems with Windows Update Services: The Windows Update services must function correctly to handle updates. Issues such as stopped or misconfigured services can cause the 0x800f0922 error.

    Verifying that the relevant services (e.g., Windows Update, BITS) are operational and set to automatic can help prevent or fix this error.

    Identifying the root cause from these common sources can significantly streamline troubleshooting steps, facilitating a quicker resolution of the 0x800f0922 Windows update error.

    Problems Resulting from Error 0x800f0922

    Encountering error 0x800f0922 during a Windows update can lead to multiple significant problems, affecting both system performance and user experience adversely. Here, we discuss five of the most prevalent issues caused by this error.

    First and foremost, the inability to install critical security updates is perhaps the most severe problem. Critical updates are designed to protect user data and ensure the system’s security. Failure to apply these updates leaves the system vulnerable to security threats like malware and ransomware, increasing the risk of data breaches.

    Secondly, system vulnerabilities due to outdated software compounds the issue further. When 0x800f0922 errors prevent updates like the KB4343909 or KB4462919 from installing, the system cannot benefit from the latest security patches and functionality improvements. This lag in software maintenance widens the gap for potential exploitation by cyber threats.

    Third, performance degradation surfaces as another major concern. As updates often include optimizations for better performance, missing these updates can slow down the system. Gradually, the system becomes sluggish and unresponsive, leading to a subpar user experience.

    Next in line are software compatibility issues, which are frequent when updates fail. Applications, especially those relying on the latest Windows updates, may not function correctly. This incompatibility can cause crashes, errors, and software malfunctions, frustrating the user and potentially leading to data loss.

    Finally, unsuccessful upgrades to newer Windows versions stem from persistent 0x800f0922 errors. Users attempting to move from Windows 10 to Windows 11, for instance, may face recurrent interruptions, inhibiting their ability to take advantage of new features and improved performance. This stifles productivity and may require professional intervention for resolution.

    In all, the error code 0x800f0922 manifests in various problematic ways, each an impediment to maintaining a secure, efficient, and user-friendly computing environment.

    Solution 1: Resolve Network Connectivity Issues

    Error 0x800f0922 in Windows updates often stems from underlying network connectivity issues. Such issues might prevent the system from accessing necessary update files, whether on Windows 10 or Windows 11.

    Addressing these root causative factors can significantly enhance the odds of a smooth update process. Here’s how you can troubleshoot and resolve network connectivity concerns:

    Step 1: Check Network Connections

    Begin by ensuring that all physical connections are intact. Verify that your Ethernet cables are correctly plugged in, or if using Wi-Fi, ensure a stable wireless connection. Fluctuating or weak signals can trigger the 0x800f0922 error.

    Step 2: Reset the Router

    A simple yet effective method is to reset your router. Unplug the router from its power source, wait about one minute, and then plug it back in. Once the router initializes, try running the update again. This reset can resolve temporary issues that might be causing network disruptions.

    Step 3: Ensure a Stable Internet Connection

    Analyze your internet performance. High latency or intermittent drops can derail Windows updates. Use tools like the Windows Command Prompt to run a ping test (e.g., “ping google.com”) to check for packet loss or extensive delays. Address any identified problems by contacting your Internet Service Provider (ISP) if necessary.

    Step 4: Use the Built-in Windows Network Troubleshooter

    Windows comes with integrated troubleshooting tools designed to diagnose and repair network issues. Navigate to “Settings” > “Update & Security” > “Troubleshoot.” Select “Internet Connections” and run the troubleshooter. Follow the on-screen instructions to identify and resolve any network-based issues potentially causing the 0x800f0922 error.

    Tackling these network elements comprehensively can eliminate connectivity hurdles that lead to errors such as 0x800f0922 during Windows 10 and Windows 11 updates. This proactive approach ensures a smoother update process and promotes overall system stability.

    Solution 2: Free Up System Reserved Partition Space

    Encountering the 0x800f0922 windows update error, be it on Windows 10 or Windows 11, can be frustrating. A common cause of this error is insufficient space in the System Reserved partition.

    Identifying and resolving this issue is crucial for a successful update. Here, we walk you through the process of checking the System Reserved partition space and freeing it up effectively.

    First, we need to use the Disk Management tool to inspect the System Reserved partition. Start by pressing Win + X and selecting Disk Management.

    0x800f0922 disk management error

    In the Disk Management window, locate the System Reserved partition, typically labeled with no drive letter and a size of around 100-500 MB. Right-click on it and select Properties to check the available space. If the free space is less than 20 MB, we need to take action.

    Resizing the System Reserved partition is one option to increase available space. However, this process requires shrinking an adjacent partition to free up space first. Right-click the partition adjacent to the System Reserved partition, select Shrink Volume, and specify the amount of space to shrink (100-200 MB is recommended).

    Once you have the unallocated space, right-click the System Reserved partition and select Extend Volume, then follow the wizard to add the unallocated space, enhancing the partition size and potentially resolving the 0x800f0922 error.

    Another method involves removing unnecessary files or backups within the System Reserved partition. Although users typically do not have direct access to this partition, leveraging Command Prompt could assist.

    Running DISM.exe /Online /Cleanup-image /AnalyzeComponentStore assesses and frees up unnecessary files. However, care should be exercised to avoid deleting crucial boot files, which could render the system unbootable.

    Addressing the 0x800f0922 error often requires attention to the System Reserved partition’s space limitations, especially relevant in specific updates like 0x800f0922 kb4343909 and 0x800f0922 kb4462919. Ensuring adequate space allocation within this partition lays a strong foundation for seamless installation of Windows updates.

    Solution 3: Enable .NET Framework

    Addressing the error code 0x800f0922 in Windows involves a comprehensive check of the system components critical to the update process. One such essential component is the .NET Framework.

    This software framework developed by Microsoft provides the necessary runtime and libraries fundamental for many applications and updates, including potentially resolving the 0x800f0922 Windows update error.

    Begin by verifying whether the .NET Framework is disabled. Open the Control Panel, navigate to ‘Programs’ and then ‘Turn Windows features on or off.’ In the subsequent window, look for the ‘.NET Framework 3.5 (includes .NET 2.0 and 3.0)’.

    Ensure the box is checked. If it is not, enable it by checking the box and clicking ‘OK.’ This step can resolve various Windows update issues, including the infamous 0x800f0922 error frequently reported in both Windows 10 and Windows 11.

    In some scenarios, enabling the .NET Framework via the Control Panel may not be sufficient, particularly if underlying issues persist or for more advanced troubleshooting.

    Consequently, it is prudent to utilize Command Prompt or PowerShell. To execute this, open Command Prompt as an administrator and input the following command:

    dism /online /enable-feature /featurename:NetFx3 /All /Source:X:sourcessxs /LimitAccess

    Here, replaces ‘X’ with your actual installation media drive letter. Likewise, a PowerShell command can achieve the same outcome using:

    Enable-WindowsOptionalFeature -Online -FeatureName NetFx3 -All -Source X:sourcessxs -LimitAccess

    These commands forcefully enable .NET Framework 3.5, which can directly mitigate 0x800f0922 DHCP or other networking-related update failures.

    The significance of the .NET Framework cannot be understated in the Windows ecosystem. It ensures that applications run smoothly and updates proceed without interruptions.

    Instances of updates errors, like 0x800f0922 kb4343909 or 0x800f0922 kb4462919, may directly correlate to issues with the .NET Framework. Therefore, this solution is pivotal for troubleshooting and ensuring an error-free update process.

    Solution 4: Repair Corrupted Update Files

    Error 0x800f0922, common in both Windows 10 and Windows 11, often stems from corrupted or incomplete update files. Repairing these files is crucial to resolving the issue and ensuring the smooth operation of your Windows system.

    One effective method for addressing corrupted update files is to utilize the Windows Update Troubleshooter. This built-in tool is designed to diagnose and automatically fix common update problems.

    To use it, navigate to Settings > Update & Security > Troubleshoot, then select Windows Update and click on ‘Run the troubleshooter’. Follow the on-screen instructions, and the troubleshooter will attempt to locate and resolve issues related to 0x800f0922.

    If the troubleshooter does not resolve the issue, you may need to manually delete the corrupted files. Begin by stopping the Windows Update service. Open Command Prompt with administrative privileges and type the following commands:

    net stop wuauservnet stop bits

    Next, delete the content of the SoftwareDistribution folder, where update files are stored. Navigate to C:WindowsSoftwareDistribution and delete all the files and folders inside. Restart the Windows Update services by entering the following commands in the Command Prompt:

    net start wuauservnet start bits

    A more advanced approach involves resetting the Windows Update components using specific commands. First, open Command Prompt with administrative rights. Then execute the following commands one by one:

    net stop wuauservnet
    stop cryptSvcnet
    stop bitsnet
    stop msiserverren C:WindowsSoftwareDistribution SoftwareDistribution.old
    ren C:WindowsSystem32catroot2 Catroot2.oldnet
    start wuauservnet
    start cryptSvcnet
    start bitsnet
    start msiserver

    These commands stop the necessary services, rename the corrupted folders, and restart the services. This comprehensive approach can often resolve persistent 0x800f0922 errors, be it those related to specific updates like KB4343909 or KB4462919 or broader system issues involving DHCP configurations.

    Solution 5: Restart Windows Update Services

    Encountering error 0x800f0922 while attempting to update your Windows system, whether it be Windows 10 or Windows 11, can lead to significant disruptions. One effective method to address this issue is by restarting the Windows Update services. This solution often resolves conflicts or disruptions hindering the update process.

    To begin, you need to open the Services Manager. You can do this by pressing the Windows key + R to open the Run dialog, then type services.msc and press Enter. This action will launch the Services Manager, where you can manage all the services running on your Windows system.

    Within the Services Manager window, you need to locate several essential Windows Update services. These include:

    • Windows Update (wuauserv)
    • Background Intelligent Transfer Service (BITS)
    • Cryptographic Service

    Once you have identified these services, follow the steps below to restart them:

    1. Right-click on the Windows Update service (wuauserv), and select Stop.
    2. After the service stops, right-click on it again and select Start.
    3. Repeat the same steps for the Background Intelligent Transfer Service (BITS) and Cryptographic Service.

    Restarting these services can resolve various issues, including the 0x800f0922 error.

    This technique is particularly essential if you’re encountering this error specifically with updates like KB4343909 or KB4462919, which demand smooth operation of Windows Update services. Additionally, it may resolve specific network-related problems linked to DHCP services displaying error 0x800f0922.

    By following these steps, you can ensure that all essential services required for Windows Update are running correctly, thereby minimizing the chances of encountering update errors and improving the overall stability and functionality of your system.

  • 3 Common Problems causing 0x80070490 and Their Solutions

    3 Common Problems causing 0x80070490 and Their Solutions

    Windows 11 users have recently encountered an unexpected hurdle with the popular TranslucentTB app, facing a perplexing error code 0x80070490. This issue has left many scratching their heads, wondering why a Microsoft Store app would suddenly stop functioning. Let’s dive into this problem and explore potential solutions.

    Troubleshooting TranslucentTB: 0x80070490 Error in Windows 11

    TranslucentTB, a beloved application that allows users to customize their Windows taskbar with transparency effects, has been reporting a fatal error for some users. The error message, accompanied by the code 0x80070490, appears even after attempts to reinstall the app from the Microsoft Store.

    Initial Troubleshooting Steps

    When faced with this error, many users have tried the following steps:

    1. Uninstalling and reinstalling the app from the Microsoft Store
    2. Running the System File Checker (sfc /scannow)
    3. Executing the DISM Restore Health command

    Unfortunately, these common troubleshooting methods have proven ineffective for many users, leaving them at a loss for what to do next.

    The Mysterious Resolution

    Interestingly, some users have reported that the issue resolved itself without any specific action on their part. In one case, a user booted their machine to find a welcome message from TranslucentTB, indicating that the app was functioning normally again.

    Possible Causes and Considerations

    1. Recent Windows Updates: The error may be related to recent Windows 11 updates, which could have temporarily interfered with the app’s functionality.
    2. App Version Compatibility: Ensure you’re running the latest version of TranslucentTB. The developers recently released version 2024.1, which includes improvements to reduce timing-related errors.
    3. Alternative Solutions: While troubleshooting, some users have explored alternative customization options. For instance, using ExplorerPatcher with the Win10 taskbar option and Open-Shell can provide custom taskbar textures and colors.

    What to Do If You’re Still Experiencing Issues

    If you’re still facing the 0x80070490 error with TranslucentTB, consider the following steps:

    1. Check for any pending Windows updates and install them.
    2. Visit the TranslucentTB GitHub page to ensure you have the latest version.
    3. Temporarily disable any third-party antivirus software, as it might be interfering with the app.
    4. Create a new Windows user account and test if the app works there.
    5. Consider reaching out to the TranslucentTB developers through their GitHub page for specific support.

    Troubleshooting Xbox Gaming Services Installation Error 0x80070490

    Gaming enthusiasts know the excitement of unboxing a new gaming laptop, especially when it comes with pre-installed goodies like the Xbox app and a free Xbox Game Pass trial.

    However, this excitement can quickly turn to frustration when technical issues arise. One such problem that has been plaguing some users is the error code 0x80070490 when trying to install the Gaming Services app required for the Xbox app. In this blog post, we’ll dive deep into this issue and explore potential solutions to get you back in the game.

    Typical Windows 11/10 update error

    Understanding the Error

    Error code 0x80070490 typically occurs when there’s an issue with file corruption or processing within the system. This error can prevent the Gaming Services app from installing completely, usually hanging at 99% before failing. As a result, users are unable to access the features of their Xbox app or take advantage of their Game Pass subscription.

    Common Symptoms

    Here’s what you might experience when encountering this error:

    1. The Xbox app prompts you to download the Gaming Services app
    2. The download progresses normally until reaching 99%
    3. At 99%, the installation halts and presents the 0x80070490 error code
    4. Repeated attempts to install result in the same error

    Potential Causes

    Several factors could contribute to this error:

    • Corrupted system files
    • Issues with the Component Based Servicing (CBS) system
    • Interference from antivirus software
    • Incomplete or faulty Windows updates

    Troubleshooting Steps

    Let’s explore some methods to resolve this frustrating issue:

    1. Reinstall the Xbox App

    While this may seem obvious, sometimes a fresh installation can work wonders:

    1. Uninstall the Xbox app from your system
    2. Restart your computer
    3. Reinstall the Xbox app from the Microsoft Store

    2. Run System File Checker (SFC) and DISM

    These built-in Windows tools can help repair corrupted system files:

    1. Open Command Prompt as administrator
    2. Run the following commands in order:
       DISM /Online /Cleanup-Image /StartComponentCleanup
       DISM /Online /Cleanup-Image /RestoreHealth
       SFC /SCANNOW
    1. Restart your computer and try installing Gaming Services again

    3. Temporarily Disable Antivirus

    Sometimes, overzealous antivirus software can interfere with installations:

    1. Temporarily disable your antivirus program
    2. Attempt to install Gaming Services
    3. If successful, re-enable your antivirus

    4. Perform an In-Place Upgrade

    This method, suggested by a community member, has proven successful for some users:

    1. Download the Windows 11 Installation Assistant from Microsoft’s official website
    2. Run the assistant to perform an in-place upgrade
    3. This reinstalls Windows without deleting your files or apps
    4. After the upgrade, try installing Gaming Services again

    5. Update Windows

    Ensure your system is fully up-to-date:

    1. Go to Settings > Windows Update
    2. Check for updates and install any available
    3. Restart your computer and attempt the installation again

    When All Else Fails

    If none of the above methods work, you may need to consider more drastic measures:

    1. Create a new Windows user account and try installing from there
    2. As a last resort, you might need to consider a clean Windows installation

    Troubleshooting the Mysterious 0x80070490 Error in Windows Event Viewer

    Windows users often encounter cryptic errors that can leave them scratching their heads. One such error that has been causing confusion recently is the “0x80070490” error appearing in the Windows Event Viewer.

    If you’ve come across this error and are wondering what it means and how to fix it, you’ve come to the right place. In this post, we’ll dive deep into the causes of this error and provide step-by-step solutions to resolve it.

    0x80070490 error in event viewer

    Understanding the 0x80070490 Error

    The 0x80070490 error is typically associated with the “Microsoft Windows DeviceSetupManager” and appears with Event IDs 131 and 201. This error often manifests after a Windows reinstallation or update and can be accompanied by other issues in the Device Manager and Devices and Printers section.

    Common Symptoms

    Users experiencing this error may notice:

    1. “PCI Memory Controller” and “SM Bus Controller” appearing under “Other Devices” in Device Manager
    2. A clock icon next to devices in the Devices and Printers section
    3. Additional errors in the Event Viewer related to metadata staging and connection issues

    Potential Causes

    The 0x80070490 error can stem from various sources, including:

    1. Outdated or missing drivers
    2. Issues with Windows Update
    3. Problems with the Windows Metadata and Internet Services (WMIS)
    4. Registry inconsistencies
    5. Corrupted system files

    Troubleshooting Steps

    Let’s explore some effective methods to address this error:

    1. Update Chipset Drivers

    One of the first steps is to ensure your chipset drivers are up-to-date:

    • Visit your motherboard manufacturer’s website
    • Download and install the latest chipset drivers
    • Restart your computer

    This step often resolves issues with “PCI Memory Controller” and “SM Bus Controller” in Device Manager.

    2. Clear Windows Update Cache

    Clearing the Windows Update cache can help resolve update-related errors:

    1. Press Win + R, type “services.msc”, and hit Enter
    2. Find the Windows Update service and disable it
    3. Navigate to C:\Windows\SoftwareDistribution
    4. Delete all files in the DataStore and Download folders
    5. Rename the SoftwareDistribution folder to SoftwareDistribution.old
    6. Re-enable the Windows Update service
    7. Check for updates again

    3. Check Registry Entries

    Incorrect registry entries can cause the 0x80070490 error:

    1. Press Win + R, type “regedit”, and hit Enter
    2. Navigate to HKEY_LOCAL_MACHINE\SOFTWARE\Microsoft\Windows\CurrentVersion\Device Metadata
    3. Verify that the DeviceMetadataServiceURL value is correct (http://go.microsoft.com/fwlink/?LinkID=252669&clcid=0x409)

    4. Run System File Checker

    Corrupted system files can lead to various errors. Run the System File Checker:

    1. Open Command Prompt as administrator
    2. Type “sfc /scannow” and press Enter
    3. Wait for the process to complete and restart your computer

    5. Update or Reinstall Printer Drivers

    Sometimes, printer-related issues can trigger this error:

    1. Uninstall your current printer drivers
    2. Download and install the latest drivers from the manufacturer’s website
    3. If issues persist, try using the Microsoft Printer Metadata Troubleshooting Tool

    6. Consider Disabling Device Setup Manager

    As a last resort, some users have reported success by disabling the Device Setup Manager service:

    1. Open Services (services.msc)
    2. Locate the Device Setup Manager service
    3. Stop the service and set its Startup type to Disabled
    4. Restart your computer

    Note: This is a temporary workaround and may have unintended consequences. Only use this method if other solutions fail.

    Conclusion

    While the TranslucentTB error 0x80070490 can be frustrating, it’s important to remember that such issues are often temporary and can be resolved through updates or simply with time. The app’s popularity and its availability on the Microsoft Store suggest that any widespread issues are likely to be addressed promptly.

    As Windows 11 continues to evolve, users may occasionally encounter hiccups with third-party applications. Staying patient, keeping your system updated, and being willing to explore alternative solutions can help navigate these challenges.

    While the 0x80070490 error can be frustrating, especially when you’re eager to start gaming, it’s not insurmountable.

    By following these troubleshooting steps, you should be able to resolve the issue and get your Gaming Services app installed.

    Remember, patience is key when dealing with technical issues. If you continue to face problems, don’t hesitate to reach out to Microsoft Support or consult with a professional technician.

    The 0x80070490 error can be frustrating, but with the right approach, it’s often resolvable.

    Always start with the least invasive methods, such as updating drivers and clearing caches, before moving on to more drastic measures.

    If you continue to experience issues after trying these solutions, it may be worth consulting with Microsoft support or a professional technician.

    Remember, keeping your system up-to-date and regularly maintaining your drivers can prevent many of these errors from occurring in the first place.

    Stay vigilant, and don’t let cryptic error codes intimidate you – with a bit of patience and the right knowledge, you can overcome most Windows issues.

    Have you encountered this issue with TranslucentTB? We’d love to hear about your experiences and any solutions you’ve found in the comments below!

    #TranslucentTB, #Windows11, #TroubleshootingWindows, #WindowsApps, #ErrorCode0x80070490, #MicrosoftStore, #WindowsCustomization, #TechSupport, #WindowsUpdate, #SoftwareBugs #XboxGaming, #TroubleshootingTips, #GamingServices, #ErrorCode0x80070490, #WindowsUpdate, #XboxGamePass, #GamingLaptop, #TechSupport, #GamerProblems, #MicrosoftXbox #WindowsError, #TechTroubleshooting, #0x80070490, #EventViewer, #WindowsUpdate, #DriverIssues, #PCMaintenance, #WindowsTips, #TechSupport, #ComputerProblems

  • Troubleshooting Windows 11 24H2 Upgrade Failures

    Troubleshooting Windows 11 24H2 Upgrade Failures

    Windows 11 brought stricter hardware requirements compared to its predecessor, leaving many users with capable but technically unsupported systems in a tricky situation.

    One such error that has been plaguing many Windows 11 users is the dreaded 0x80888002 error code when trying to install the 22H2 update. If you’ve been banging your head against the wall trying to get this update to work, you’re not alone.

    Updating to the latest version of Windows is usually a smooth process, but sometimes users encounter frustrating errors that prevent the installation from completing.

    As Microsoft continues to evolve Windows 11, upgrading these machines becomes increasingly challenging. In this post, we’ll explore a common upgrade error and potential workarounds for those attempting to install Windows 11 24H2 on unsupported hardware.

    Understanding the 0x80888002 Error

    The 0x80888002 error typically occurs when trying to install the Windows 11 22H2 update through Windows Update.

    Users report that the update will download to about 8%, pause for a few seconds, then fail with this cryptic error code. This can happen even if your system meets all the hardware requirements for Windows 11 and other updates install without issues.

    0x80888002 error fix
    Source: Microsoft Community

    The root cause seems to be related to how Windows checks for TPM (Trusted Platform Module) and Secure Boot compatibility during the update process.

    Even on systems that pass the initial Windows 11 compatibility checks, something in the 22H2 update’s security verification is triggering this error.

    Solution 1: Remove vdsldr.exe Image File Execution Options

    One effective fix that has worked for many users is to remove a specific registry entry. Here’s how to do it:

    1. Open an elevated Command Prompt (run as administrator)
    2. Copy and paste the following command:
    reg delete "HKLM\SOFTWARE\Microsoft\Windows NT\CurrentVersion\Image File Execution Options\vdsldr.exe" /f
    1. Press Enter to execute the command
    2. Restart your computer and try the update again

    This solution removes an execution option for the vdsldr.exe file, which seems to interfere with the update process for some users.

    Solution 2: Remove TPM Check Event Filter

    If the first solution doesn’t work, try this alternative command:

    1. Open an elevated Command Prompt (run as administrator)
    2. Copy and paste the following command:
    wmic /namespace:"\\root\subscription" path __EventFilter where Name="Skip TPM Check on Dynamic Update" delete
    1. Press Enter to execute the command
    2. Restart your computer and attempt the update again

    This command removes an event filter that may be causing the TPM check to fail during the update.

    Solution 3: Use the Skip TPM Check Script

    For more advanced users comfortable with running scripts, there’s a third option:

    1. Visit the MediaCreationTool GitHub repository
    2. Download the Skip_TPM_Check_on_Dynamic_Update.cmd file
    3. Run the script as administrator
    4. Try the Windows Update again

    This script disables various TPM and Secure Boot checks that may be preventing the update from installing.

    Why These Solutions Work

    The 0x80888002 error seems to occur when the Windows 11 22H2 update process encounters issues verifying TPM and Secure Boot status. By removing certain checks or execution options, we’re essentially telling Windows to bypass these problematic verifications.

    It’s worth noting that while these solutions have worked for many users, they do involve modifying system settings. Always ensure you have a backup of your important data before attempting any system modifications.

    The Scenario

    A user with the following system configuration encountered issues:

    • Current OS: Windows 10 22H2
    • CPU: Intel Core i7-6800K (supports SSE4.2)
    • UEFI/Secure Boot enabled
    • No TPM module

    Despite meeting some of the key requirements and using methods to bypass checks, the upgrade to Windows 11 24H2 failed with the error code:

    0x80888002 - 0x40008

    Understanding the Error

    This error code typically indicates a failure during the Out-of-Box Experience (OOBE) phase, specifically related to preparing the safe OS (recovery partition). It’s a common stumbling block for users attempting to upgrade unsupported systems.

    Potential Causes and Solutions

    1. Hidden Compatibility Checks

    Microsoft has implemented additional compatibility verifications in newer Windows 11 versions. These checks may occur even if you’ve bypassed the initial requirements.

    Solution: Disconnect from the internet during the upgrade process. This prevents Windows from performing online compatibility checks that might block the installation.

    1. Recovery Partition Issues

    The error code suggests a problem with the recovery partition, which might not have enough space to accommodate the upgrade changes.

    Solution: Ensure your recovery partition has sufficient space. You may need to resize or recreate it before attempting the upgrade.

    1. Driver Incompatibilities

    Outdated or incompatible drivers can cause upgrade failures.

    Solution: Update all drivers to their latest versions compatible with Windows 11. You may need to check manufacturer websites for beta or preview drivers designed for the new OS.

    1. Alternative Upgrade Method

    Some users have reported success with a hybrid installation approach.

    Solution:

    • Create a Windows 11 23H2 installation media (USB or ISO)
    • Replace the install.wim or install.esd file in the sources folder with the equivalent file from Windows 11 24H2 media
    • Attempt the upgrade using this modified installation source
    1. Disable Network Connectivity Status Indicator (NCSI)

    Instead of physically disconnecting from the internet, you can try disabling the NCSI active probing:

    reg add "HKLM\SYSTEM\CurrentControlSet\Services\NlaSvc\Parameters\Internet" /v EnableActiveProbing /t REG_DWORD /d 0 /f
    reg add "HKLM\Software\Policies\Microsoft\Windows\NetworkConnectivityStatusIndicator" /v NoActiveProbe /t REG_DWORD /d 1 /f
    net stop netman && net start netman

    This makes Windows think you’re offline while maintaining actual network connectivity.

    Important Considerations

    1. Backup Your Data: Always create a full system backup before attempting any major OS upgrade.
    2. Legacy BIOS Warning: If you’re upgrading a Legacy BIOS (MBR) installation, be aware that Windows 11 24H2’s bootloader no longer supports Legacy booting. Have a hybrid Windows 10/11 or Windows 11 23H2/24H2 USB drive ready to reinstall the bootloader if needed.
    3. No Guaranteed Success: These methods are workarounds and may not be successful in all cases. Unsupported hardware remains unsupported, and you may encounter stability or functionality issues even if the upgrade succeeds.

    FAQs – Windows 11 error code 0x80888002:

    1. What does Windows 11 error code 0x80888002 mean?
      Error code 0x80888002 in Windows 11 typically indicates a problem with the Microsoft Store or a specific app installation. It is often accompanied by an error message stating, “Something happened on our end.”
    2. When does error code 0x80888002 usually occur?
      This error code commonly appears when trying to download or update apps from the Microsoft Store on Windows 11. It can also occur during the initial setup of Windows 11 or while attempting to use certain Microsoft Store apps.
    3. What causes error code 0x80888002 in Windows 11?
      Several factors can contribute to this error, including:
    • Temporary server issues on Microsoft’s end
    • Corrupted Microsoft Store cache
    • Problematic Windows Update
    • Interference from security software
    • Incorrect date and time settings on your PC
    1. How can I fix error code 0x80888002 in Windows 11?
      You can try the following methods to resolve this error:
    • Check the Microsoft Store’s service status for known issues
    • Restart your computer
    • Clear the Microsoft Store cache
    • Run the Windows Store Apps troubleshooter
    • Reset the Microsoft Store app
    • Ensure your date and time settings are correct
    • Disable your antivirus software temporarily
    • Update or reinstall the problematic app
    1. What should I do if the error persists after trying these solutions?
      If the error code 0x80888002 persists after attempting the above solutions, you may need to take additional steps:
    • Perform a clean boot to identify any software conflicts
    • Reset Windows Update components
    • Repair or reset Windows 11 without losing your files
    • Contact Microsoft Support for further assistance

    If the issue remains unresolved, it is advisable to seek help from a professional technician or the official Microsoft Support channels.

    Final Thoughts

    Updating to Windows 11 22H2 shouldn’t be a headache-inducing process. While Microsoft works on a more permanent fix for this issue, these solutions should help most users overcome the 0x80888002 error and successfully install the update.

    Remember, if you’re not comfortable making system changes yourself, it’s always best to consult with an IT professional. And don’t forget to provide feedback to Microsoft about your experience – the more information they have, the better they can address these issues in future updates.

    While Microsoft discourages installing Windows 11 on unsupported hardware, many users still wish to attempt the upgrade. By understanding the potential pitfalls and applying these workarounds, you might be able to successfully upgrade to Windows 11 24H2. However, always weigh the risks and benefits carefully before proceeding with an unsupported upgrade path.

    #Windows11, #24H2Upgrade, #UnsupportedHardware, #TroubleshootingWindows, #WindowsCompatibility, #TechTips, #MicrosoftWindows, #OSUpgrade, #WindowsHacks, #PCMaintenance

  • How to Fix Issues with Changing App Recommendation Settings in Windows 11/10

    Windows 10 and 11 users may encounter issues when trying to change their app recommendation settings, which can be frustrating when attempting to install apps from sources other than the Microsoft Store.

    This problem is often caused by restrictions put in place by Microsoft to enhance security and performance, particularly on devices running Windows 10 or 11 in S mode.

    Users may see error messages or be unable to locate the necessary settings to modify app recommendations.

    Fortunately, there are several solutions available to resolve this issue, depending on the specific version of Windows and the user’s level of technical expertise.

    In this guide, we will explore three different methods to tackle the problem of changing app recommendation settings in Windows 10 and 11, catering to users with varying levels of technical knowledge. By following these steps, users can regain control over their app installation preferences and enjoy a more personalized Windows experience.

    Solution 1: Switch out of Windows 10/11 S Mode

    As the original poster Kyle heckman discovered, one of the main causes of being unable to change app recommendation settings is that the Windows device is running in S mode.

    Windows 10 and 11 in S mode is a more locked down, secure version of Windows that only allows apps to be installed from the Microsoft Store in order to improve security and performance. It does not allow changing many settings related to installing apps from other sources.

    To resolve this, you need to permanently switch out of S mode:

    1. Go to Settings > Update & Security > Activation
    2. Under “Switch to Windows 10/11 Home or Pro“, click the “Go to the Store” link
    3. On the “Switch out of S mode” page in the Microsoft Store, click “Get” to switch out of S mode for free
    4. After switching, you will have the options to change app recommendation settings under Settings > Apps as expected.

    Note that switching out of S mode is a one-way process. Once you switch, you cannot put the device back into S mode. However, there are no costs or licensing issues with switching out of S mode.

    Solution 2: Modify “Choose where to get apps” setting via Registry Editor (not recommended for most users)

    For advanced users on Windows 10/11 Home who do not have access to the Local Group Policy Editor, it is possible to enable the “Choose where to get apps” setting to change app recommendation settings by modifying the Windows Registry.

    Warning: Incorrectly editing the registry can cause serious problems that may require you to reinstall Windows. Make sure to backup the registry before making changes and only proceed if you know what you are doing.

    1. Right-click the Start button and select “Run”
    2. Type “regedit” and click OK to open the Registry Editor
    3. Navigate to the following registry key:
      HKEY_LOCAL_MACHINE\SOFTWARE\Policies\Microsoft\Windows\Explorer
    4. Right-click in the right pane and select New > DWORD (32-bit) Value
    5. Name the value “AicEnabled” and press Enter
    6. Double-click the new “AicEnabled” value and change the Value data to 1
    7. Click OK and close the Registry Editor
    8. Restart your computer for the changes to take effect

    After the restart, you should see the “Choose where to get apps” option under Settings > Apps > Apps & features to modify your app recommendation settings.

    Again, directly editing the registry can be risky, so most users should try other solutions first if possible. If you are not confident making registry changes, seek assistance from a professional.

    Solution 3: Use Local Group Policy Editor (Windows 10/11 Pro, Enterprise, and Education only)

    For Windows 10 and 11 Pro, Enterprise, and Education editions, you can change the app recommendation settings through the Local Group Policy Editor. Home editions do not include the Local Group Policy Editor.

    1. Press the Windows key + R to open the Run dialog
    2. Type “gpedit.msc” and press Enter to open the Local Group Policy Editor
    3. Navigate to the following policy:
      Computer Configuration > Administrative Templates > Windows Components > Store > Turn off Automatic Download and Install of updates
    4. Double-click “Turn off Automatic Download and Install of updates” and set it to “Enabled”
    5. Click OK and close the Local Group Policy Editor
    6. Restart your computer for the changes to take effect

    Once the policy is enabled, the Microsoft Store will no longer automatically update apps. This allows you to change the “Choose where to get apps” setting under Settings > Apps to modify your app recommendation settings.

    By enabling this policy, you are opting to take manual control over Store app updates rather than using Microsoft’s recommended automatic app updates. Make sure to periodically check for and install app updates yourself to maintain security and get the latest features.

    In summary, the three ways to resolve issues changing app recommendation settings are:
    1) Switching out of Windows 10/11 S mode
    2) Modifying the “Choose where to get apps” setting via the Registry Editor
    3) Enabling the “Turn off Automatic Download and Install of updates” policy via the Local Group Policy Editor

    I recommend trying the S mode solution first if applicable to your situation, as it is the most straightforward. Registry and Group Policy edits should only be used by advanced users. When in doubt, consult a Windows expert for further assistance.

  • 5 Solutions to No Sound from Laptop

    5 Solutions to No Sound from Laptop

    Is your laptop not producing any sound? Don’t worry, you’re not alone. Many users face issues with no sound from laptop, leaving them frustrated and wondering, “Why is there no sound in my laptop?” .

    Whether you’re trying to listen to music, watch a video, or attend a conference call, no audio from your laptop can be a major hindrance.

    Few things are as frustrating as a laptop that won’t emit any sound. Whether speakers, headphones, or external speakers won’t work, muted audio can significantly affect usability.

    In this article, we’ll explore common reasons why you might experience “my laptop don’t have sound” and provide step-by-step solutions to help you troubleshoot when you find the “sound in laptop not working.”

    Fix #1 Update or Reinstall Sound Drivers

    Outdated, corrupt, or missing sound drivers are one of the most common reasons for laptop sound problems. Open device manager, find your audio device, and update to the newest sound drivers from the hardware manufacturer. If updating doesn’t work, uninstall and reinstall the drivers fully.

    Fix #2 Inspect Hardware and Connections

    Examine any 3.5mm headphone jacks, internal speakers, volume buttons, or other hardware components related to sound. Make sure no debris or damage is contributing to laptop speaker issues. Also check that all cables are securely connected.

    Fix #3 Run Audio Troubleshooter

    Windows and MacOS come equipped with automated troubleshooting tools designed to detect and fix common audio problems. Search for “audio troubleshooter” and run it. This will analyze and attempt to correct any identifiable issues.

    no sound from laptop fix

    Fix #4 Adjust Sound Settings

    Open volume controls and audio properties to verify that nothing is incorrectly muted, volumes are turned up, and the right output source is selected. Choosing the wrong output device can make it seem like there is no audio.

    fix #5 Perform System Restore

    If the no sound problem started after a recent change or event like a software update, perform a system restore to revert back to an earlier time when sound worked properly. This can undo potentially problematic OS updates.

    Conclusion

    Troubleshooting laptop no sound issues takes patience, but following these solutions can help identify and resolve many underlying causes. Don’t ignore audio problems – address them promptly before assuming permanent hardware failure. With the right fixes, you can get your laptop’s sound working again.

    FAQ – No Sound from Laptop

    Why did my laptop speakers suddenly stop working?

    Common causes include outdated drivers, incorrect settings, hardware issues, and recent system changes like an OS update. Run through troubleshooting solutions to isolate the cause.

    How do I know if my laptop speaker hardware is bad?

    If you’ve tried every software troubleshooting solution to no avail, it may indicate a hardware problem. Contact the device manufacturer for repair options if internal speakers fail.

    Why is the sound only coming from headphones, not laptop speakers?

    This typically means the audio output source is accidentally set to an external device. Go into sound settings and change the output back to your laptop speakers.

    Can malware or viruses cause laptop audio problems?

    Yes, malware infections can sometimes damage software and drivers associated with sound. Run antivirus scans to check for any infections impacting audio.

    My old laptop speakers worked – why don’t the new ones?

    Make sure replacement laptop speakers are fully compatible with your specific model. Look for manufacturer part numbers to double check compatibility.