Category: Microsoft

  • Order Microsoft Edge Favorites for Productive Work

    Order Microsoft Edge Favorites for Productive Work

    Microsoft Edge Bookmark Manager is a robust tool that enables users to effectively organize, manage, and access their saved bookmarks.

    • Create folders to organize your bookmarks. This will help you keep your bookmarks organized and easy to find.
    • Use tags to categorize your bookmarks. This will help you find specific bookmarks quickly.
    • Sync your bookmarks across devices. This way, you can access your bookmarks from any device.
    • Use the search bar to find specific bookmarks. This is a quick and easy way to find the bookmark you’re looking for.
    • Import bookmarks from other browsers. If you’re switching to Microsoft Edge from another browser, you can import your bookmarks so you don’t have to start from scratch.
    • Export your bookmarks. If you want to back up your bookmarks or share them with someone else, you can export them.
    • Delete bookmarks you no longer need. This will help keep your bookmark manager organized.

    Create new favorites and rename them if you want in Microsoft Edge. Also known as bookmarks in different other browsers. Manage your favorites to ease your work. Over a course of years, site links build up. If you don’t know how to search for your content, it is waste of time. 

    microsoft edge favorites organize

    Introduction to Microsoft Edge Favorites Manager

    The favorite settings in 2023 have changed a lot. You can remove duplicates. Make the clutter go-away. Simply reorder them. Create a separate folder based on month and year basis. Take backup when required. Import and Export favorites to use on another profile of Microsoft Edge. 

    The top right corner header 3 horizontal dots helps to find your settings. You can show icon to save a website instantly. Favorite in Edge is just like a traditional bookmark. Web browser helps to find your work and sync across devices.

    Setting up and organizing bookmark folders

    The first step to using the bookmark manager effectively is to set up some basic organization. By creating folders for different categories of bookmarks, you can quickly and easily find the ones you need. To create a new folder, click the “New Folder” button in the toolbar and enter a name for the folder. You can then drag and drop bookmarks into the folder.

    Utilizing advanced features

    In addition to basic organization, the bookmark manager also offers a number of advanced features that can help you get more out of your bookmarks. For example, you can create tags to categorize your bookmarks, add notes to bookmarks, and even share bookmarks with others. To access these features, click the “More” button in the toolbar and select the desired option.

    Customizing the bookmark manager

    The bookmark manager can also be customized to fit your needs. You can change the appearance of the bookmark bar, choose which folders are displayed, and even add shortcuts to frequently used bookmarks. To customize the bookmark manager, click the “Customize” button in the toolbar and select the desired options.

    The favorite bar is easy and useful to organize favorites. Microsoft Edge browser and chrome web store differ. Hide the favorites bar when not required. delete favorites and folders manually when required. organize your favorites in Microsoft edge. access your content wherever and stay organized. 

    Understanding the purpose of a bookmark manager

    From setting up and organizing bookmark folders to utilizing advanced features and customization options, we will cover everything you need to know to make the most out of this handy tool.

    Whether you are a casual internet user or a professional researcher, mastering the bookmark manager in Microsoft Edge will undoubtedly elevate your browsing experience. So, let’s dive in and discover how to make productive use of bookmark manager in Microsoft Edge.

    Let’s face it, we live in a digital age where we have hundreds (or maybe thousands) of websites we visit on a regular basis. Remembering all those URLs can be a real headache. That’s where bookmark managers come to our rescue. They allow us to save and organize our favorite websites so we can easily access them whenever we want, without having to rely on our memory.

    Setting up and organizing bookmark folders

    Edge organizer can add all tabs. frequently visited websites can be saved. favorite links are useful to open daily use sites. chromium-based browser can add current tab to favorites and save websites. desktop computer, mobile and tablet can sync favorites. It is free of charge. 

    Creating and managing bookmark folders

    One of the key features of Microsoft Edge’s bookmark manager is the ability to create folders. Folders help you keep your bookmarks structured and organized. Simply right-click anywhere in the bookmark manager and select “New Folder” to create a new folder. You can then name it whatever you like and start populating it with bookmarks.

    Favorites on Microsoft edge allows you to save and remove duplicate bookmarks. Favorites sync is easy to manage. 

    Once you have your folders set up, you can easily move bookmarks into them. Simply drag and drop a bookmark onto a folder, and voila! It’s neatly organized. You can also right-click on a bookmark and select “Move to folder” to relocate it. This way, you can keep related websites together and quickly find what you’re looking for.

    If you’re a super-organized individual (or aspire to be one), you’ll love the ability to create nested folders in Microsoft Edge’s bookmark manager.

    Nested folders allow you to create a hierarchy of folders within folders, giving you even more granular control over your bookmark organization. You can have folders within folders within folders, and so on. It’s like bookmark inception!

    Efficiently bookmarking websites and webpages

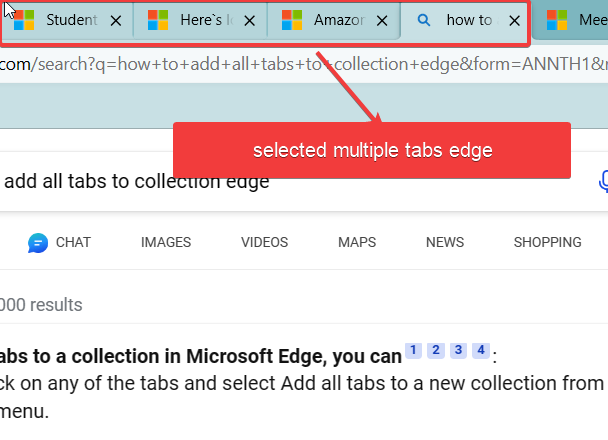
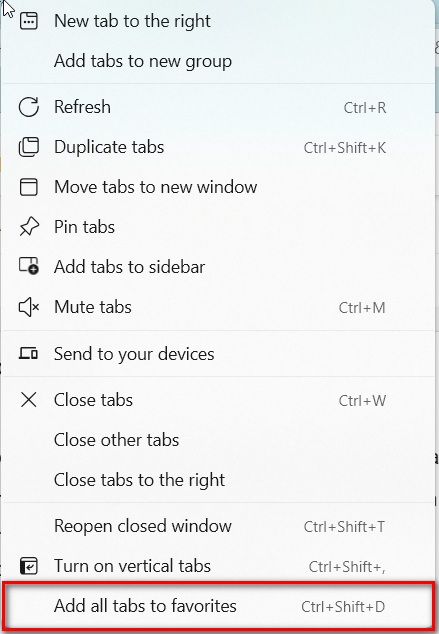
    Bookmarking a webpage in Microsoft Edge is as easy as pie. You can simply click on the star icon in the address bar, use the keyboard shortcut “Ctrl+D,” or right-click anywhere on the page and select “Add to favorites.” Choose whichever method tickles your fancy and start building your bookmark collection.

    To make your bookmarks even more organized and easily searchable, you can add tags and notes to them. Tags are like little labels that you can assign to your bookmarks, while notes allow you to jot down any additional information or reminders. These handy features ensure that you’ll never have trouble finding that one elusive bookmark ever again.

    If you’re a keyboard warrior who loves efficiency, you’ll appreciate the keyboard shortcuts Microsoft Edge offers for bookmarking. By pressing “Ctrl+Shift+D,” you can quickly bookmark the current webpage without even touching your mouse. It’s a small time-saver that can add up throughout your browsing adventures.

    Utilizing bookmark syncing across devices

    Microsoft Edge’s bookmark manager takes productivity a step further by allowing you to sync your bookmarks across multiple devices. To enable this handy feature, simply sign in to your Microsoft Edge account. This way, all your bookmarks will be available on any device that’s linked to your account.

    Once you’ve signed in to your Microsoft Edge account on all your devices, the magic happens. Your bookmarks will effortlessly sync across all your devices, ensuring that you have access to your favorite websites no matter where you are. Whether you’re using a laptop, tablet, or smartphone, your bookmarks will be there, ready to accompany you on your browsing adventures.

    Bookmark management doesn’t have to be a tedious task. With the bookmark manager in Microsoft Edge, you can boost your productivity and easily access your favorite websites.

    Using bookmark search and filter options

    Searching for a specific bookmark can be like finding a needle in a haystack. But fear not, the bookmark search feature in Microsoft Edge is here to save the day. Simply type in keywords related to the website or its title in the search bar, and Edge will display the relevant bookmarks. You can also filter your bookmarks by tags, folders, or even date added, making it easier to find what you need.

    Creating bookmark shortcuts for quick access

    Time is precious, so why waste it clicking through folders to find your favorite websites? Microsoft Edge allows you to create bookmark shortcuts on your desktop or taskbar, giving you one-click access to your most visited sites. Simply right-click on the bookmark, select “Create Shortcut,” and voila!

    Utilizing bookmark bar for frequently used websites

    The bookmark bar is like your VIP section for websites you visit frequently. Drag and drop your most-used bookmarks onto the bookmark bar, and they’ll be available at the top of your browser window, just a click away. No more digging through menus or typing URLs. It’s like having a personal express lane to your favorite online destinations.

    Tips and tricks for effective Favorite management

    Bookmark management may seem like a trivial task, but with a few tips and tricks, you can keep your bookmarks organized and avoid the chaos of a cluttered digital life. Here are some handy tips to help you stay bookmark savvy:

    Regularly reviewing and organizing bookmarks

    Let’s face it, we’ve all gone down the rabbit hole of bookmarking endless web pages we never revisit. Take some time to review your bookmarks regularly and purge the ones you no longer need. Create folders based on categories or interests to keep things tidy and make it easier to find what you’re looking for.

    Backing up bookmarks for data protection

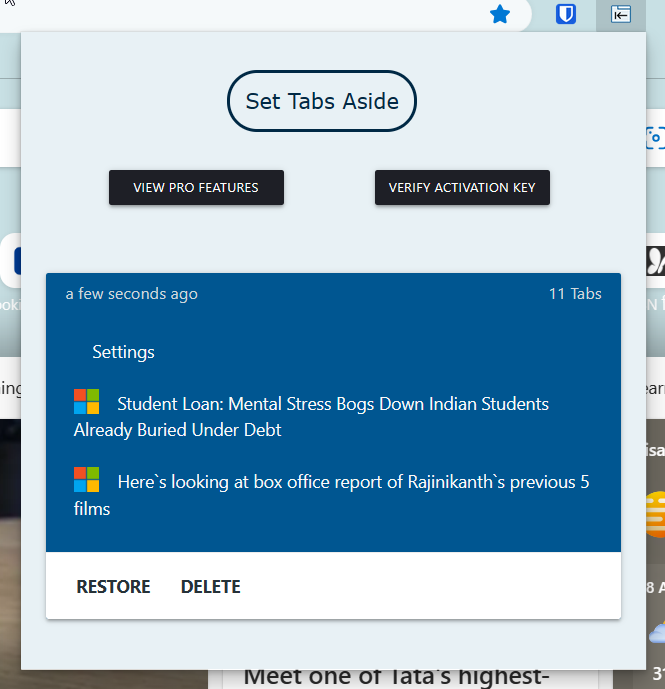
    Accidents happen, computers crash, and bookmarks disappear. To safeguard your precious collection, make sure to back up your bookmarks periodically. Microsoft Edge allows you to export your bookmarks to a file, which you can store in a safe place. That way, if disaster strikes, you won’t lose all those bookmarked cat videos.

    Importing and exporting bookmarks from other browsers

    If you’re transitioning to Microsoft Edge or using multiple browsers, you don’t have to start from scratch. You can import your bookmarks from other browsers like Chrome or Firefox. Similarly, if you need to switch back or share your bookmarks with someone else, you can export them as a file and import them into a different browser.

    Advanced features and customization options in Microsoft Edge Favorites Manager

    Customizing bookmark manager appearance and layout

    Not a fan of the default layout? No problem! You can customize the appearance of your bookmark manager in Microsoft Edge. Change the view to a grid or list, adjust the font size, or even apply themes to give your bookmark manager a personal touch.

    Using extensions and add-ons for enhanced bookmark functionality

    Extensions and add-ons can supercharge your bookmark management experience. Microsoft Edge has a wide range of extensions available, from bookmark managers with advanced features to tools that sync your bookmarks across multiple devices. Explore the Microsoft Edge Extension Store to find the perfect addition to your bookmarking arsenal.

    Exploring bookmark manager settings and preferences

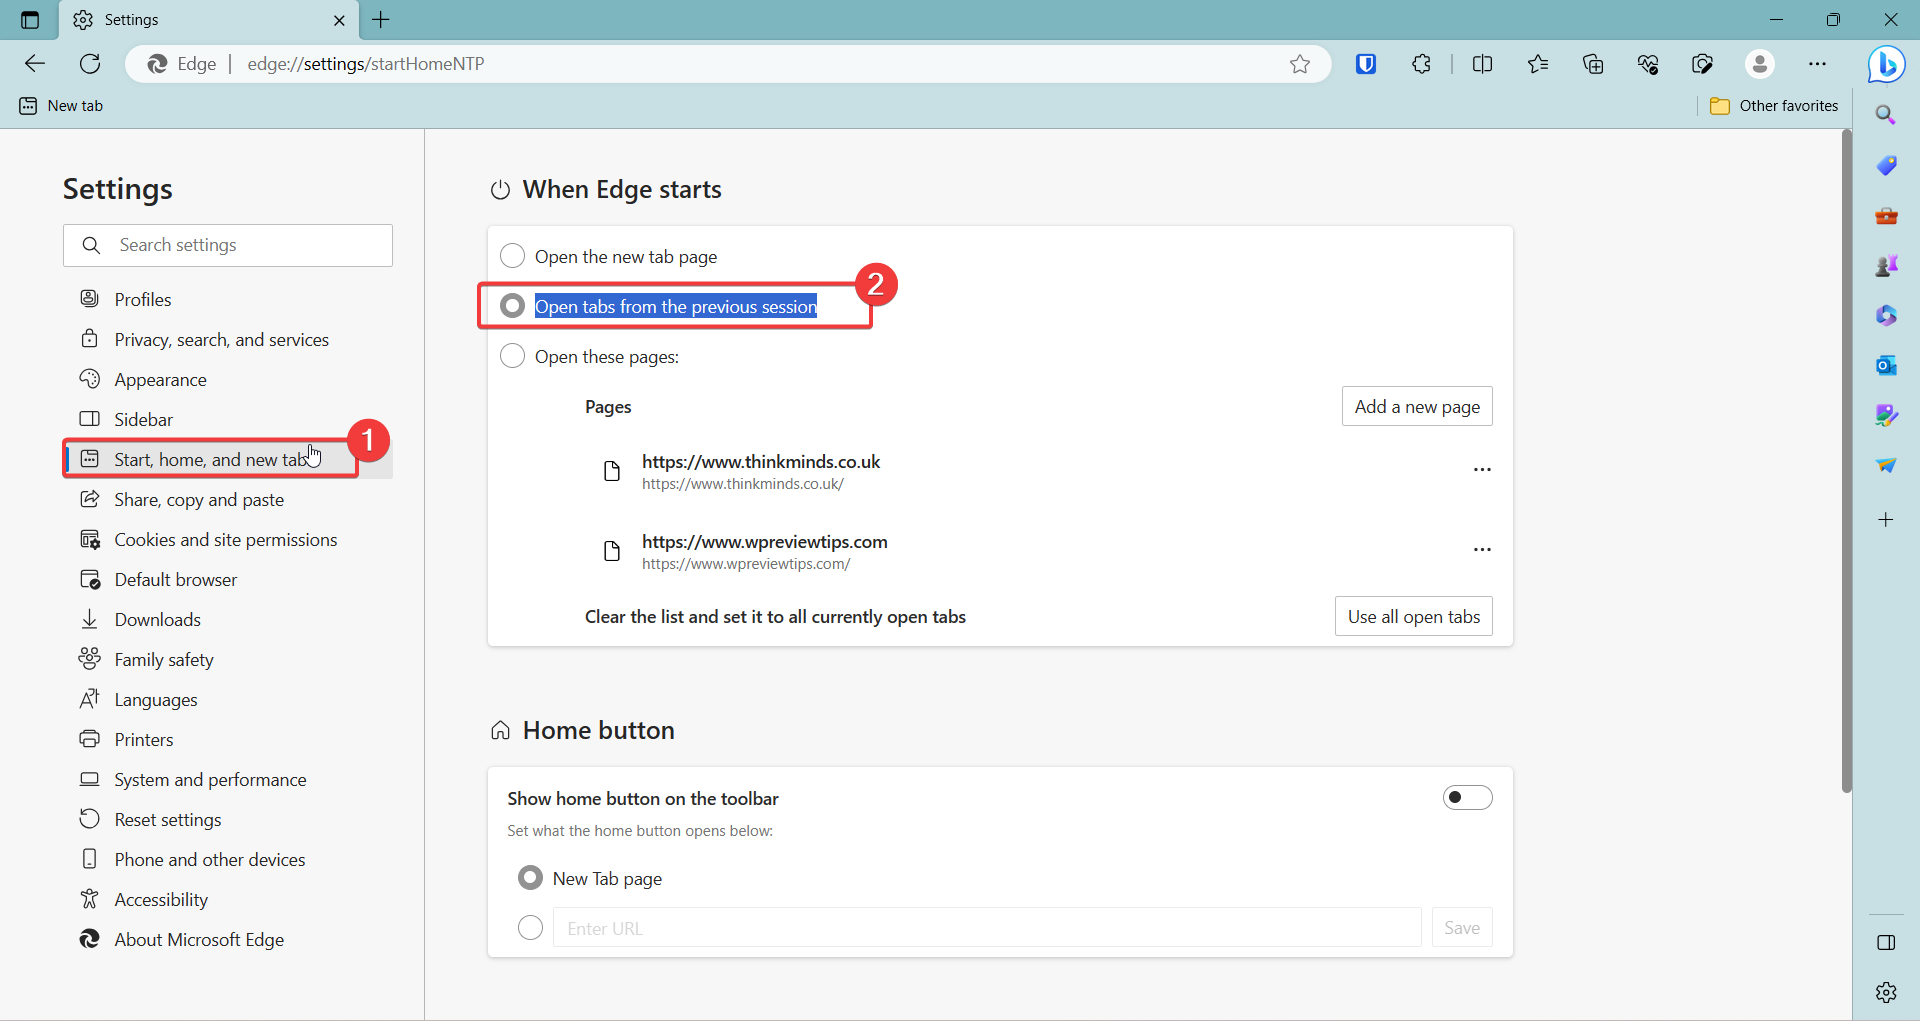
    Personalize your bookmark manager by diving into the settings and preferences. Microsoft Edge allows you to fine-tune the behavior of your bookmarks, such as choosing where new bookmarks are saved or enabling syncing across devices. Take some time to explore these options and make your bookmark manager work for you.

    Troubleshooting and common issues with bookmark management in Microsoft Edge

    Even the best bookmark managers can sometimes hit a snag. Here are some common issues you may encounter and how to troubleshoot them:

    Resolving bookmark syncing errors

    If your bookmarks aren’t syncing across your devices, fear not! Start by ensuring that syncing is enabled in your Microsoft Edge settings on all your devices. If that doesn’t work, sign out and back in to your Microsoft account or restart your devices. If all else fails, try resetting your sync data.

    Recovering accidentally deleted bookmarks

    Oh no, did you accidentally delete that important bookmark? Don’t panic just yet. Microsoft Edge allows you to easily recover deleted bookmarks. Right-click on the bookmark bar, select “Show all bookmarks,” and navigate to the “Trash” folder. From there, you can restore your accidentally deleted treasures.

    Fixing compatibility issues with third-party bookmark tools

    If you’re using third-party bookmark tools or extensions and experiencing compatibility issues, first ensure that they are up to date. If the problem persists, consider disabling or uninstalling the conflicting tools. Sometimes, it’s better to let Microsoft Edge’s built-in bookmark manager shine without any interference.

    Conclusion

    By following the tips in this article, you can learn how to make productive use of the bookmark manager in Microsoft Edge. With a little practice, you’ll be able to quickly and easily find the bookmarks you need, whether you’re browsing the web for work or for pleasure.

    FAQ

    Can I import my bookmarks from another browser to Microsoft Edge Bookmark Manager?

    Yes, Microsoft Edge offers a convenient way to import bookmarks from other browsers. Simply go to the bookmark manager settings, locate the import option, and follow the prompts to import your bookmarks. This allows you to seamlessly transition to Microsoft Edge without losing any of your saved websites.

    Can I access my bookmarks on multiple devices with Microsoft Edge Bookmark Manager?

    Absolutely! Microsoft Edge Bookmark Manager supports bookmark syncing across devices. By signing in with your Microsoft Edge account, your bookmarks will be synced and available on all your devices that have Microsoft Edge installed. This ensures you have access to your bookmarks wherever you go.

    How can I back up my bookmarks in case of data loss?

    To back up your bookmarks in Microsoft Edge, you can export them to a file. Within the bookmark manager settings, you’ll find the option to export bookmarks. Simply select it, choose a location to save the exported file, and your bookmarks will be safely backed up. If needed, you can then import this file to restore your bookmarks.

    What should I do if I accidentally delete a bookmark?

    If you accidentally delete a bookmark, don’t panic. Microsoft Edge has a built-in feature called “Recently Deleted” where deleted bookmarks are temporarily stored. Simply open the bookmark manager, locate the “Recently Deleted” folder, and restore the accidentally deleted bookmark from there. This ensures that you can easily recover any bookmarks that were mistakenly deleted.

  • How to Save All Current Tabs at Once in Microsoft Edge?

    How to Save All Current Tabs at Once in Microsoft Edge?

    One of the most sought-after capabilities is Edge save tabs, which allows users to manage multiple open tabs effortlessly.

    Whether you’re working on a project or browsing through various websites, saving your session is crucial to ensuring that your work is not lost.

    If you’re wondering how to save all open tabs in Edge, the browser offers several straightforward techniques. One of the easiest ways is to use the “Add All Tabs to Collection” feature.

    This feature allows you to save tabs in Edge by creating a collection, a convenient tool for organizing your open websites into manageable groups. Additionally, Edge saves all open tabs in one go, which is possible with just a few clicks, ensuring that your browsing session is preserved for later reference.

    Another option is to use the bookmarking feature. To bookmark all tabs in Edge, simply click the menu and select the option to bookmark all tabs in Edge.

    This allows you to store all your current tabs as bookmarks, making it easy to revisit them whenever needed. For users who frequently switch between tasks, saving tab groups is an excellent way to stay organized.

    Microsoft Edge bookmark all tabs

    With Edge save tab groups, you can group related tabs and access them later with a single click, providing a smooth, efficient browsing experience.

    For those who prefer a more temporary solution, Edge Save Tabs for Later is also possible using the “Save Session” feature. This feature lets you close the browser without losing your tabs, enabling you to save all tabs in Edge and reopen them when you’re ready to continue.

    This function is especially useful for users who need to pause their work without worrying about losing important information.

    This article will explore different methods on how to save tabs in Edge, focusing on options like bookmarking and saving sessions for later use.

    How To Save All Tabs in Edge

    In conclusion, learning how to save multiple tabs in Edge is essential for users looking to streamline their browsing experience.

    From saving open tabs in Edge to bookmarking all tabs in Edge and using collections, Microsoft Edge offers multiple ways to keep your work organized and accessible.

    Whether you’re looking to save tabs in Edge for later or simply want to add all tabs to the collection in Edge, these tools ensure a seamless, efficient browsing experience.

    This way you can protect your history, even if it’s cleaned. Temporary and cache files of the Edge browser are cleaned, including current tabs. Then you cannot get back the old tabs or sites.

    If you are like me, you probably have dozens of tabs open in your browser at any given time. You might be working on a project, researching a topic, shopping online, or just browsing for fun.

    Simple way to save current tabs in Microsoft Edge

    1. Click on any tab in the group of tabs.
    2. Right-click and click on Add all tabs to favorites.
    3. Or else, press Ctrl + Shift + D.
    4. Create a new folder in Favorites and Save.
    Image Source: windowstechit.com

    Now you can open all current tabs in one go.

    How to Add Current Tabs to New Group?

    Another way is to select a few tabs that you want to save. Then add those to a Tab Group. Give color to the group. Disperse them when not required.

    1. Press Ctrl and select all the required tabs in Microsoft Edge.
    2. Click on Add tabs to the new group in the pop-up.
    3. A colored tab sits at the top left-hand side.
    4. You can ungroup and close groups.

    This way you can save the currently selected tabs.

    Why Multiple Edge Save Tabs at Once in Edge?

    You can access your saved tabs from any device that has Microsoft Edge installed and signed in with the same account. Just follow steps 1 and 2 above, and then click on the tab group name to open all the tabs in a new window.

    Saving multiple tabs at once in Edge is a great way to organize your browsing sessions, keep track of your work, and resume where you left off. You can also share your tab groups with others by clicking on the “Share” button next to the tab group name. Try it out today and see how it can improve your productivity and convenience.

    Even if you close your browsing session and restart Edge, the tab group is still there. You can also name the tab group with today’s date to distinguish it from other groups.

    Use Edge extension to save all open tabs at once

    In some cases, if you are using a beta or canary version of Edge, some features will not work properly. In that case, you can make use of the Edge extension to fulfill your needs.

    One such extension is the Save Edge Tabs for Later.

    It has been updated in Aug 2021 and is a little old. The number of downloads is also less.

    • Once installed, it sits in the address bar as an icon. Click it.
    • The Set Tabs Aside option is visible. Click it.
    • All the open tabs are saved.
    • Click on Restore to get back all the tabs again.
    edge save tabs all at once

    These are 3 methods to save multiple tabs at once in Microsoft Edge. It is useful to save your important work and restore it when needed.

    Adding all your open tabs to a collection in Microsoft Edge is a convenient way to organize your browsing sessions and easily access them later. Collections allow you to group related tabs together, whether for research, work projects, or personal interests. Here’s a simple, step-by-step guide on how to add all tabs to the collection Edge:

    Step 1: Open Microsoft Edge

    Ensure that Microsoft Edge is open and running on your computer. Make sure you have multiple tabs open, as this guide will show you how to add all of them to a collection at once.

    Step 2: Open the Collections Panel

    In the Microsoft Edge browser, locate the “Collections” icon. It’s typically represented by a small icon with a stack of rectangles, located in the top-right corner of the browser, just to the right of the address bar.

    If you don’t see it, click on the three dots in the upper-right corner of your browser (the settings menu) and look for “Collections” in the dropdown menu. Alternatively, you can use the keyboard shortcut Ctrl + Shift + Y to open the Collections panel.

    Step 3: Create a New Collection

    If you don’t have an existing collection or want to organize your current tabs into a new one, click on the “Start new collection” button in the Collections panel.

    A pop-up will appear asking you to name your new collection. Give your collection a relevant name based on the content or topic of the tabs you’re working with. For example, if you’re researching a particular topic, you might name the collection “Research Project” or “Personal Interests.”

    Step 4: Add All Tabs to the Collection

    Once you’ve opened the Collections panel and have either created a new collection or selected an existing one, the next step is to add all your open tabs. To do this, right-click on any tab in your browser, and you’ll see an option that says “Add all tabs to collection.” Click this option, and it will add all the open tabs in the current window to the collection you’ve chosen.

    This action will create a list of all your open tabs, with links to the websites you had open at the time. Each tab will be listed in the order it was opened, and you can easily click any of the links within your collection to reopen that tab.

    Step 5: Organize and Use the Collection

    After adding all tabs to your collection, you can organize the content within the collection. You can reorder the tabs by dragging them, remove unwanted tabs by clicking the trash icon next to each one, or add notes and additional content to the collection for reference.

    Collections are great for saving resources, bookmarking related tabs, or sharing them with others. You can also export collections to other devices if you sign into Edge with the same Microsoft account, making it easy to access your saved tabs on multiple devices.

    Step 6: Revisit and Manage Your Collection

    Any time you want to revisit your collection, simply click on the Collections icon in Edge, select the collection you’ve saved, and all the tabs will be available for you to reopen. You can add more tabs, remove tabs, or even share the entire collection if needed.

    Conclusion

    In conclusion, Microsoft Edge provides a powerful and flexible way to manage your browsing sessions, making it easier than ever to save tabs in Microsoft Edge.

    Whether you’re looking to save all open tabs in Edge for later, organize your workflow, or simply bookmark all tabs in Edge, the browser offers several efficient tools to enhance your productivity.

    One of the simplest options is using the Edge save tabs for later feature, which ensures that you don’t lose track of important websites when you close the browser. This can be particularly helpful for users who need to pause their work and resume later.

    Adding all your tabs to a collection in Microsoft Edge is a fast and efficient way to save your work, keep related tabs organized, and ensure you can access them again in the future.

    Whether you’re working on a project or just want to organize your browsing session, collections in Microsoft Edge offer a simple solution to stay organized and enhance productivity.

    For those who need to organize their tabs into manageable groups, how to save tab groups in Edge is an essential feature. With this option, you can save a group of tabs in Edge and reopen them later with a single click.

    Similarly, if you’re looking to save a group of tabs in Edge, Microsoft Edge makes it easy to save and access these groups at any time, offering better organization for your browsing experience.

    Edge’s Save Open Tabs also ensures that you don’t lose your current session, allowing you to easily save your progress and pick up where you left off.

    For users who prefer using bookmarks, Microsoft Edge saving all tabs is a convenient feature that helps save multiple tabs at once. This is perfect for users who want to quickly store their tabs in a folder and revisit them later.

    Additionally, Edge’s how-to-save-all-open-tabs feature is straightforward with the option to add all tabs to the Edge collection, which helps you organize and categorize your open websites for easy access later.

    Another valuable tool is the Microsoft Edge save session feature, which saves your entire session, including all open tabs, for future use.

    This is particularly beneficial for users who want to preserve their session across different browsing sessions. Whether you prefer saving open tabs in Edge or how to save tab groups in Edge, these features provide a seamless experience that makes managing multiple tabs and sessions effortless.

    Ultimately, learning how to save all tabs in Microsoft Edge and utilizing features like Save Tab Groups in Edge or Add All Tabs to Favorites will significantly improve your browsing efficiency.

    With these powerful tools, you can easily save all the tabs in Edge, manage your workflow, and ensure your data is always accessible when you need it.

  • How to Fix Microsoft Edge Not Open Previous Session Tabs Error?

    How to Fix Microsoft Edge Not Open Previous Session Tabs Error?

    Microsoft Edge does not restore the previous session tabs can be frustrating if you are doing some important research or work. You are trying to find the solution to the query of “best laptop in usa”. You opened several tabs to know the tech specifications and another set to know the price.

    Boom! All of them are gone when suddenly the battery is 0%. When you restart, you see a new tab. You have to start from scratch. If only you have chosen the “Open tabs from previous session” in Edge settings.

    In this post we are going to see if restoring the previous session setting failed in Edge, how to recover the tabs.

    How to Restore Previous Session Tabs from History in Microsoft Edge?

    First make sure your previous session is back before you try the next solutions.

    1. Press Ctrl+H to see the history tab.
    2. Click on the Recently closed tab.
    3. Press Ctrl+Shift+T on each link.
    4. Proceed till all the tabs are recovered.

    Then you can save all the tabs to open in the next session.

    Now let’s fix the problem of previous session tabs not opening on restore in Microsoft Edge.

    One of the most frustrating things that can happen when you’re browsing the web is losing your tabs. Maybe your browser crashed, or you accidentally closed it, or your computer shut down unexpectedly. Whatever the reason, you want to get back to the pages you were looking at before.

    Fortunately, Microsoft Edge has a feature that lets you restore your previous tab session. This means that you can reopen all the tabs that were open the last time you used Edge, even if you didn’t save them as bookmarks.

    Causes of Microsoft Edge not restoring previous Tab session

    However, sometimes this feature may not work as expected. There are a few possible reasons why Edge may not restore your previous tab session:

    You have too many tabs open. Edge has a limit of how many tabs it can restore at once, which depends on your device’s memory and performance. If you exceed this limit, some tabs may not be restored.

    You have cleared your browsing data. Edge relies on your browsing history to restore your tabs. If you have deleted your history, cookies, or cache, Edge may not be able to find your previous tabs.

    You have enabled InPrivate browsing. Edge does not save or restore tabs from InPrivate sessions, which are designed to protect your privacy and leave no trace of your browsing activity.

    You have installed an extension that interferes with tab restoration. Some extensions may modify or block Edge’s ability to restore tabs. Try disabling or uninstalling any extensions that may affect this feature.

    Check the correct Microsoft Edge Profile?

    In this browser, you can have multiple accounts as profiles. We have already discussed on how to create a profile on Microsoft Edge. So make sure that you are in the correct profile. The session you are trying to recover should be in the same profile. So login to the same profile when you last used Microsoft Edge.

    If this comes OK, and still facing problem then you can try the next solution.

    Check When Microsoft Edge starts setting is correct!

    In our previous post we have told already how to choose the setting that will restore your previous session tabs. By default, Edge will open a new tab page. So if this setting is off, then you may not be able to recover last session tabs.

    In that case, you have to recover from history.

    Repair or Reset Microsoft Edge app

    To fix the problem, you can try set Edge to its original settings. (As in Windows 11)

    1. Open Settings > Apps > Installed apps.
    2. Click on 3 dots beside Microsoft Edge app and click Modify.
    3. Click on Repair on the pop-up.
    4. It will reinstall the browser.
    repair microsoft edge

    Note: Browser data settings are not affected.

    This works in Windows 11 home. It may slightly differ in Windows 10.

    If everything fails, you can uninstall Edge completely with its settings and reinstall it again.

    How to Completely Reinstall Microsoft Edge in Windows 10/11?

    Type any of the following commands in the elevated command prompt.

    cd %PROGRAMFILES(X86)%\Microsoft\Edge\Application\9*\Installer
    cd %PROGRAMFILES(X86)%\Microsoft\Edge\Application\<YourEdgeVersion>\Installer

    You can know the Edge version from Settings > Help and feedback > About Microsoft Edge.

    Then run the following command.

    setup.exe –uninstall –force-uninstall –system-level

    Your Microsoft Edge should completely uninstall.

    Then go to the following download Microsoft Edge link and reinstall it. Now  you are good to go. Don’t forget to change previous session tabs settings as mentioned at the start of the article.

    Final Thoughts

    If none of these solutions work for you, you may have encountered a bug or a glitch in Edge. In that case, you can try updating Edge to the latest version, resetting Edge to its default settings, or reinstalling Edge altogether.

    We hope this guide helped you restore your previous tab session in Microsoft Edge. If you have any questions or feedback, please let us know in the comments below.

  • How to Seamlessly Continue Where You Left Off in Microsoft Edge

    How to Seamlessly Continue Where You Left Off in Microsoft Edge

    By default, when Edge starts it opens with a homepage or new tab. Is that good enough?

    You have opened 20 tabs with important site visits. Now you want to find that 1 site which has that important information. You can search in history. 

    But if it’s cleaned, what can you do? It’s always better to restore your previous session tabs in Microsoft Edge. This helps you to get a mind map of what you were doing some time back. 

    Then you can save them as favorites or collections. I used to use this setting long back. But, after a recent upgrade, my Edge was starting with a new tab. So I decided to find the setting where I can get back my previous session tabs. 

    Are you tired of losing your browsing progress every time you close Microsoft Edge? Worry not, for there’s a simple solution that will revolutionize your online experience. 

    Reopening tabs from your previous browsing sessions in Microsoft Edge is a game-changer, ensuring you never miss a beat. In this article, we’ll guide you through the seamless process of reopening tabs and maximizing your productivity.

    How to Continue your Previous Session Tabs in Microsoft Edge?

    1. Go to the Settings tab. You can click the 3 horizontal dots on the top right hand side corner of Microsoft edge. 
    2. Start, home and new tabs on the left hand panel. 
    3. When Edge starts, the setting is visible on the right hand side. 
    4. Open tabs from the previous session option needs to be checked. 

    This time when your Windows 11 laptop battery life is over or sudden power fluctuation on your Windows 10 desktop pc, then you can restore your lost tabs in Edge. All your work is not lost. 

    In addition there are other settings that you can do on this page. 

    The Power of Reopening Tabs

    Imagine this scenario: you’re engrossed in researching for a crucial project, juggling multiple tabs filled with valuable information. Suddenly, you need to close Microsoft Edge to attend to an urgent task. In the past, you would lose all your tabs and spend valuable time retracing your steps. With the innovative feature of reopening tabs, this frustration is a thing of the past.

    How to Reopen Tabs in Microsoft Edge

    1. Accessing the History Menu: Launch Microsoft Edge and click on the three horizontal lines at the top-right corner of the browser window. This will open a dropdown menu.

    2. Reopening Recent Tabs: In the dropdown menu, locate the “History” option and click on it. A submenu will appear, displaying your recently closed tabs.

    3. Selecting Tabs to Reopen: Browse through the list of recently closed tabs and select the ones you wish to reopen. You can hold down the “Ctrl” key on your keyboard while clicking to select multiple tabs.

    4. Restoring Tabs: Once you’ve made your selections, right-click on any of the chosen tabs and select “Restore”. Alternatively, you can use the keyboard shortcut “Ctrl” + “Shift” + “T” to quickly restore the most recently closed tab.

    Why This Feature Matters

    1. Efficiency: By reopening tabs from your previous session, you’re immediately back on track, saving precious time that would have been wasted searching for lost tabs.

    2. Productivity: This feature enhances your productivity by allowing you to seamlessly switch between tasks without the fear of losing valuable information.

    3. Convenience: Whether you’re a researcher, student, or professional, the ability to reopen tabs ensures a smoother browsing experience, eliminating unnecessary disruptions.

    How to Open Specific pages or links when Microsoft Edge restarts?

    It is very simple to start with a common list of pages or links when Edge starts. 

    1. Check the option that says – Open these pages. On the same page as above.
    2. Click the Add a new page button and add a url. 
    3. The list will be visible below. 

    Now when the browser starts again, it will open up all the links mentioned above instead of a new tab. 

    In conclusion, reopening tabs from your previous session in Microsoft Edge is a game-changer for efficient and productive browsing. Embrace this feature and take control of your online journey like never before. Say goodbye to lost tabs and hello to seamless browsing continuity. Your browsing experience will thank you.

  • Exploring Web Capture in Microsoft Edge: A Comprehensive Guide

    Exploring Web Capture in Microsoft Edge: A Comprehensive Guide

    Taking screenshots on Windows computers used to be hard with the print-screen command. Things have changed over the past decade, that different extensions and third-party software exist to do the work. If you are using Web Capture Edge as an in-house feature that simplifies screenshot of sites.

    Most of our office work involves writing emails and sending important drafts. But with one screenshot, you can visually send your colleague the problem you are facing. Let it be technical or general information.

    Images over text and videos are easy to understand. That way you can handle the simplicity of your ideas. I decided to test the Web Capture feature of Microsoft Edge and found it very interesting. It has improved and has a lot of important, likable features.

    What Does Web Capture Mean?

    In today’s fast-paced digital landscape, the ability to capture and save web content for later reference has become increasingly important. Microsoft Edge, a powerful web browser, offers a feature known as “Web Capture” that allows users to effortlessly capture, annotate, and save web content. In this guide, we will delve into the various aspects of Web Capture and how it enhances your browsing experience.

    Understanding Web Capture

    Web Capture is a versatile tool integrated into Microsoft Edge, enabling users to take snapshots of web content and store them for future use. Whether you’re a student conducting research, a professional gathering resources, or simply someone who enjoys saving interesting articles, Web Capture simplifies the process.

    Image Source: windowstechit.com

    How to Access Web Capture

    Accessing Web Capture in Microsoft Edge is straightforward:

    1. Launching Microsoft Edge: Open the Microsoft Edge browser on your device.

    2. Navigating to the Desired Page: Navigate to the web page you wish to capture.

    3. Activating Web Capture: Click on the Web Capture icon, usually located in the toolbar. This action activates the Web Capture tool.

    Image Source: thewindowsclub.com

    What does Web Capture Do?

    Web Capture offers several features to enhance your captured content:

    1. Full-Page Captures

    With Web Capture, you can capture entire web pages, ensuring that no vital information is left behind. This is particularly useful when you want to save articles, blog posts, or research papers in their entirety.

    2. Selection Mode

    Web Capture allows you to select a specific portion of a web page to capture. This feature is beneficial when you want to save a particular section or an image from an article.

    3. Annotating Captures

    Enhance your captured content by adding annotations. Highlight essential text, draw shapes, or insert notes to provide context and make your captures more informative.

    How to simply capture region of a web page and highlight any content

    There are 3 main features.

    1. Capture area
    2. Capture full page.
    3. Web Select

    Of the most 3, I found capture area to be most beneficial. We can always send a link to the page, if we want a full page. But for long posts and content, taking a small portion of the page and annotating an error would be useful for the customer support team.

    web capture edge 3 main features

    After taking region capture, you can do 3 things.

    1. Copy
    2. Markup capture.
    3. Visual search.

    When you click the last one, you will get different products and results based on your web screenshot. It is useful to find related content and websites. Markup capture is useful, to highlight a point you want to stress about.

    You can save the part web capture. Share with Microsoft contacts and snipping tools. One recent feature is the Draw feature. You can increase the thickness of the line to annotate and change its color. Erase the drawing if its not correct. Then redraw to suit your needs.

    The Benefits of Web Capture Edge

    Web Capture offers a multitude of benefits that contribute to a seamless browsing experience:

    1. Streamlined Research

    Gone are the days of juggling between browser tabs or bookmarking multiple pages. With Web Capture, you can compile all your research material in one place, making it easier to refer back to later.

    2. Improved Organization

    Web Capture provides a systematic approach to organizing your saved content. You can categorize captures into folders, add tags, and even search for specific captures using keywords.

    3. Collaboration Made Easy

    Share your captured content with colleagues, friends, or classmates effortlessly. Collaborative projects become more efficient when you can quickly share references and resources.

    FAQ – Web Capture Edge

    Is Web Capture available on all versions of Microsoft Edge?

    Yes, Web Capture is available on both the desktop and mobile versions of Microsoft Edge.

    Can I use Web Capture offline?

    While Web Capture requires an internet connection to access content, you can view your saved captures offline.

    Are my captures synced across devices?

    Yes, if you’re signed in with a Microsoft account, your captures and collections will sync across devices.

    Can I export my captures to other applications?

    Currently, there is no direct export option, but you can share your captures with other applications.

    Is Web Capture free to use?

    Yes, Web Capture is a free feature included in Microsoft Edge, requiring no additional cost.

    Transitioning Seamlessly with Web Capture

    In addition to its powerful features, Web Capture offers a user-friendly interface that ensures a smooth experience. With a simple click, you can capture, annotate, and store web content, simplifying your online research and content gathering endeavors.

  • How to remove Duplicate Favorites in Microsoft Edge?

    Once you add favorites or bookmarks to Edge browser in Windows 11 or 10, they are long to stay. Microsoft account is commonly used to sync your favorites. Otherwise, when you change devices, it becomes difficult to see your last saved bookmarks.

    In other cases, you can import your favorites to your Android phone from your Windows PC. But this will take time and they will not be in sync. For this purpose, we need to sync your Edge favorites across various devices.

    In other scenarios, duplicate favorites fill up. When you delete a folder or favorite, it may reappear again. In such conditions, Microsoft has provided an easy way to remove duplicate edge favorites in an easy way.

    This way your favorites table would be more organized. You will have only 1 link per url. Having multiple urls as favorites confuses you. Also search results of favorites can dupe you into thinking that it is a different bookmark.

    How to Remove Duplicate Favorites in Edge on Windows 11?

    1. Press the 3 horizontal dots on the top right hand side.
    2. Click on Favorites on the pop-up.
    3. Click the 3 dots again on the Favorites window.
    4. Click on Remove duplicate favorites.
    5. Click on Remove .
    A 25s video that will show you the steps in detail to remove duplicates in edge.

    Note: The duplicates in Favorites are based on the name of the favorite. If the same link has two different names then they are not deleted. Then, you have to manually delete them.