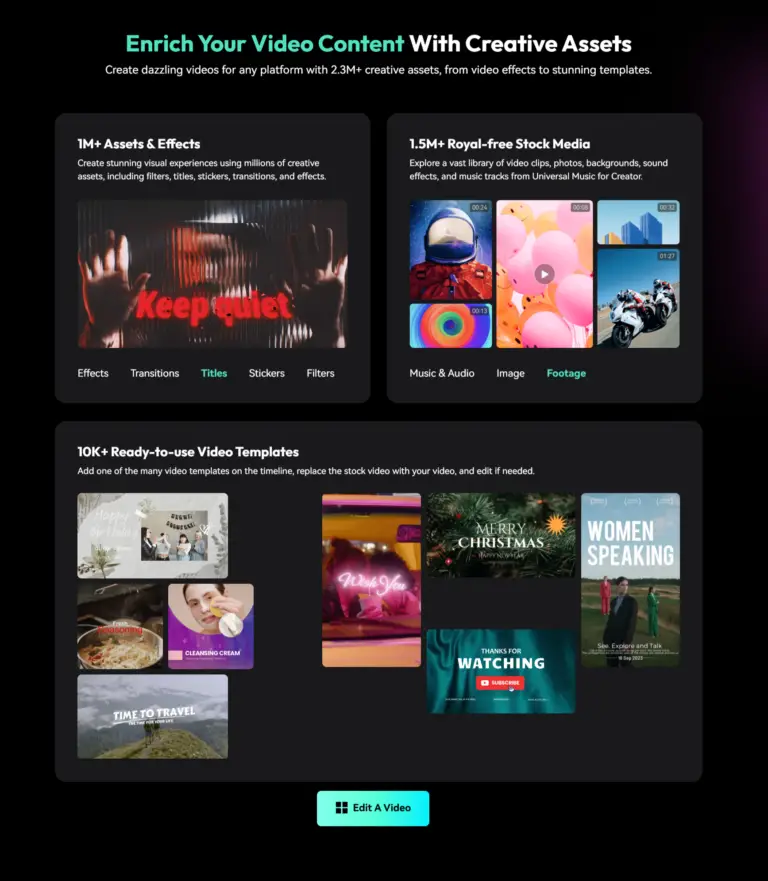
In the ever-evolving world of video editing, Wondershare Filmora 2025 continues to stand out as one of the most user-friendly and powerful tools for creators of all levels. Whether you’re a beginner or a seasoned professional, knowing how to export videos correctly is crucial for maintaining quality, compatibility, and ensuring your content looks its best on any platform.
In this comprehensive guide, we’ll walk you through the step-by-step process of – Filmora how to export video in 2025, covering everything from basic settings to advanced features. By the end of this tutorial, you’ll be equipped with the knowledge to export videos like a pro, optimized for YouTube, social media, or professional use.
Step 1: Preparing Your Project for Export
Make sure your project is prepared for the final output before pressing the export button. Skipping this step can lead to errors, poor quality, or even failed exports.
Finalize Your Edit
Start by reviewing your timeline thoroughly. Check for any unfinished sections, misplaced transitions, or missing audio. Filmora 2025’s intuitive interface makes it easy to spot and fix these issues.
- Tip: Use the “Playback” feature to preview your video in real-time. This helps you catch any mistakes before exporting.
Check Video Resolution and Settings
Your video’s resolution plays a significant role in its final quality. Filmora 2025 allows you to customize resolution settings to match your project’s requirements.
- For standard videos, 1080p (1920×1080) is ideal.
- For ultra-high-quality content, consider 4K (3840×2160).
- Don’t forget to adjust the aspect ratio if needed (e.g., 16:9 for YouTube, 9:16 for Instagram Reels).
Optimize File Size
Large video files can be challenging to share and upload. To reduce file size:
- Trim unnecessary clips.
- Use proxy files for high-resolution footage.
- Compress audio tracks without compromising quality.
Step 2: Accessing the Export Menu
Once your project is polished, it’s time to export. Filmora 2025’s export menu is designed to be straightforward, even for beginners.
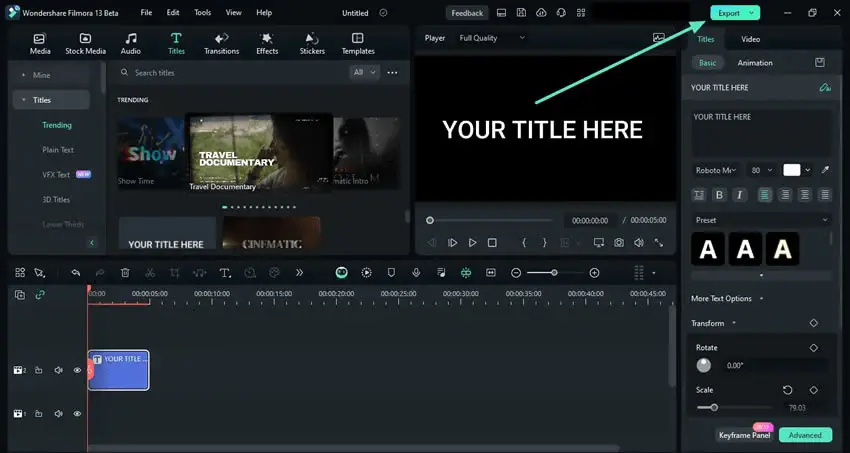
Locate the Export Button
In Filmora 2025, the “Export” button is prominently displayed in the top menu bar. Clicking it opens a dropdown menu with various export options.
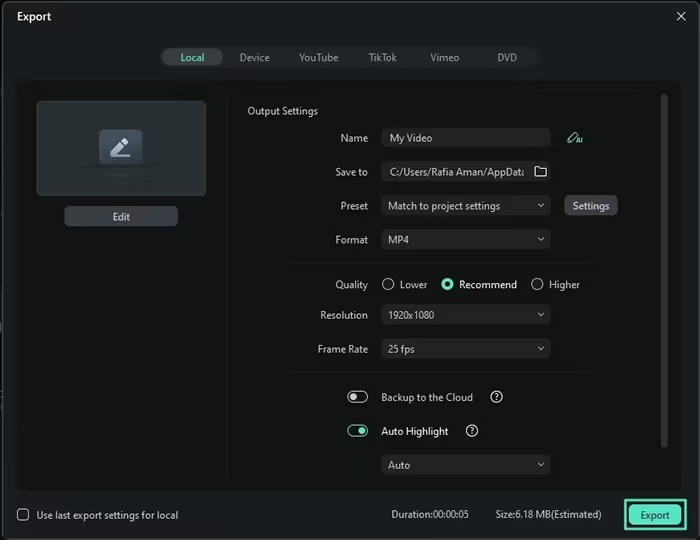
Overview of Export Options
Filmora 2025 offers a range of export formats and platforms, including:
- Local Formats: MP4, MOV, AVI, MKV, and more.
- Platform-Specific Presets: YouTube, Vimeo, Instagram, TikTok, and Facebook.
- Device Compatibility: Optimized settings for iPhone, iPad, Android, and gaming consoles.
Step 3: Choosing the Right Export Settings
Selecting the correct export settings is crucial for achieving the best results. Here’s how to do it:
Select the Output Format
MP4 is the most widely used format due to its balance of quality and compatibility. However, if you’re working on a professional project, consider using MOV for higher quality.
- Tip: Use the H.264 codec for MP4 files, as it offers excellent compression without sacrificing quality.
Adjust Resolution and Bitrate
Resolution and bitrate directly impact your video’s clarity and file size.
- For 1080p videos, a bitrate of 8-12 Mbps is recommended.
- For 4K videos, aim for 35-45 Mbps.
Frame Rate Settings
Match the frame rate to your project settings:
- 24 fps for a cinematic look.
- 30 fps for standard videos.
- 60 fps for smooth motion, ideal for gaming or action footage.
Audio Settings
Don’t overlook audio quality. Set the audio bitrate to at least 320 kbps for clear, crisp sound.
Step 4: Exporting for Specific Platforms
Different platforms have unique requirements. Here’s how to optimize your exports for popular platforms:
Exporting for YouTube
- Resolution: 1080p or 4K.
- Format: MP4 with H.264 codec.
- Bitrate: 8-12 Mbps for 1080p, 35-45 Mbps for 4K.
- Aspect Ratio: 16:9.
Pro Tip: Add metadata like titles, tags, and descriptions directly in Filmora 2025 to streamline your YouTube upload process.
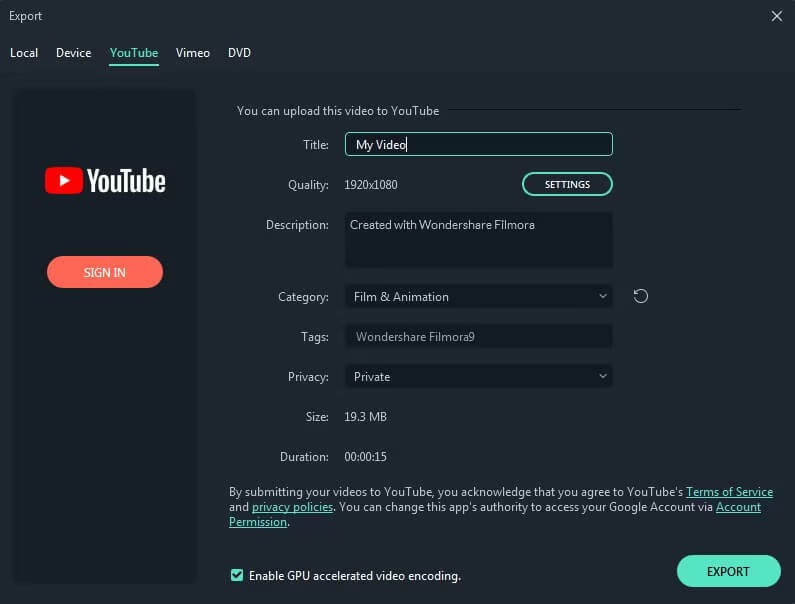
Image Source: Filmora how to article
Exporting for Social Media
- Instagram Reels/TikTok: Use a 9:16 aspect ratio (1080×1920).
- Facebook: 1280×720 (720p) or 1920×1080 (1080p).
- Bitrate: 4-6 Mbps for smaller file sizes.
Exporting for Professional Use
- Format: MOV or ProRes for high-quality deliverables.
- Resolution: 4K or higher.
- Bitrate: 50 Mbps or more for lossless quality.
Step 5: Advanced Export Features in Filmora 2025
Filmora 2025 introduces several advanced features to enhance your export experience.
Batch Export
Export multiple projects or clips simultaneously to save time. This is especially useful for creators managing multiple videos.
Hardware Acceleration
Enable GPU acceleration in Filmora 2025 to speed up export times. This feature leverages your computer’s graphics card for faster processing.
Custom Export Presets
Save your preferred export settings as custom presets for future projects. This ensures consistency and saves time.
Step 6: Troubleshooting Common Export Issues
Even with the best preparation, issues can arise. Here’s how to tackle common problems:
Export Fails or Freezes
- Solution: Ensure your computer meets Filmora 2025’s system requirements. Close unnecessary applications to free up resources.
Poor Video Quality
- Solution: Increase the bitrate and resolution. Avoid over-compressing your video.
Audio Sync Issues
- Solution: Check your project’s frame rate and audio settings. Use Filmora’s “Audio Sync” tool to align audio and video tracks.
Step 7: Saving and Sharing Your Exported Video
Once your video is exported, it’s time to save and share it with the world.
Choosing the Right File Location
Save your video to a dedicated folder for easy access. Consider using an external SSD for large files.
Uploading to Cloud Storage
Use platforms like Google Drive or Dropbox to share large files with clients or collaborators.
Sharing Directly to Social Media
Filmora 2025 allows you to upload videos directly to YouTube, Vimeo, and other platforms. This feature saves time and streamlines your workflow.
Filmora: How to Export Video (2025)—A Step-by-Step Guide
Wondershare Filmora has become one of the most popular video editing software choices for beginners and professionals alike. Whether you’re creating YouTube videos, marketing content, or personal projects, knowing how to export footage properly ensures high-quality output and compatibility with various platforms.
In this guide, we’ll walk you through the Filmora video export process, covering different formats, resolutions, advanced settings, and troubleshooting tips to help you achieve the best results.
Preparing Your Project for Export
Finalizing Edits
Before exporting your project, ensure all editing is complete. Double-check:
- Cuts and Transitions: Smooth out jump cuts and adjust transition durations.
- Effects and Animations: Ensure effects and overlays are properly aligned.
- Audio Levels: Adjust background music and voiceovers to avoid distortions.
Rendering the Timeline
Rendering your timeline allows you to preview the video without lags. To render:
- Click on the Render Preview button.
- Wait for the process to complete for smooth playback.
Accessing the Export Feature
Once your project is ready, follow these steps to start the export process:
- Click the Export button in the top-right corner of the Filmora interface.
- A new export window will open, presenting different saving options.
Choosing the Export Destination
Filmora provides multiple export options:
Save to Local Computer
To save the video directly to your computer:
- Click on the Local tab.
- Choose a preferred format (MP4, AVI, MOV, MKV, etc.).
- Select an output folder for saving the file.
Upload Directly to Online Platforms
For social media creators, Filmora allows direct uploads to:
- YouTube: Log in to your account and set the title, description, and privacy settings.
- Vimeo & TikTok: Directly export and share videos without extra steps.
Selecting the Output Format
Choosing the right format impacts file size, quality, and compatibility. Here are the recommended formats:
- MP4 (Best for general use)
- MOV (High-quality Apple format)
- AVI (For uncompressed professional use)
- WMV (Windows media format)
- MKV (For high-resolution exports)
Configuring Export Settings
To optimize quality, adjust the following settings:
File Name and Location
- Assign a relevant name for easy identification.
- Select a destination folder for storage.
Resolution and Frame Rate
Choose resolutions based on your project:
- 1080p (Full HD) – Best for YouTube and general content
- 4K (Ultra HD) – High-end production quality
- 720p (HD)—Smaller file size, suitable for quick uploads
Set the frame rate to match your project:
- 30 FPS: Standard frame rate for most videos.
- 60 FPS: Best for smooth motion in gaming and action footage.
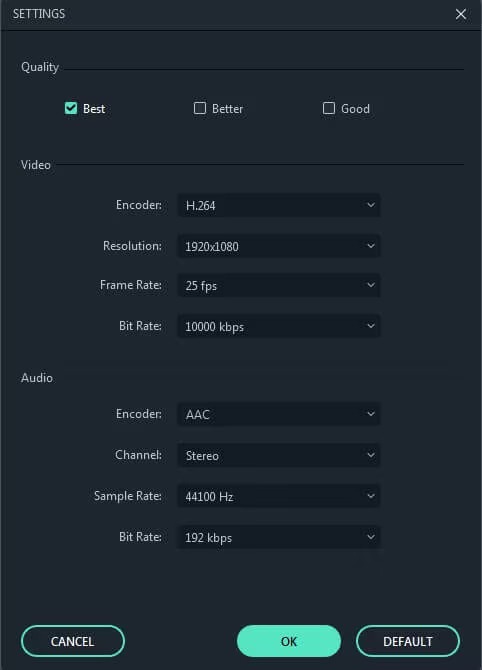
Bit Rate and Quality
- Best (Higher bit rate, larger file size)
- Better (Balanced quality and size)
- Good (Smaller file size, lower quality)
Advanced Export Settings
For detailed configuration, click Settings:
- Encoder: Choose H.264 (MP4) for compatibility.
- Sample Rate & Channels: Set audio to 48,000 Hz stereo for clear sound.
- Hardware Acceleration: Enable GPU encoding for faster exports.
Exporting the Video
Once settings are configured, click Export to start the process. The duration depends on the video length and system performance.
Post-Export Actions
After exporting, check the file:
- Locate the Video: Navigate to the selected folder.
- Preview the Output: Play the video to ensure quality.
- Share & Distribute: Upload to social media, websites, or cloud storage.
Troubleshooting Common Export Issues
Low-Quality Output
- Ensure export resolution matches project settings.
- Increase the bit rate for better clarity.
Large File Size
- Lower the bit rate or choose a compressed format like MP4.
- Reduce the resolution if high quality is unnecessary.
Export Stuck or Crashes
- Clear Filmora cache files.
- Restart the software and close unnecessary background apps.
- Update Filmora to the latest version.
Conclusion
Exporting videos in Filmora 2025 doesn’t have to be complicated. By following this step-by-step guide, you can ensure your videos are optimized for quality, compatibility, and performance on any platform. Whether you’re creating content for YouTube, social media, or professional use, Filmora 2025 provides the tools you need to export videos like a pro.
Don’t forget to experiment with different settings to find what works best for your projects. And if you have any questions or tips of your own, feel free to share them in the comments below!
Bonus Tips
- Use keyboard shortcuts (e.g., Ctrl+E for Export) to speed up your workflow.
- Regularly update Filmora 2025 to access the latest features and bug fixes.
- Invest in external storage to keep your projects organized and accessible.
By mastering the art of exporting videos in Filmora 2025, you’ll be well on your way to creating stunning content that stands out in today’s competitive digital landscape. Happy editing!


