In Windows 7 the facility to take screen capture and video recording is very useful for tutorial makers. With Movavi Screen Capture software you can accomplish this task very easily. Microsoft has provided Screen Recorder utility which has some limitations. So, you have to rely on third-party software for maximum benefits.
But unlike other vendors, with this screen capture and recording software you can save your video to different formats like MP4, AVI, GIF, MOV, FLV etc. But in 2017, the dominance of mobile market requires that you save the recorded file in its corresponding format. So, in this software, there is a provision to save the video based on device like Android, Apple, BlackBerry, Amazon Kindle, HTC etc.
Read More: 4 Simple Methods to Update Sound Card Drivers in Windows
How to do Screen Cast Recording in Windows 7 using Movavi ?
The process is quite simple. First install the 7-day trial version of the software, if you want to know its features before you buy it. Otherwise, you can buy it for $29.99, after a 40% discount.
The initial screen will have the following options.
- Record Screen
- Take a screenshot
- Repeat last recording
- Quick capture shortcuts
- Edit captured files
The above options are also available in compact mode.
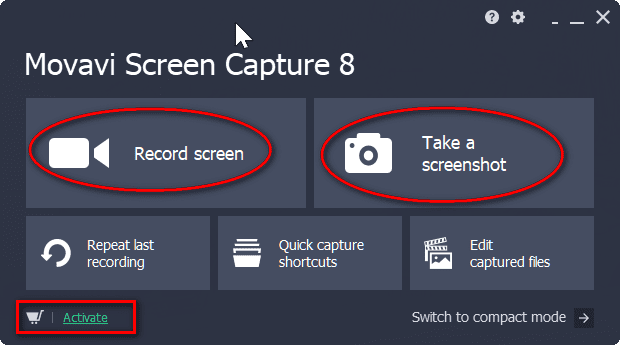
Using the Movavi Screen Capture software you can either record screen as a video or take a screenshot of your screen
How to Record Video on Windows 7 of your Screen Process?
The below steps will guide you through this procedure.
- Just click the Record Screen button.
- Select the capture region of which you want to record.
- A welcome screen and Movavi Screen Capture controls window will open.

If you want to read the tutorials on how to capture online videos, capture your desktop, capture skype calls etc, you can click the corresponding icon. Otherwise, just click continue trial or enter key for activation of the product. You also have several other tutorials.
- Another small window will have different controls to fine tune your settings.
The following are the different options which you can set.
- Capture Area
- Dimension of the Area
- Webcam
- System Audio
- Microphone
- So, before you start recording your screen, you need to set these controls. If you click the capture area button, you will get a vertical and horizontal line with pointer at the center.
- Go to one corner, left-click the mouse and drag it, to capture the required region.
- You can fine tune this region with the Custom setting option beside it.
- You can enter the width and height values in pixels to enlarge and decrease the region. Otherwise, you can just select standard options like full screen, standard, widescreen etc which also have preformat sizes.
Using the Movavi Screen capture, you can record both video and audio.
- If you have a webcam, you can select that option also. Then you will be able to record your cam.
- Regarding audio, you have two options – 1. Speakers (System Audio) and 2. Headphones (Microphone).
- The selected options will turn green.
- After this, you just click the big red circle button “Rec” to record the screen.
Then you can follow the operations on your screen which you want to record.
- The trial version allows only 2-minute recording and a watermark of the software is laid.
- But in activated version, these limits are removed.
- Then you can click the pause or stop button, to finish the recording.
This will open the video in an editor.
Here the video is shown frame by frame. You can delete the unwanted frames.
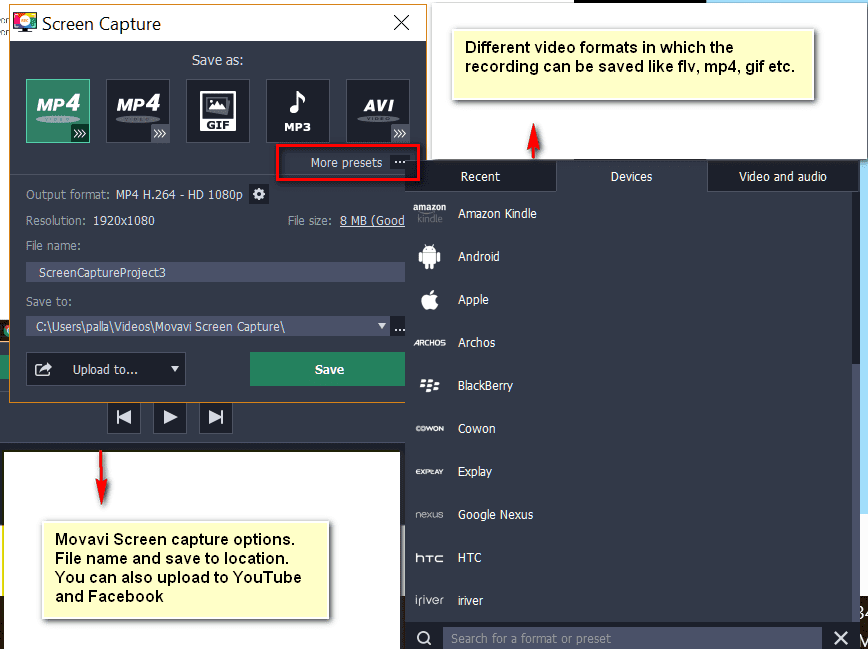
After this, you can save the video in your desired format.
There are several options here –
- Output format
- Resolution
- File name
- Save to location
- Upload to
For example, if you want your recording in high resolution format you can save in MP4 H.264 – HD 1080p. This will store as an .mp4 file. If you click the wheel icon, you have some more settings. You can select the video and audio codecs.
Since its Internet time, you can directly upload these videos to iTunes, Facebook or YouTube.
The file size is also displayed.
If these editing options are not sufficient, you can further edit the video using “Open in Editor”. Then you can use the “Movavi Screen Capture Studio” to do further corrections. This is another product of Movavi and has a demo version.
You can also take screenshot in a similar way. If you want to save a frame of the video, you can do the same. Under Settings > Preferences, you have some default options like storage location, language selection, keyboard shortcuts, audio quality etc. which can be changed.
You can also have several effects like show cursor on recording, highlight cursor, highlight clicks, mouse click sound etc. Also, keystroke recording options like keyboard shortcuts, all keystrokes etc can be enabled here.
One can also record the video for a specified period. You can mention the time duration. Otherwise, you can schedule the video by mentioning the start record time and end time. Also, you can make your computer sleep and shutdown after the scheduled recording activity is over.
Conclusion
On a personal note, I tested the trial version for a few recordings. I find that the software is very easy to use. The recording of the screen is also completely without errors. The size of the file saved in different formats is also not big. But with increased duration, the file size may increase. The best thing is that you can upload the video directly to your YouTube or Facebook account.
You can also save the desired frames which can be used as screenshots. Finally, the editing of the video makes Movavi Screen Capture an apt choice for bloggers, tutorial makers and for troubleshooting technicians.
Subscribe to our Weekly FREE Newsletter
You will get latest updates on Microsoft and Technology solutions every week.
- All data will be according to the cookie and privacy law pages of this site. Data will be stored on third-party sites to send newsletter campaigns.
Very informative! Thanks for showing clearly how to record computer screen. I’d also recommend Acethinker Screen Recorder which I have been using for many years. It’s a free web-based application to record computer screen right from the browser, you don’t have to download or install anything. Share it here as an alternative to Movavi.
If you’re a gamer then you might wanna try Fraps too as it’s more optimized for that cause.
I have heard about movavi in the past from a friend, will try it for sure. Great tutorial sir, thanks for sharing.
Keep doing the awesome job 🙂